Giant Strawberry Cake


Baking , Birthday , Buttercream , Cake , Collection--giant-cake-recipes , Collection--novelty-cake-recipes , Fruit , Fruit cake , Giant strawberry , Recipes-export , Strawberries , Strawberry , Strawberry butter cream , Strawberry cake , Strawberry filling , Strawberry jelly , Strawberry shortcake , Summer , Summer 2017
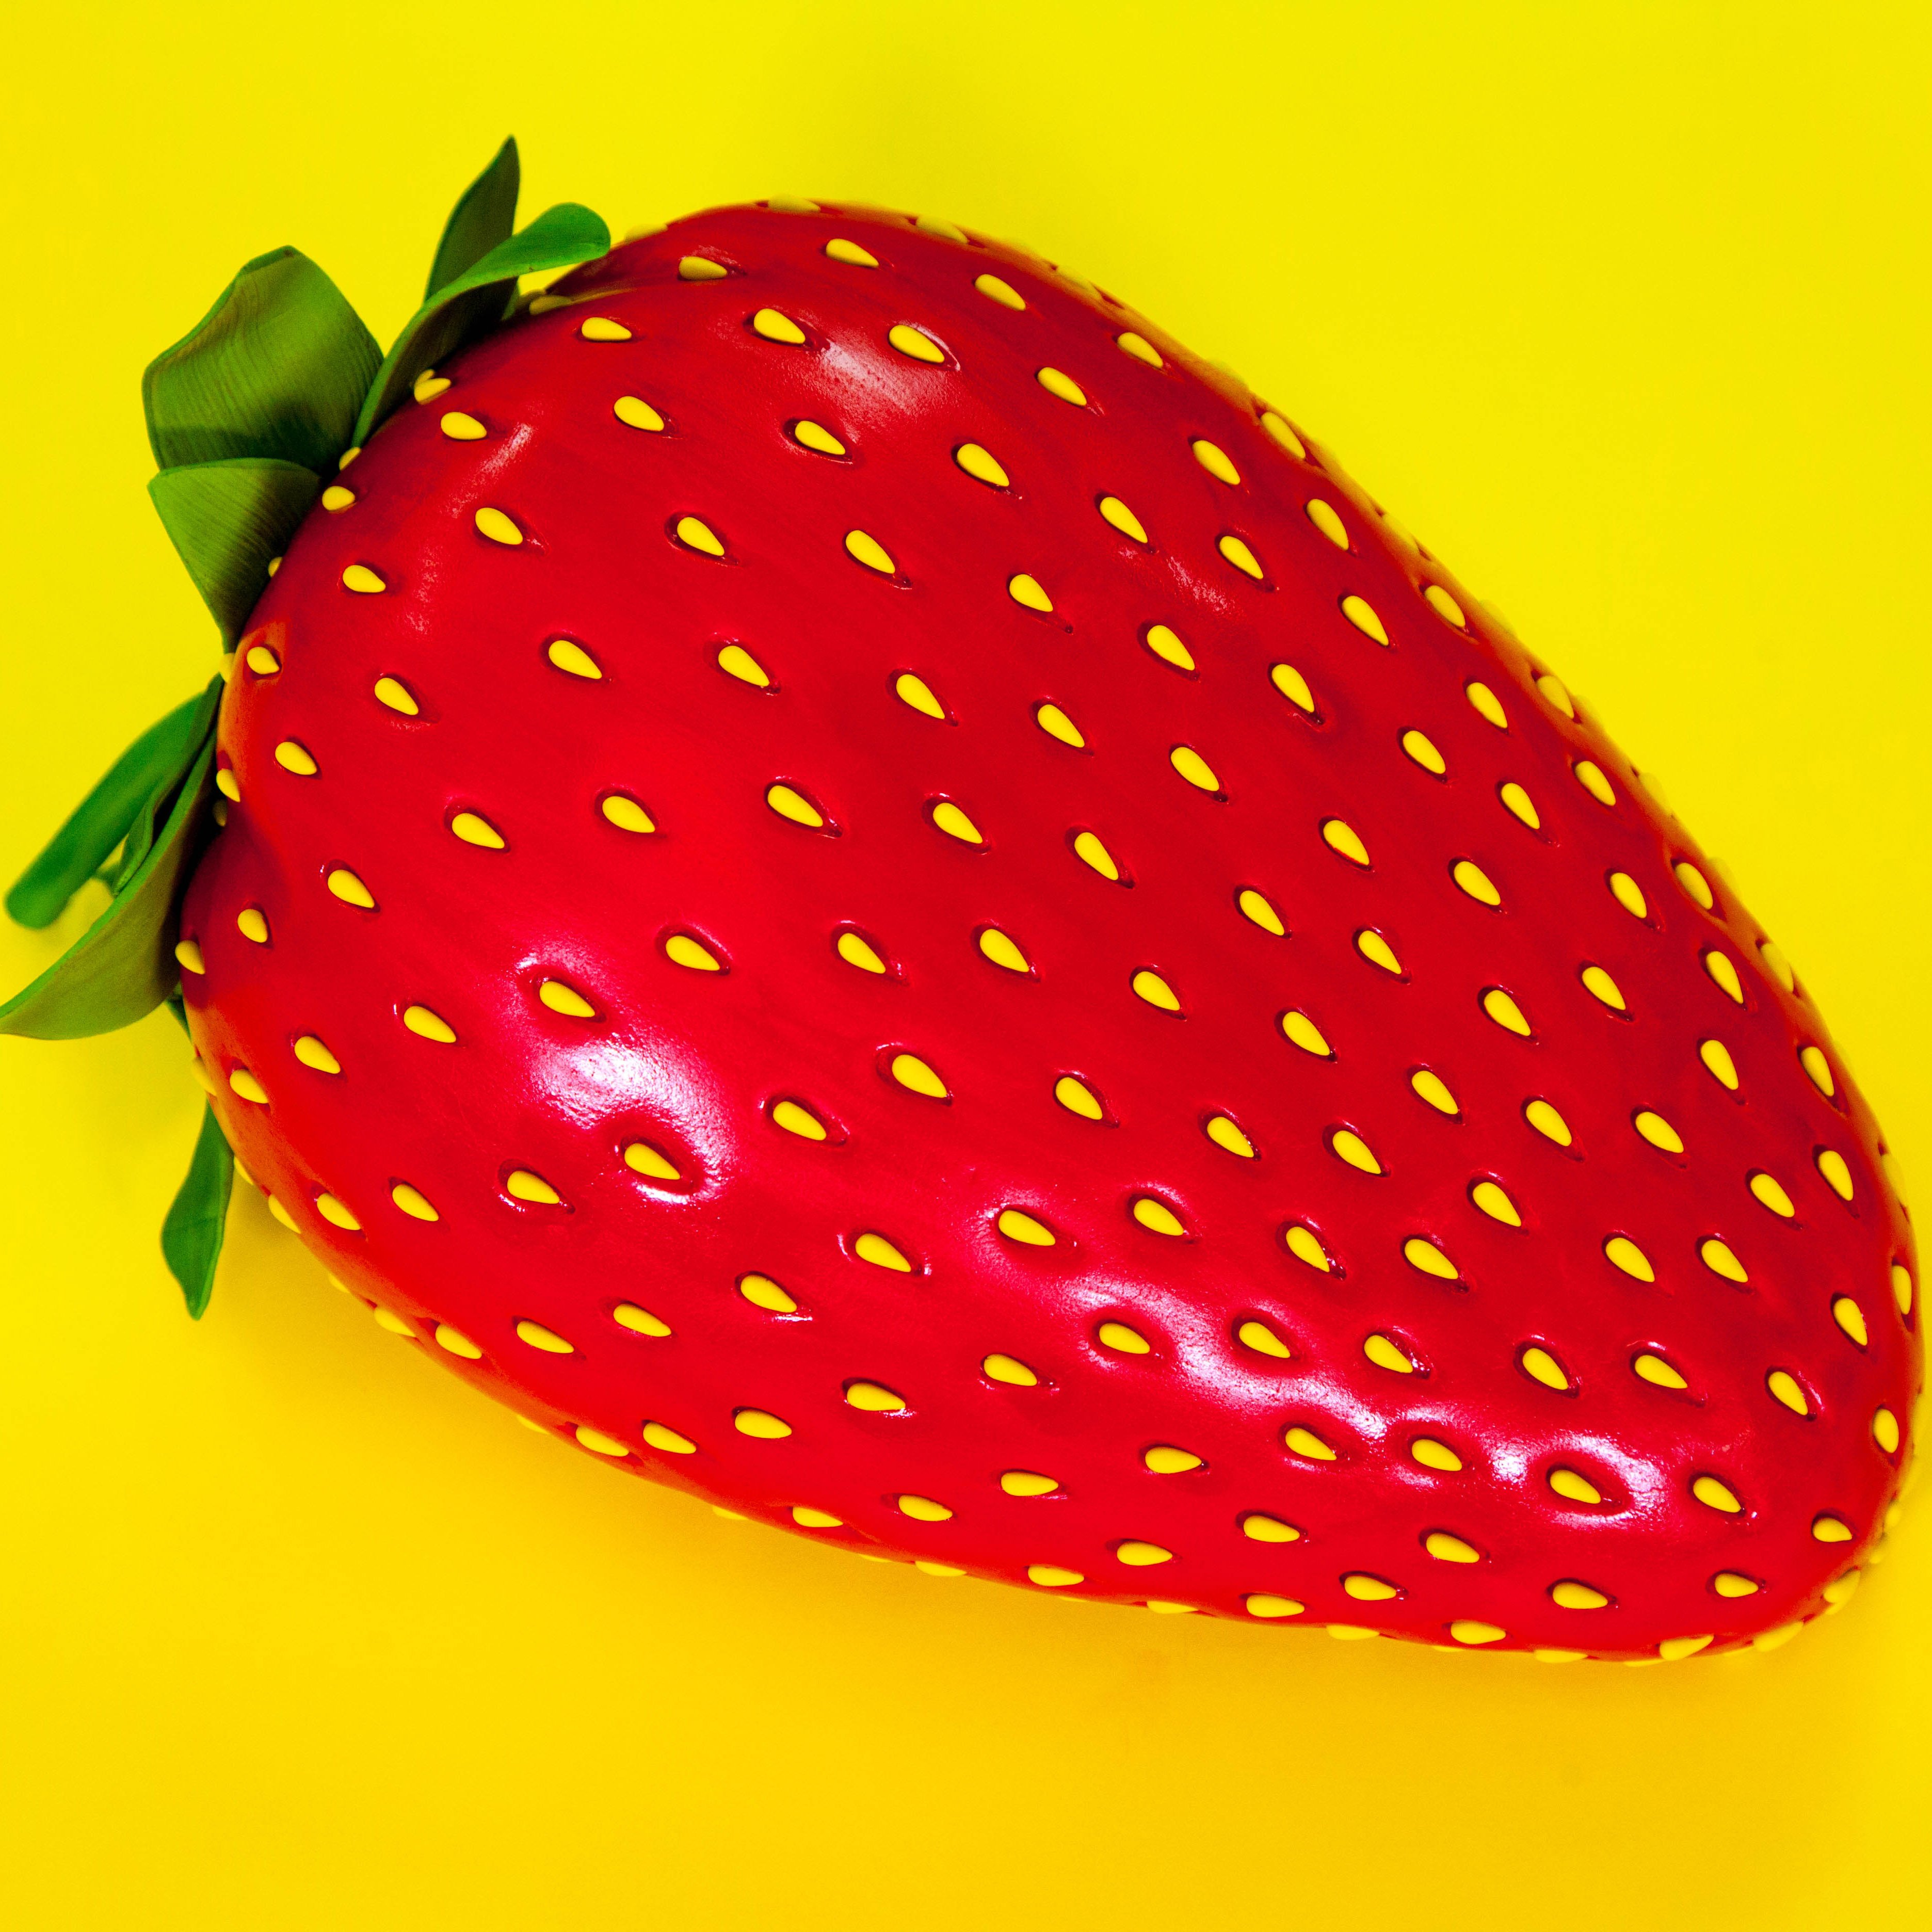
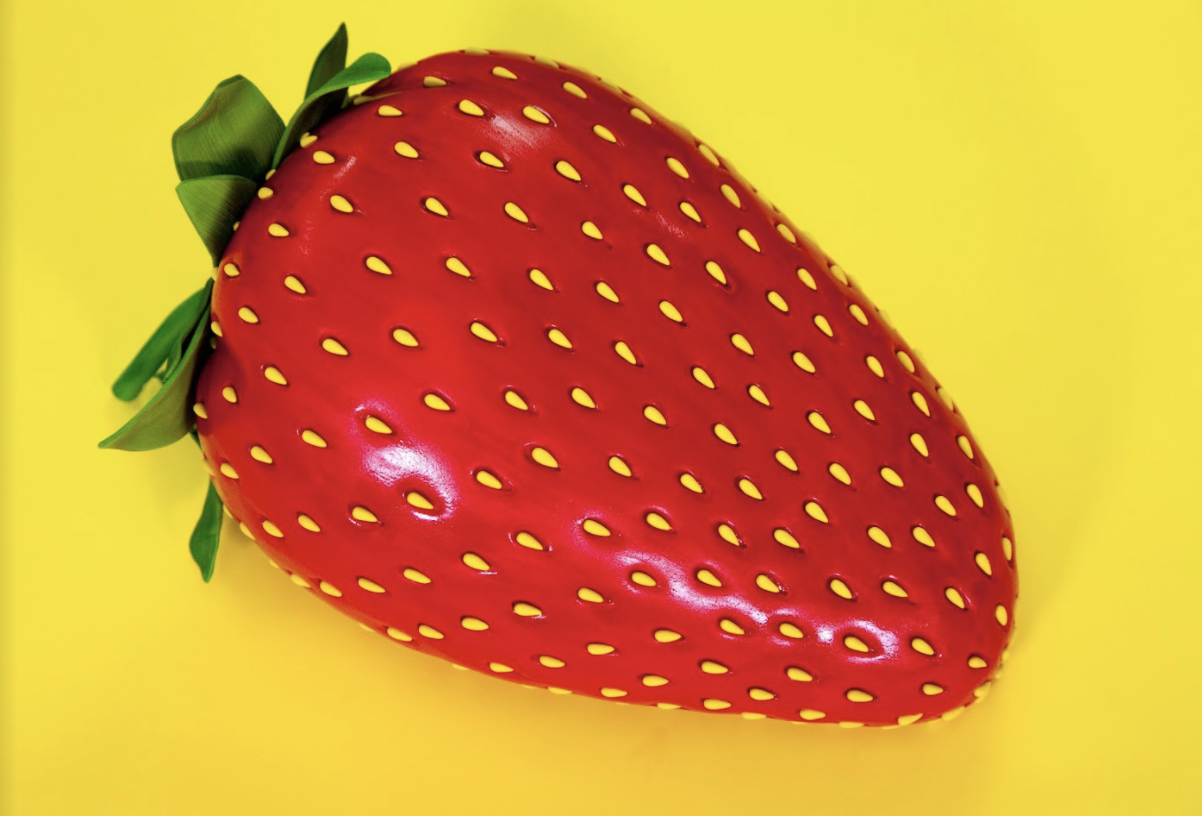
A BERRY Sweet Cake! Nothing says “summer” quite like biting into a plump, juicy strawberry! So, what’s a better way to celebrate the end of summertime than enjoying a GIANT strawberry… CAKE!?
To make this GIANT Strawberry Cake, I baked a whopping 16 lbs of pink-dyed Ultimate Vanilla Cake, filled it all with Strawberry Buttercream, covered it in red fondant and decorated it with red food colouring, gumpaste 'strawberry seeds' and a full, leafy “crown”. I even attached a stem at the end to make it look like it’s freshly picked!


Ingredients
Cake
- 16 lbs of Yo’s Ultimate Vanilla Cake
- Pink Food Colouring
Icing
- Simple Syrup
- Italian Meringue Buttercream
- Strawberry Buttercream
Decorations
- 4 lbs Red Fondant
- 1 lb Green Gumpaste
- 3 oz Yellow Gumpaste
- Red Food Colouring
- Clear Food Grade Alcohol
- Piping Gel
- Green Colour Dust
- Yellow Colour Dust
- Dutch-Processed Cocoa
 Gourmet Cake Slices with Yolanda Gampp
$29.99
Gourmet Cake Slices with Yolanda Gampp
$29.99


Read It!
-
Prepare your Italian Meringue Buttercream annd Strawberry Buttercream. Set both bowls aside at room temperature.
-
Prepare 16 lbs of Yo’s Ultimate Vanilla Cake and fold in some Pink Food Colouring until you achieve a bright pink hue. Split batter between four 10" round cake pans. Bake at 350 degrees until a toothpick comes out clean. Cool cakes completely in their pans, sitting on a wire rack.
-
Once your cakes are completely cool, gently remove them from their pans and level with a serrated knife, cutting off all the caramelization from the bottom of each cake. Then, using a ruler and serrated knife, layer each cake into two equal layers to create eight equal layers of cake.
-
Prepare your Simple Syrup and set aside at room temperature.
-
Time to stack and fill your cakes with your Strawberry Italian Meringue Buttercream! Place your first layer of cake onto a cake board, spread a layer of buttercream on top, then stack your next layers, and spread more buttercream on top. Finally, gently lay your final cake layer overtop and pop it in the fridge to chill.
-
Place all of your cake layers onto a flat surface and shower them with a layer of simple syrup. Allow the simple syrup to soak in completely before moving on to the next step.
-
Remove your chilled cake from the fridge. With cake standing upright, carve one side of the cake flat with a serrated knife so that it can become the bottom of the cake, and carefully place the cake on your cake board flat-side down. With the cake now sitting on its side, carve a diagonal line from the middle of the cake and down to one end, then round out the edges of the side of the cake that wasn’t carved. This is where the top of the strawberry will be. Next, carve a little “valley” in the centre of the top of your strawberry, where the stem will eventually go. Using some of the cake you carved away from the diagonal, place it at the end of the strawberry to elongate it. Continue carving until you achieve a plump strawberry shape.
Note: This cake is great because all strawberries are different - meaning, you really can’t go wrong with the shape. To help with the carving, you can watch the way I did this in my Giant Strawberry Youtube video! -
Remove cake from the fridge and ice again with the same buttercream, creating a smooth finish. Chill for another 20 minutes.
-
Crumb coat your cake using the pink-dyed plain Italian Meringue Buttercream (not the Strawberry Buttercream) using a small offset spatula. Chill cake in the fridge for about 20 minutes.
-
Now, it’s time to cover your cake! Remove your cake from the fridge and roll out some red fondant large enough to cover the entire cake. Pick up your fondant with a French Rolling Pin and drape over the entire cake. Starting from the top, smooth the fondant down with your hands, tucking the fondant underneath your cake as best as possible and cutting away any excess with a sharp paring knife. Continue this process of smoothing and trimming until you achieve an even finish and your fondant is flush to the cake.
-
While your cake is chilling, roll out long cords of yellow gumpaste. Using a ruler and a sharp paring knife, cut out even measurements from the gumpaste, then shape each piece to make it look like a strawberry seed, rounding out the top and coming to a point at one end. Set aside.
Note: You’ll be doing this step for a while! Be sure to prepare more than enough seeds, just in case you dirty some during the application step.
-
Let’s create the ‘indents’ in our strawberry where each of the seeds will go. Use a Ball Tool to create the larger, rounded part of the indent at the top and a Veining Tool to bring it to a point at the bottom. It’s helpful to use a template or ruler to help space everything out the way it looks on a real strawberry.
-
Once you’re happy with the way it looks, take some Red Food Colouring mixed with a bit of clear food grade alcohol and paint entire strawberry to give it a pop of colour and eliminate that ‘matte’ look. Let dry completely before moving onto the next step.
-
Once you’re happy with your coat of paint, add your seeds to every single indent. Press carefully into the fondant, making sure to do this step quickly while your paint is still wet.
-
Paint the entire surface of your cake with your red food colouring mixture one more time. This is both to really enhance the colour of your Strawberry Cake, and if surface is wet, it’ll be easier to add our seeds!
-
Starting with your first crown, use an impression mat to give it more texture. Next, paint the leaves using a brush and some dry colour dust in Green and Yellow to give it both texture and a more realistic/natural look. Once you’re happy with that side, turn your leaf over and press with your impression mat again. Brush this side with a bit of dutch-processed cocoa to “dirty” the leaves up a bit. (Because, truthfully, strawberry leaves can look pretty dirty!) Repeat with your second set of leaves.
-
To make the strawberry’s “crown” roll out some green gumpaste larger than the top side of your strawberry. Next, draw out a freehand template, or search for a ‘daisy’ looking template online. Lay your paper template overtop of the gumpaste, then use a sharp paring knife to cut out your leaf template. Cut varying lengths of floral wire and insert them from the tip of the leaf into the middle (or so) of the leaf. You don’t want the wire to reach the centre; you just want to be able to bend your leaves a bit later. Repeat this step a second time to create two “crowns”.
-
Take some more of your green gumpaste and roll it into a thicker “cord”. Using your hands, flatten out one end of the cord (which will be the side where the stem attaches to the berry). When you’re happy with the way it looks, take a few strands of floral wire twisted together for more support and insert it into your “stem” through the flattened end. Very gently insert this end into the crown of your Strawberry Cake and shape as necessary.
-
Once you’re happy with the way both leaves look, brush that little “valley” at the top of your strawberry with some piping gel and press your first crown onto the end of your cake. Once it’s dry enough, fold your leaves in varying directions so that it looks like it’s resting naturally around the top of your Strawberry Cake. Finally, press the second set of leaves overtop of the first set and adjust the direction of your leaves as necessary to give it a fuller crown.
Congratulations you did it!
