Olaf Cake


Baking , Birthday , Birthday cake , Birthday cakes , Buttercream , Characters , Chocolate , Chocolate ganache , Collection--novelty-cake-recipes , Disney , Fondant , Frozen , Frozen 2 , Kids party , Movies , Novelty cakes , Olaf , Recipes-export , Rice krispies , Simple syrup

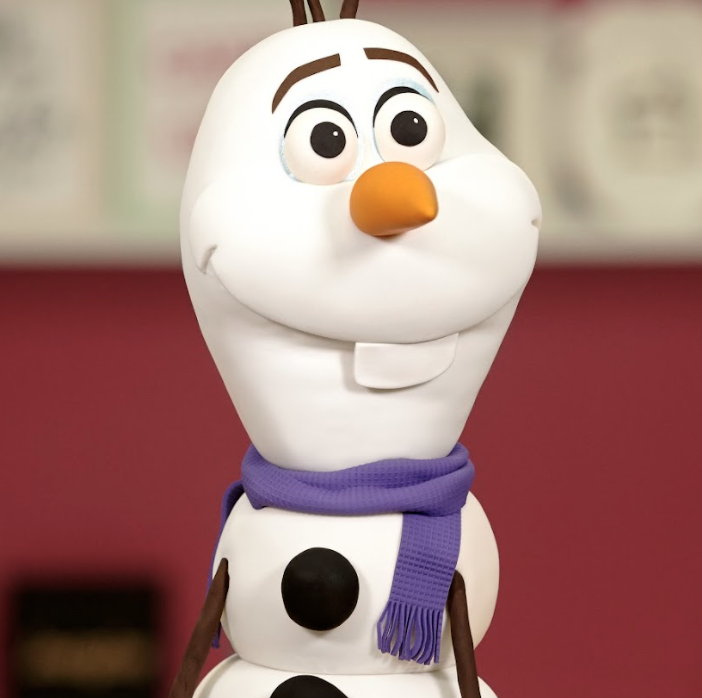
Do you wanna cake a snowman? I’m caking this Frozen friend out of rich chocolate cake (mmmmmmm chocolate!), dark chocolate ganache, and Italian meringue buttercream. Big thank you to Else for providing Olaf with his personal flurry - it made our crumb coat and chill dance so much more chill!


Ingredients
Cake
- 8 lbs Yo’s Ultimate Chocolate Cake
Icing
- Simple Syrup
- Dark Chocolate Ganache
- Italian Meringue Buttercream
Decorations
- 5 lbs White Fondant
- Icing Sugar
- 3 oz Brown Fondant
- 5 oz Black Fondant
- 2 oz Gum paste
- Chefmaster Sunset Orange Gel Food Colour
- Sky Blue Luster Dust
- Matte Black Colour Dust
- Clear Food Grade Alcohol
- Royal Icing
Olaf's Head & Feet
- 1 ½ x Modelling Rice Krispie Mixture (that’ll be 9 cups Rice Krispie Cereal & 60 Marshmallows)
 Gourmet Cake Slices with Yolanda Gampp
$29.99
Gourmet Cake Slices with Yolanda Gampp
$29.99


Read It!
-
Preheat oven to 350 degrees, and prepare Yo’s Ultimate Chocolate Cake batter. Prepare your pans with parchment. Pour 2 ½ lbs into each 7” round pan, 1 ½ lbs into your 6” round pan, and divide the remaining batter evenly between your 5” round pans.
-
Bake your 7” round cakes for 50 minutes, your 6” round cake for 40 minutes, and your 5” round cakes for 30 minutes, or until a toothpick comes out clean. Set aside to cool completely in their pans on a wire rack.
-
Prepare your dark chocolate ganache, Italian meringue buttercream, and simple syrup. Set aside until you’re ready to decorate.
-
Remove your cooled cakes from their pans and level them with a ruler and serrated knife.
-
Give all of your cakes a simple syrup shower with Sir Squeeze, and allow to fully soak in before moving on to the next step.
-
You’re going to stack two cakes, one for his bottom snowball, and another for his top snowball. As you stack the cakes, spread a layer of ganache between each layer.
Bottom Cake - 7” cake, 7” cake, 6” cake on top
Top Cake - 5” cake, 5” cake
-
Place your cakes in the fridge for 10 minutes to allow the ganache to set.
-
Once chilled, carve each cake into the snowballs that make up Olaf’s body. You want them to be lumpy and bumpy just like Olaf - don’t aim for perfect spheres.
-
Crumb coat both cakes with Italian meringue buttercream, and return to the fridge to chill. He is a snowman afterall, he needs the cold to keep him in shape!
-
Retrieve your cakes from the fridge after 20 minutes, and give them another ice with your Italian meringue buttercream. Give him another chill for 20 minutes. Smooth out any ridges in the buttercream with a small offset spatula, and a little bit more buttercream if needed.
-
We’re going to make Olaf’s head and feet out of modeling rice krispie mixture. Prepare your rice krispie mixture using the ingredient quantities above.
-
This will take some intuition. Pour out enough of your rice krispie mixture and begin to sculpt it into Olaf’s cute lil face. I found it helpful to find a photo of him online, blow it up to your desired size, and use it as a template.
-
Add ridges of rice krispie where Olaf’s nose will go, building out the front of his face to give it dimension. Leave a space where his eyes will go. If you find your hands sticking as you sculpt, rub a little bit of shortening on them.
-
Roll the remaining rice krispie mixture into a cylinder. Cut the cylinder in half to form Olaf’s stubby lil’ feet. Allow both face and feet to set at room temperature until it lacks heat and hardens a bit.
-
Once your rice krispie components are set, give them a crumb coat with Italian meringue buttercream. Get buttercream into all of the crevices, trying to get these pieces as smooth as your cakes. Chill them for 20 minutes, and then give them another ice. Return to fridge for a final 20 minute chill.
-
Roll out a circle of white fondant large enough to cover your bottom cake. Drape the fondant over the cake, tucking the fondant underneath and cutting away the excess. Repeat this for your top cake.
-
For Olaf’s head, I covered the front with fondant and then flip his face over onto a flower sponge, gathering the excess fondant around the back. Trim and smooth as best you can.
-
Cover his feet, and then flip them over so that you can trim the excess off around the top. The bare rice krispie part will be where his feet meet his belly. Dab a bit of royal icing on the exposed rice krispie and press against the cake, spacing the feet out accordingly.
-
Put the bottom cake down on a cake board, and use a 3” circle cutter to remove the fondant from the top where your top cake will be placed. Cut three ¼ inch dowels into six dowels of the height of your cake, and insert them down into the cake. Be sure to leave the center clear of dowels. Then place the 3” cake board on top. Add the top cake on to of the board. You can use an extra pat of royal icing between the board and cake as well.
-
Add a bit more white fondant to Olaf’s head to make his laugh line. This should look like a jellybean shape, cut so that there’s a clear smile line underneath. You’ll also want to create a curved line under his eyes. Use a circle cutter at the edges of his smile to give him dimples.
-
Use a 2” circle cutter to remove the fondant from the top of the top cake. Cut two ¼ inch dowels into four dowels of the right height, and press into the cake. Measure the length of your cake, and sharpen your ½ inch dowel on both ends, pressing it all the way through the center of the cake and through the cake boards. You’ll want to use a hammer to do this. You want part of the dowel left exposed at the top, and it should measure approximately half the height of Olaf’s head. I find it easier to make a pilot hole into Olaf’s head with a dowel before attaching it to the cake. You don’t want to squash poor Olaf’s head by pushing to hard! Attach Olaf’s head with another dab of royal icing, pressing into the dowel. Make sure you’re happy with the angle of his head tilt before you press it down.
-
Take your black fondant and form them into imperfect spheres in your hands. You want them to look lumpy and natural looking. Set aside to dry. Brush with matte black colour dust. Insert a lollipop stick halfway into the coals and insert them into the cake.
-
Make a blend of 50/50- one part gum paste and one part fondant dyed orange. Roll into a carrot shape making lines with your knife. Again, inset into the cake, once dry, with a lollipop stick.
-
Press your gum paste into a large rounded spoon (a coffee scoop works marvelously). You can also roll your gum paste into a ball and cut it in half. Roll out a bit of black fondant, and use a small piping tip to cut out circles for his pupils. Use tiny balls of white for the catch lights. Affix with clear piping gel or royal icing.
-
Mix a little bit of blue luster dust with clear food grade alcohol, and brush it on for the frosty shadows around his eyes. Roll some really thin black fondant, and use circle cutters to create his lash line. Affix with clear piping gel.
-
Using the same photo of Olaf’s head you used as a template, cut out his eyebrows and use them as another template to cut out some thinly rolled brown fondant. Affix with clear piping gel.
-
Roll out some more gum paste, and cut into the shape of a tooth. Apply this to your cake with a bit of gum paste behind the tooth, so that it will appear to stick out.
-
Take a bit of brown fondant and darkened it with a touch of black. Mold the fondant around your lollipop sticks, keeping the surface imperfect and nobbly. Place his arms on an angle so that they’re resting on his feet. Repeat for the hair sticking out of his head.
-
Roll out a bit of purple gum paste thinly. Use a textured rolling pin and roll a knit pattern into the gum paste. Cut some more purple gum paste into a fringe using a strip cutter. Don’t attempt to drape your scarf around Olaf’s neck in one motion, break it into pieces. Add one piece down the front, another down the back, and then wrap the last piece around covering the seams in the back and front.
Congratulations you did it!
