Giant Carrot Cake


Carrot Cake INSIDE Of A Carrot CAKE - it’s Carrot-ception! Is it just me, or does the arrival of spring, sunshine and warm weather tend to convince us ALL that we have a green thumb!? Regardless, I think I’d prefer sticking to what I do best - CAKE!
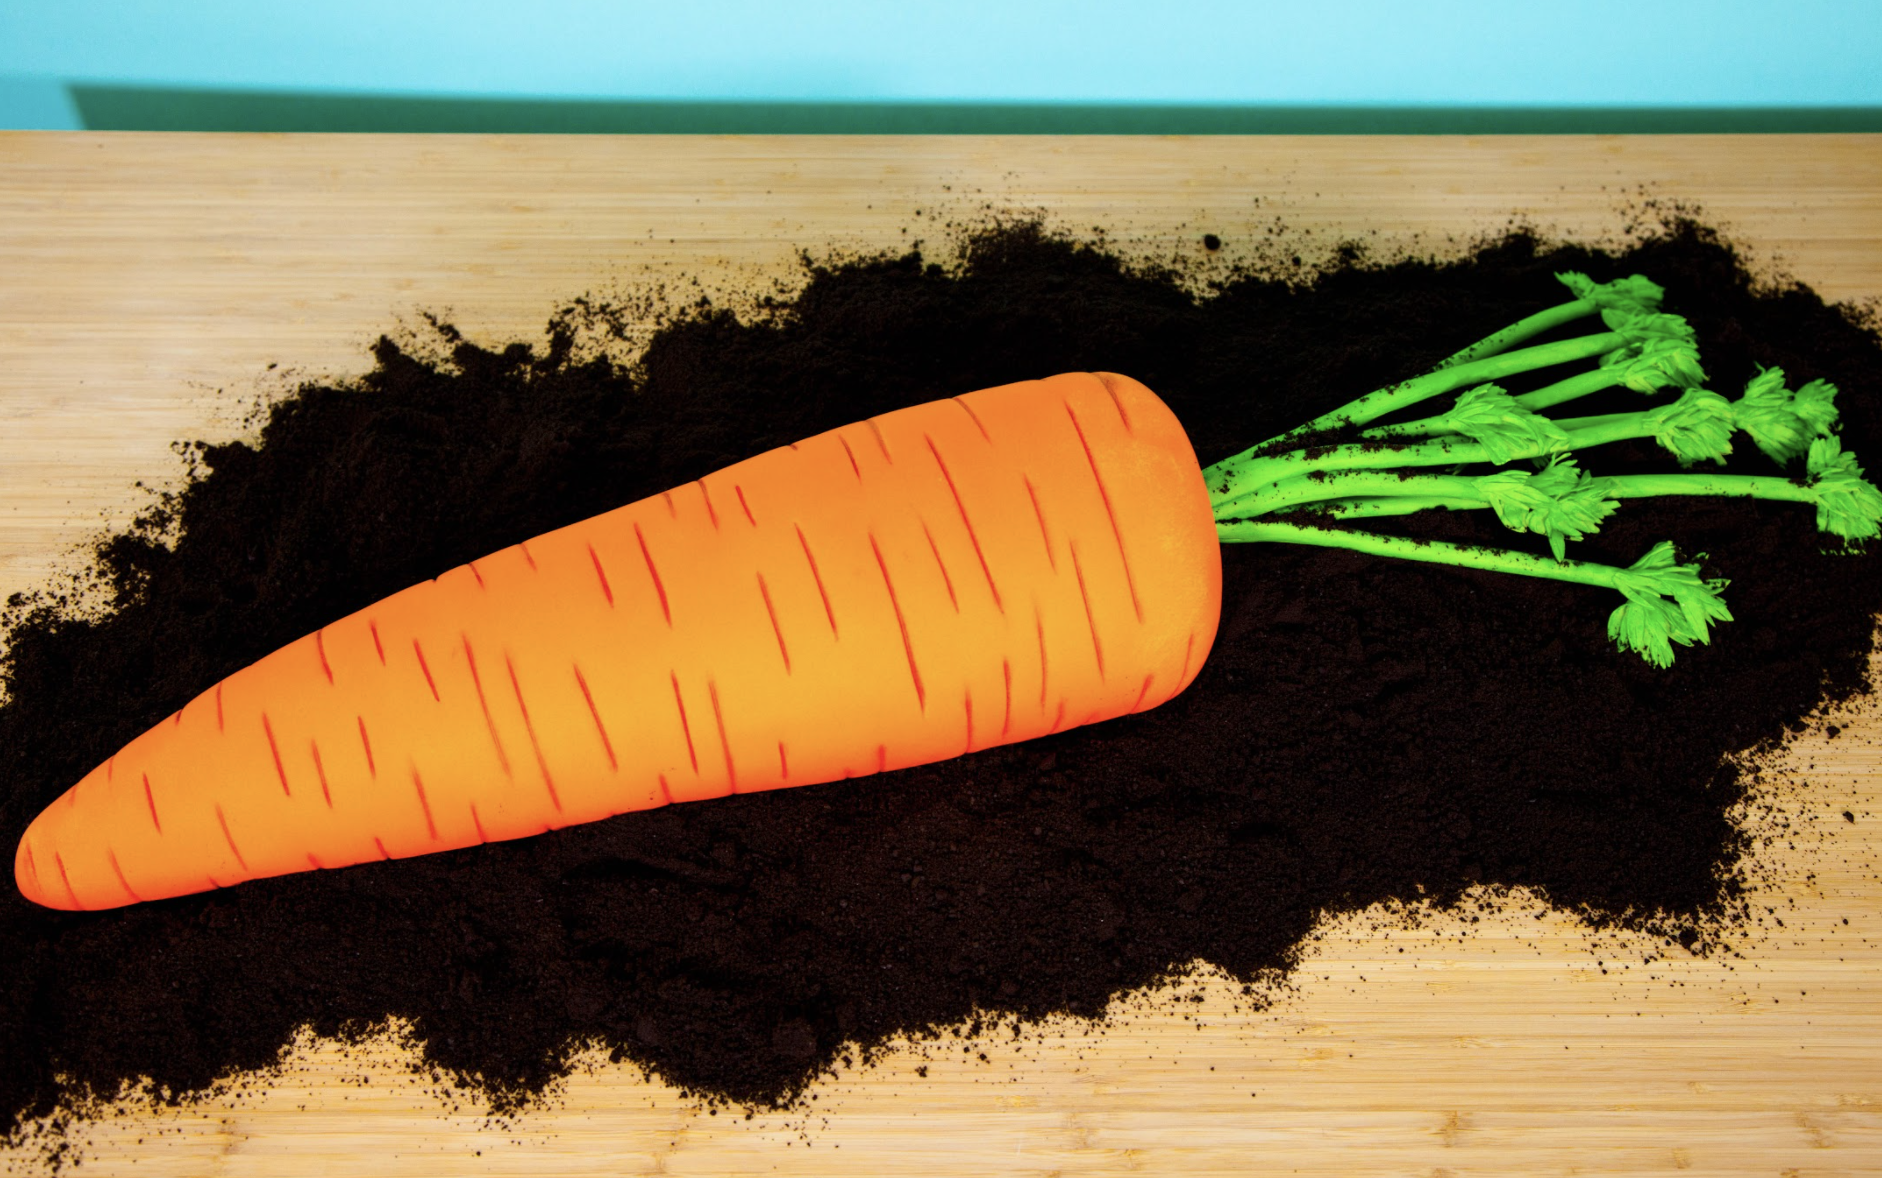
That’s why, to celebrate the arrival of spring, I’m caking a GIANT carrot out of my deliciously moist carrot cake recipe, icing it with Italian Meringue buttercream and decorating the outside so that it looks as good as a freshly-picked carrot (and TASTES even better)!


Ingredients
Cake
- 2 x Yo’s Ultimate Carrot Cake
Icing
- Simple Syrup
- Italian Meringue Buttercream
Decorations
- 3 1/2 lbs White Fondant
- Chefmaster Sunset Orange
- Wilton Ivory Icing Colour
- Icing Sugar
- Cocoa Powder
- 3/4 lb White Fondant
- Americolor Avocado Gel Colouring
- Green Colour Dust
- Clear Food Grade Alcohol
- Oreo Crumbs *optional

Tools
- 4 x 6” Round Cake Pans, lined with parchment paper
- 3 x 5” Round Cake Pans, lined with parchment paper
- 2 x 4” Round Cake Pans, lined with parchment paper
- Simple Syrup Squeeze Bottle
- Rubber Spatula
- Ruler
- Serrated Knife
- Small Serrated Knife
- Small Icing Spatula
- Offset spatula
- Rolling Pin
- Fondant Smoother
- Paring Knife
- Veining Modelling Tool
- Paint Brushes
- Fondant Rolling Pin
- Non-stick Board
- 24 Gauge Wire
- 1/4” Wooden Dowel
- Pointed Daisy Cutter
 Gourmet Cake Slices with Yolanda Gampp
$29.99
Gourmet Cake Slices with Yolanda Gampp
$29.99


Read It!
-
Prepare two portions of Yo’s Ultimate Carrot Cake recipe. Divide your batter according to the following specifications:
- 6” round cake pan - 1.5 lbs per pan (60 min)
- 5” round cake pan - 1 lb per pan (45 min)
- 4” round cake pan - ½ lb per pan (30 min)
Bake at 350 degrees for the times mentioned above in brackets, or until a toothpick comes out clean. Cool cakes completely in their pans sitting on a wire rack. -
Prepare your Italian Meringue Buttercream. Set aside.
-
Prepare your simple syrup and set aside at room temperature.
-
Once your cakes are completely cool, remove them from their pans and level with a ruler and serrated knife. Flip your cakes over and cut off all the caramelization from the bottoms of your cakes, as well.
-
Shower all of your cake layers with a light layer of simple syrup. Allow the simple syrup to soak in completely before moving on to the next step.
Note: Because this carrot cake recipe is so moist, make sure to only give your cakes a very light simple syrup shower! Otherwise, your cake layers may get soggy. -
Before we start building our cake, use a small offset spatula to spread an even layer of buttercream on top of each of your cake layers except for ONE of the 4-inch round cakes.
-
Because your giant carrot will be lying on its side, start to stack your cakes on their sides - beginning with your largest cake layers and working to the smallest - so that it looks like a large “cone” shape. Using a serrated knife, trim a small amount from the same side of each cake round to prevent the layers from rolling. Then, set it down on the trimmed side so that the cake is stable, and begin stacking all the layers together from largest to smallest.
-
To create more of a point on your giant carrot, take the smaller cake humps that you cut away from your 4 and 5-inch round cakes and use a few circle cutters to cut out some smaller rounds of cake. Sandwich the rounds together with a bit of buttercream and attach each to the end of your cake.
-
Let your cake chill in the fridge for about 20 minutes, or until all of the buttercream is properly set before moving onto the next step.
-
Now that your cake is chilled, carve your cake using a serrated knife, following the natural shape of your cake. Be sure to round out the carrot and remove all the caramelization tin the process. Make sure it tapers at the bottom!
Note: Carrots are never perfectly symmetrical, so don’t worry too much about the shape! As long as you can achieve a general tapering shape, it should be relatively easy to carve. -
Crumb coat your cake with Italian Meringue buttercream using your small offset spatula & chill in the fridge for about 20 minutes.
-
Remove cake from the fridge and ice again, making sure that the buttercream is completely smooth and even on all sides. Chill for another 20 minutes. Once the buttercream is chilled and firm, smooth out any ridges and set aside.
-
Dye 31/2 lbs of your white fondant with Chefmaster Sunset Orange and a bit of Wilton Ivory, to dull down the brightness and give it a more natural shade of orange. (I found it helpful to use an actual carrot as a model to make sure the colour was right.) Next, measure the length and width of your cake before rolling out all of your fondant so that it’s larger and longer than the size of your cake. Drape the fondant over your cake, smooth it with your fingertips and gently tuck the fondant underneath before trimming away the excess with a sharp paring knife.
Note: If you have trouble folding the fondant over the top of the carrot and smoothing away the seams - don’t worry! Just try to get it as smooth as possible, pushing the seams toward the bottom of the cake. It’s a bit easier to hide the seams if they’re located underneath where the stems of your carrot are going to go! -
We all know carrots come in all shapes and sizes, but they ALSO come with some unique indents and markings all over. Using a carrot as your model, create similar indents in the fondant of your cake using your Veining Modelling Tool. Once you’re satisfied with your carrot details, dust on a bit of cocoa into the indents with a dry brush to make them stand out a bit more, giving the carrot a “freshly picked” look.
Note: For this technique, it’s recommended to use regular cocoa that’s a lighter brown colour, not the dark, dutch processed cocoa! -
Dye your remaining white fondant with Americolor Avocado, getting it to a nice green hue. Next, cut some 24 Gauge Wire at different lengths - this will give the stems a more ‘natural’ look when it’s all bunched together. Roll your green fondant into tubes, brush some clear piping gel onto each piece of 24 Gauge Wire and insert the wires into each of those tubes, making sure to leave some wire exposed. Continue rolling the fondant with the wire inside to help thin it out and make it more uniform. Set aside.
Note: If your fondant is too soft to work with, mix your dyed fondant with a bit of CMC to help stiffen it slightly. -
Prepare a 1/4” Wooden Dowel so that it is sharpened on one side. Taking the excess wire that you left hanging outside of your green fondant stems, wrap all of the wires around the top of the dull side of your dowel so that it’s secure. Try to have all of the stems cover the dowel on all sides so that you won’t be able to see any trace of the wooden dowel once it’s pushed inside the cake. Set aside.
-
Roll out more of your remaining green fondant nice and thin. Use a pointed daisy cutter to cut out a bunch of daisies, which we will be using to create our carrot’s leaves. Pinch each daisy in the middle so that the leaves fold on top of each other and attach onto each stem with a bit of clear piping gel. To add further detail, make a small cut into a few of your stems using a sharp paring knife. Then, attach some leaves into the spaces you cut your original stem to make it look like there are smaller stems that protrude out of the original stem.
Note: You’re not trying to completely separate the stems or open them up! Just make a large enough cut in your stems so you can attach one of your leaves inside. The smaller stems won’t be strong enough to support the leaves alone. -
Because carrot stems have some natural variation in colour, we’re going to give it that natural look! Mix some green petal dust (or colour dust), which has no luster or sheen, with a bit of clear food grade alcohol and brush it over all of your leaves and stems. Let dry.
-
Now, it’s time to attach your greenery to the carrot! Take your dowel and carefully insert the sharpened side into the top of your carrot, making sure it’s completely centered. Push the wooden dowel in entirely, making sure that all the wires go in as well once you reach the top.
-
This is best part! Have fun surrounding your carrot - especially in between the greenery and at the base of the carrot - with oreo crumbs to make it look like it’s freshly picked from the ground!
Dig in! (Get it, DIG!?)
Congratulations you did it!
