Dinosaur Cake


Animal , Birthday , Boy , Boy birthday , Boys , Boys birthday , Boys birthday party , Boys cake , Boys party , Buttercream , Chocolate , Collection--novelty-cake-recipes , Dino , Dinosaur , Fondant , Gumpaste , Holidays , Kid , Kids party , Novelty cakes , Recipes-export , Simple syrup , T rex , Trex

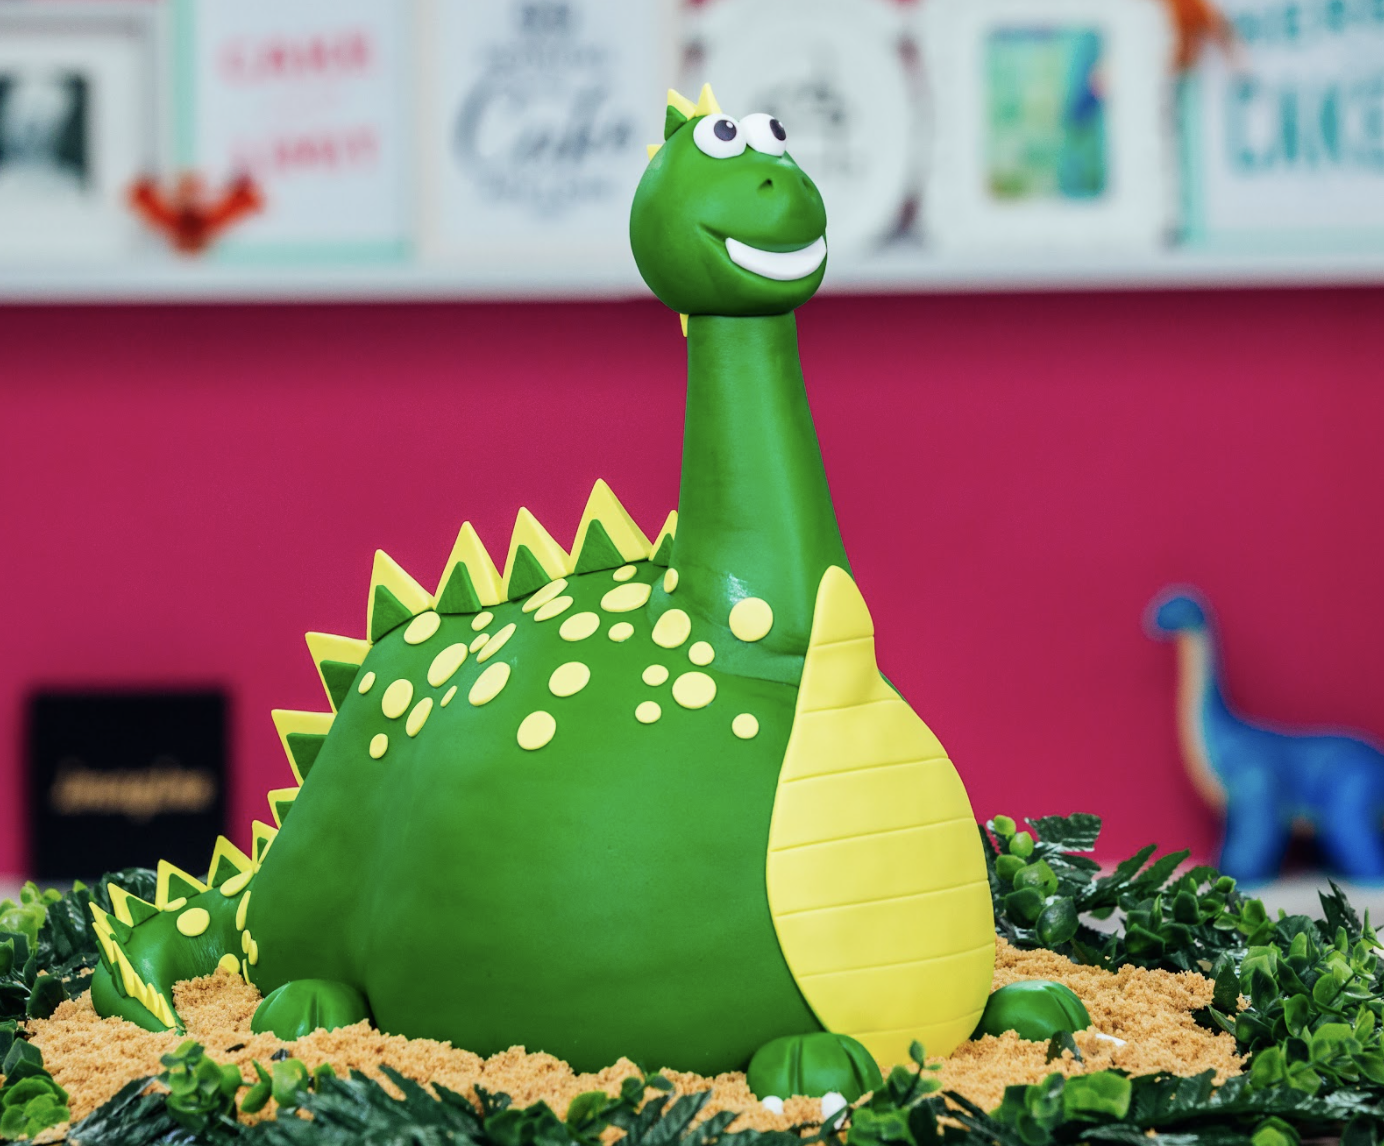
Today I’m a Cakeiontologist! It’s my son’s third birthday, and all he wanted was a dinosaur cake. And it had to be green, and it had to be chocolate! Luckily for me, he wasn’t too picky about which dinosaur he wanted, so I took all of the coolest components from his favourites, and invented a Cakeosaurus Rex! He’s a chocovore.


Ingredients
Cake
- 8 lbs Yo’s Ultimate Chocolate Cake
Icing
- Simple Syrup
- Italian Meringue Buttercream
- Sugarflair Bitter Lemon Gel Food Colouring
Decorations
- 3 3/4 lb Wilton Green Fondant
- Icing Sugar
- 1/2 lb Gum Paste
- Pinch of Black Fondant
- Vegetable Shortening
- Wilton Color Right Base Yellow
- Clear Food Grade Alcohol
- CMC
- Clear Piping Gel

Tools
- 8” Diameter Bowl, Prepared With Parchment
- 8” Round Pan, Prepared With Parchment
- 2 x 6” Round Pan, Prepared With Parchment
- Serrated Knife
- Small Serrated Knife
- Small Icing Spatula
- Small Offset Spatula
- Offset Spatula
- StayBowlizer
- Fabric Measuring Tape
- Rolling Pin
- Fondant Smoother
- Paring Knife
- Paint Brushes
- Triangle Cutter Set (hexagon)
- Small Fondant Rolling Pin
- Non Stick Board
- 1 x 3/8” Wooden Dowel
- Hammer
- 3” Circle Cutter
- Plastic Net
- Ruler
- Sculpting Tool
 Gourmet Cake Slices with Yolanda Gampp
$29.99
Gourmet Cake Slices with Yolanda Gampp
$29.99


Read It!
-
Preheat your oven to 350º and prepare 8lb portion of Yo’s Ultimate Chocolate Cake Batter. Divide among bowls as indicated below:
- 4 lb in 8” Diameter Bowl- 1 hr 50 min @ 350º
- 2 lb in 8” Round Pan- 1hr 10 min @ 350º
- 1 lb in each 6” Round Pan- 50 min @ 350º
-
Bake your 8” bowl for 1 hour and 50 minutes, your 8” round pan for 1 hour and 10 minutes, and your 6” round pans for 50 minutes, or until a toothpick comes out clean. Remove from oven and allow to cool completely on a wire rack.
-
Prepare your Italian Meringue Buttercream, and Simple Syrup. Set aside until further use.
-
Once cakes are completely cool, remove from pans and level them all with a ruler and a serrated knife. Leave a little bit of the curve of the cake hump (approximately ½” ), as this rounded shape will help you with carving. Level the bowl cake while still in the bowl.
-
Continuing with your ruler and serrated knife, cut the bowl cake into three layers, and cut the 8” round cake into two layers. Leave the 6” round cakes untouched.
-
Lay all of your cake layers out on your working surface and give them all a simple syrup shower. Allow simple syrup to soak in completely.
-
Dye three cups of your Italian Meringue Buttercream with Sugarflair Bitter Lemon Gel Food Colouring to achieve a bright hue.
-
Beginning with your 8” round cake (with the top curved layer facing down), fill with bright buttercream, and stack next layer of 8” round cake. Continuing to fill with buttercream as you go, stack the three layers of your 8” bowl cake on top of your 8” round cake.
-
On a separate cake board, stack your two 6” round cakes with buttercream, leaving the curved parts of the cake hump at the top and bottom. This will become the back hump of your dinosaur that will curve into the tail.
-
Chill these two stacks of cake for 20 minutes before you move onto carving.
-
Use your fabric measuring tape to mark a centre line that divides your dome in half. Taper off part of the dome with a serrated knife so that your dino isn’t a perfect sphere. Trim some of the rounded dome down from the top. You want to taper it down, but still retain a bit of a spine where his spikes will go.
-
Take your 6” round cake and cut about an inch off of one side, leaving you with a flat bottom. Line up the buttercream center of this cake with the carved spine on your dino’s body. Use a circle cutter to cut the front of this cake so that you can fit it nicely against your body cake. Carve this cake in a similar manner as your body cake, tapering down and sloping so that it appears to be a continuation of the dino’s back.
-
Crumb coat the entire dino in bright buttercream. You may find that it’s easier to visualize the whole shape of the dino at this point, and may want to take this time to make any carving adjustments needed. Refresh the crumb coat in any places where you made carving adjustments. Chill for 20 minutes in fridge. Ice & Chill
-
Remove from fridge and give another ice with your bright buttercream. Return to fridge for a final 20 minute chill.
-
Smooth out any ridges with a small icing spatula and a little bit out buttercream. Remember, fondant will only accentuate those ridges, not hide them.
-
Measure the body of your cake - length and width. Roll out your green fondant to a slab long and wide enough to cover your dino fully.
-
Transfer your fondant slab to your cake, and cover the entire surface. You will end up with a seam where the belly is, but if you design your dino like me, you’ll cover that area with a belly detail later.
-
Weigh your remaining fondant. I usually add 1 teaspoon of CMC per pound of fondant. Knead in the appropriate amount of CMC and allow to rest for 10 minutes. Feel your fondant after 10 minutes. If it’s too hard, you can knead a bit of untouched fondant back in, and if it’s too soft you can knead in a touch more CMC. Reserve some of your remaining fondant without CMC added.
-
Roll a large tube, looking to the size of your cake to decide on a good scale for the neck. Use a thick dowel, sharpened on both ends, and insert down into the cake where you want the neck to go. Pull out the dowel, and push it into your fondant tube. Continue to roll the fondant around the dowel, pushing and pulling to give it some shape. Allow it to get thicker at the bottom where it will meet the neck.
-
Insert neck down into the dino, using a hammer to pound the dowel straight into the cake board. Use the palms of your hands to smooth the neck down onto the body. You also want to leave an inch left at the top to help support the head, so trim if needed.
-
Take some more of your CMC fondant blend, and roll into a head shape. Use your fingers and a small fondant rolling pin to make an indent for the eye. Take your 3” circle cutter to mark out a mouth, and open it up with your fingertip. Set aside to rest.
-
Roll another tube of CMC fondant, tapering down at one end into a fine point. Use a circle cutter to trim it at the thickest part, and add it to your cake.
-
Add the head to the body by pushing it onto the remaining point on your dowel. Use your fingertips to gently sculpt the back of his head into a ridge that aligns with the spine.
-
Take a bit of non-CMC fondant, and knead in a bunch of vegetable shortening to soften it. Roll into tubes and place onto the seam where the neck meets the body. Use a paint brush with water and your fingertips to blend the seam. Allow to dry.
-
Roll out a thin piece of your CMC fondant blend. Use a plastic net and roll it between your rolling pin and fondant to create a scaly texture.
-
Dilute your Wilton Color Right Base Yellow with a bit of clear food grade alcohol. Brush it onto your entire cake, and onto your textured scaly strip. This will give some life to your green fondant. Don’t forget to paint your rolled out textured fondant as well.
-
Take the last bits of your CMC fondant and roll it into a ball. Cut into four portions and shape into little feet. Use a sculpting tool to mark out three toes in each foot. Decide where you want them on the cake, and then brush with your yellow paint to match the rest of the body.
-
Dye a bit of your gum paste with Sugarflair Bitter Lemon Gel Food Colouring. Roll into tubes, and use fondant rolling pin to roll out on an angle. You want your tube to be thicker along one length and very thin along the other. Use a chef’s knife to trim the pointed end. Use triangle cutter to cut into spikes. Add your triangles along the entire spine of your cake with clear piping gel, with the points facing up.
-
Cut triangles from your textured green fondant. You want them to be a size smaller than your previous triangles. Attach to either side of the larger spikes with a bit of clear piping gel.
-
Take a piece of paper and fold it in half. Line it up along the center of the belly. Lightly trace the shape of the belly you want. Cut out your traced shape while paper is still folded to get a symmetrical belly template. Mine looked like a pear. Roll out more light green gum paste and trim to fit your template. Use a ruler to make the horizontal lines on the belly. Add to the tummy of your dino with clear piping gel.
-
Roll out more gum paste and use a selection of round piping tips to add a variety of spots to the dino. I added mine along the spine and down the thick part of the tail with some more clear piping gel.
-
Take some uncoloured gum paste and press into very rounded spoons. You can also just roll it into a ball in your hands and cut it in half if you don’t have a rounded spoon on hand. Pinch a bit of black fondant for pupils, using your smallest piping tip to cut them out. Roll out teeny tiny balls of white to add a little gleam to each eye.
-
Roll out white gum paste, and cut a rounded band with two circle cutters. Trim into shape and apply.
-
Roll white gum paste into a tube, cut similar lengths, and shape into pointed claws. Apply to cake.
-
Use a sculpting tool to make two points for nostrils.
Congratulations you did it!
