Champagne Bottle Cake


2020 , 21 , 21st birthday , Alcohol , Beverage , Bubbly , Champagne , Champane , Chandan , Cocktail , Collection--novelty-cake-recipes , Drink , Holiday , Moet , New years , New years eve , Nye , Prosecco , Recipes-export , Sparkling , Sparkling wine , Wine
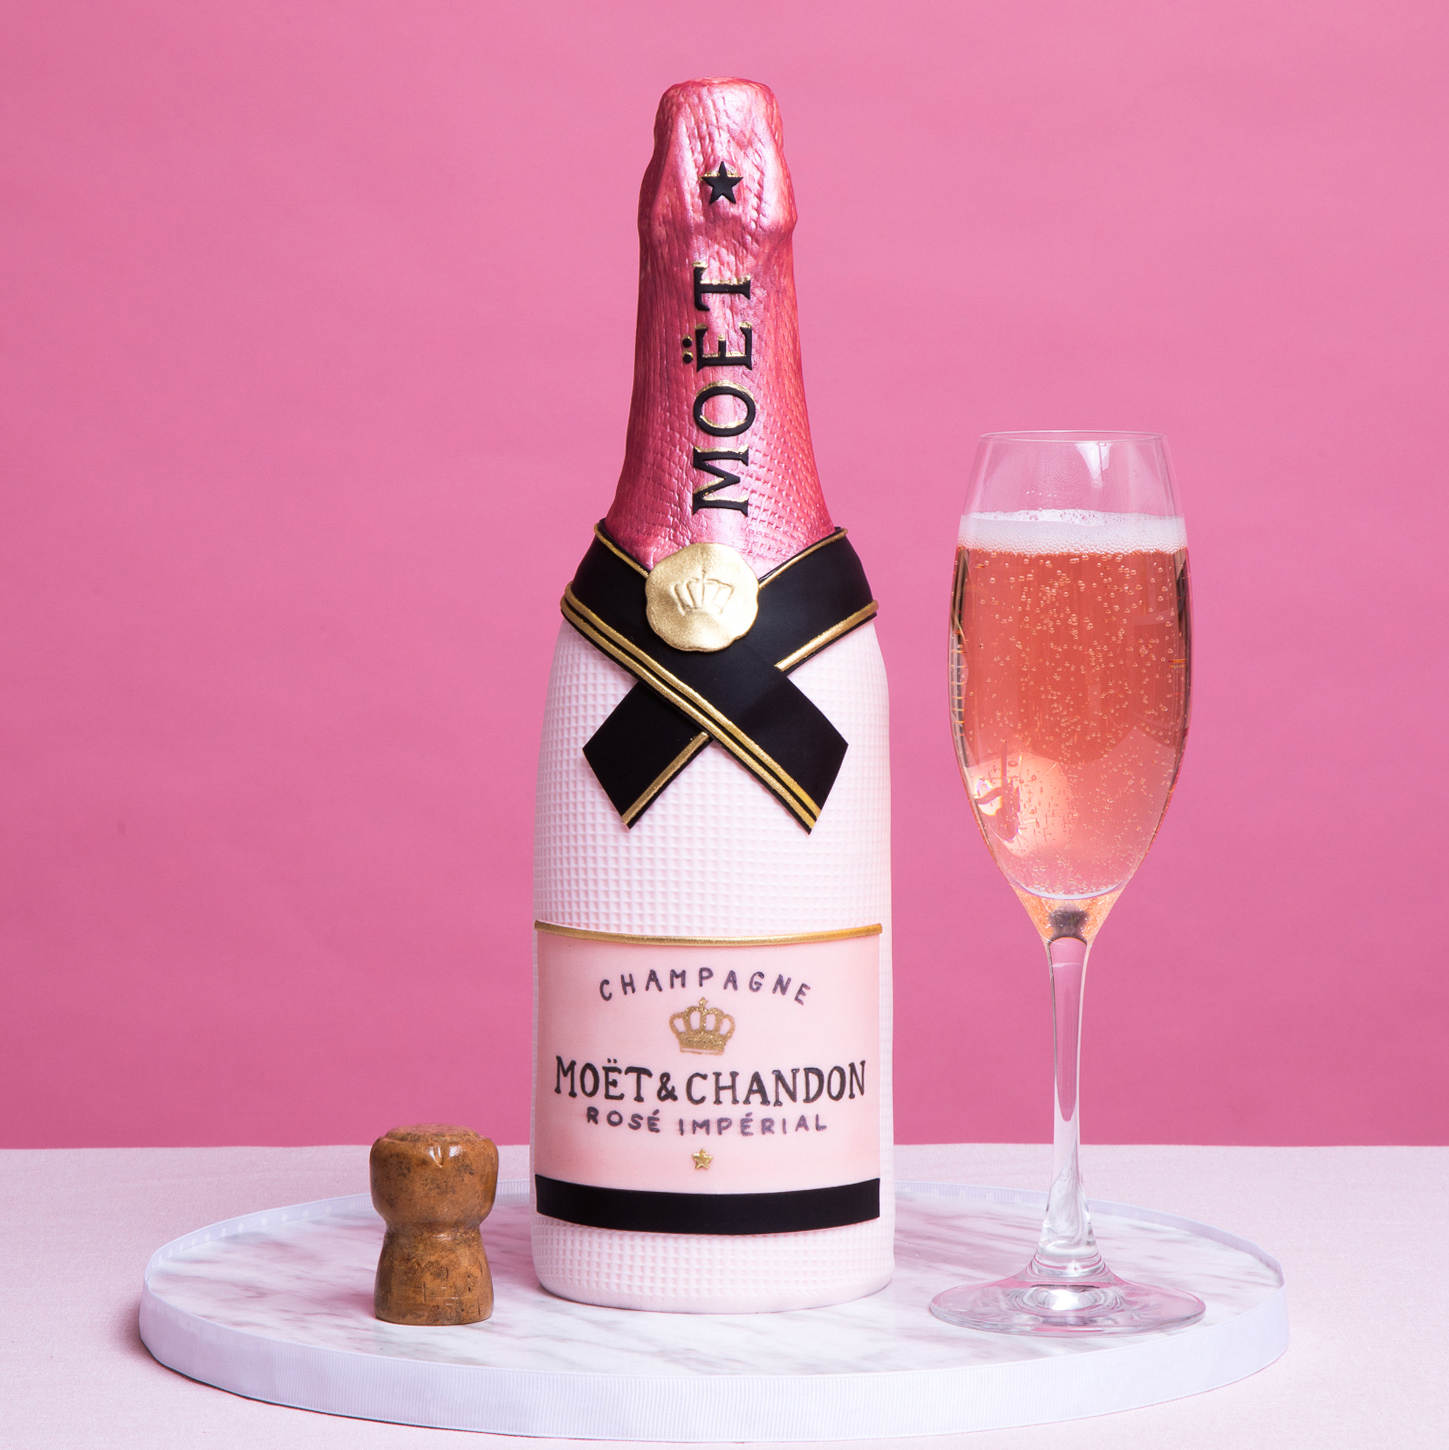
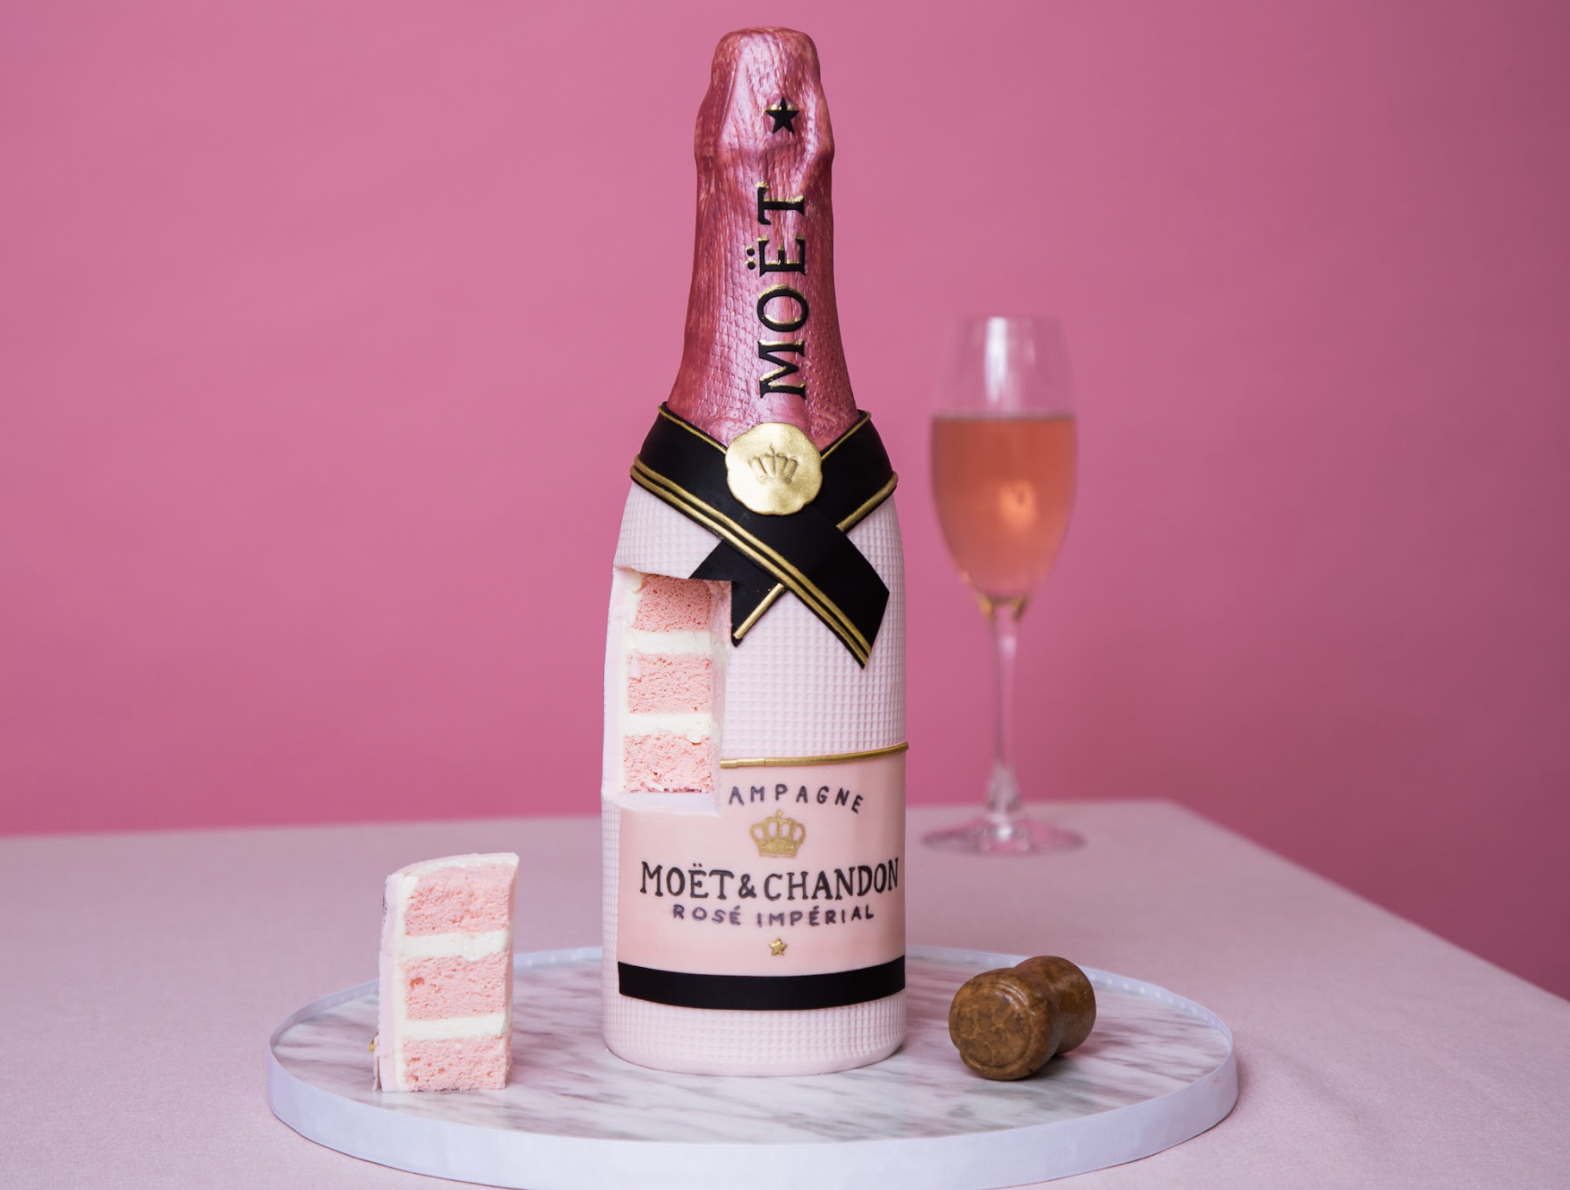
Cheers to Another Year of CAKE - now bring on the bubbly! What better way to ring in the new year than with a gorgeous pink champagne… made of cake! This cake not only looks like a real bottle of Moët’s finest champagne, it also tastes like it. Who knew vanilla cake and champagne were such a delicious duo (then again, champagne goes with everything!)
This champagne bottle is a complete party in a cake! It begins with 2lbs of my Ultimate Vanilla Cake dyed a gorgeous light pink and brushed in a bubbly champagne for a sweet taste. All of the details are carefully made with fondant or drawn on by hand. It’s not a New Years celebration without some glitter and gold so the bottle is also decorated with gorgeous gold lustre dust . This cake is truly bright like glitter and bubbly like champagne!


Ingredients
Cake
- 2lbs of Yo’s Vanilla Cake
- Champagne or Prosecco
Icing
- 1 batch of Simple Syrup
- 1 batch of Italian Meringue Buttercream
Decorations
- Gel food coloring - ivory, taupe, brown, white
- 2lbs soft pink fondant
- 4oz white fondant
- 8oz gumpaste
- 2oz pink gumpaste
- ½ ox yellow gumpaste
- White gel color
- 4 oz black gumpaste
- Gold lustre dust
- Food coloring marker - black
 Gourmet Cake Slices with Yolanda Gampp
$29.99
Gourmet Cake Slices with Yolanda Gampp
$29.99


Read It!
-
Roll out some white gumpaste about ⅛“ thick and wrap it around a vegetable shortening greased top of a bottle to create the shape. Trim a straight edge at the bottom flush to the top. Carefully cut a seam down each side so that it comes off in 2 halves.
TIP: Make this as far in advance as possible - I made mine two days in advance. Also I like to make two just in case.
-
Line your pans with parchment paper and preheat your oven to 350 degrees Fahrenheit. Make 4lbs of my Ultimate Vanilla Cake dyed a light pink. Bake 0.5lbs of cake in each pan for 40 minutes.
TIP: Let your cakes cool in their pans before removing.
-
Remove your cakes from their pans then level and remove the caramelization from the bottoms of each.
-
Layer each cake into 2 making a total of 8 layers.
-
Use Sir Squeeze A Lot to soak each of your layers with simple syrup. Let them sit for a couple of minutes to fully absorb.
-
Use a silicone brush to brush each layer with some champagne or prosecco.
-
Use a 3¼ “ circle cutter to cut each layer out removing all the caramelization on the sides.
-
Fill and stack your cakes in 3 piles with Italian Meringue Buttercream - 2 piles of 3 layers and 1 pile of 2 layers. Chill your cake stacks until firm.
-
Cut 3 cake boards into the size of your cakes (make one slightly smaller) then assemble the cakes in the order as follows:
- Cake board (on bottom) - spread royal icing on top
- 3 layer cake stack
- 4 dowels
- Board - spread royal icing on both sides
- 3 layer cake stack
- 4 dowels
- Board (smallest one)- spread royal icing on both sides
- 2 layer cake
- One long dowel through center - into board
-
Carve the top of the cake to create the bottom part of the bottle neck.
-
Crumb coat your cake with IMBC then let it chill in the fridge until firm. Ice once again using a bench scraper and my invention - a piece of acetate, to smooth out the edges.
-
Add the gumpaste neck of your bottle to the cake. Scrape away any IMBC if necessary to make it fit. Fill each shell half with white fondant and cut it flush to the edges. Use a cel stick to make an indent down the centre where the dowel will be then glue the shells together on the cake around the dowel with royal icing. Patch the seams with more royal icing.
-
Roll out some soft pink fondant (I dyed my the same colour as the cake) and texture it using a grid rolling pin. Wrap the sheet around the cake from the base up to the neck. Cut a clean seam at the back of the bottle then trim away excess at the base and at the neck.
-
Take a real champagne cork and trim away the stem leaving just the upper portion. Insert the cork into the top of the bottle using royal icing to glue it in place. Put the wire cap back on and close it.
-
Roll out some very thin pink gumpaste (slightly darker than the fondant) then texture it with the same grid rolling pin. Brush on some clear piping gel onto the neck of the bottle then drape the textured gumpaste over the bottle covering the cork and neck. Smooth the gumpaste over the bottle letting it overlap and creaselike real foil.
NOTE: If it looks to heavy, lift the folds and cut away any excess gumpaste.
-
Mix some pink lustre dust with clear food grade alcohol together to create a paint then carefully brush it over the foil portion of the bottle neck.
NOTE: Make sure it doesn’t drip down onto the rest of the cake.
-
Roll out thin black gumpaste and use a tappets letter cutter to cut out the letters for “MOET” then use a star plunger cutter to cut out a star. Use clear piping gel to glue the letters onto the foil. Mix gold lustre dust with clear food grade alcohol to make a metallic paint and draw on a shadow to each letter.
-
Roll out very thin pink gumpaste. Use a printed label of a champagne bottle as a template to cut out the rectangle then use a food colouring marker to draw on the label. Glue the label onto the cake with clear piping gel.
NOTE: The gumpaste label must be thin but be careful that it doesn’t rip. Also don’t let the gumpaste dry too much or else you won’t be able to wrap it around the bottle.
-
Roll out thin black gumpaste then cut it into 2 bands with an angled edge on each. Wrap the bands around the neck so that they criss cross in the middle, gluing them on with clear piping gel, then cut a clean seam at the back of the bottle.
-
Mix a bit of yellow gumpaste into a thin sheet. Use a strip cutter to cut out strips then cut one in half lengthwise to create two thinner strips. Use more of your gold paint mixture to paint these strips gold. Add the strips to the black bands as well as on top of the label.
-
Create a stamp by cutting out a circle from the same yellow gumpaste then using a piping tip to indent the circle around the edges - creating almost a wavy edge. Draw a crown onto the stamp using the food colouring marker then glue it onto the cake using clear piping gel.
-
Cut out a small star with a plunger cutter, paint it all in gold, then add it to the label. Cut a thin strip of the same black gumpaste and add it below the label.
Congratulations you did it!
