Caramel Ice Cream Cone Mega Cake


The Latest Scoop! I scream for Caramel Ice Cream! Summer is here – hotter than ever, and nothing says “the perfect summer day” like a classic ice cream cone, right? But of course, we don’t do just “classic” here at How To Cake It, we CAKE it up. This Caramel Ice Cream Cone cake is decked out in colourful sprinkles, peanuts, and lots of chocolate and caramel sauce. The perfect summer treat just got even sweeter and I can’t wait for you all to try it out!
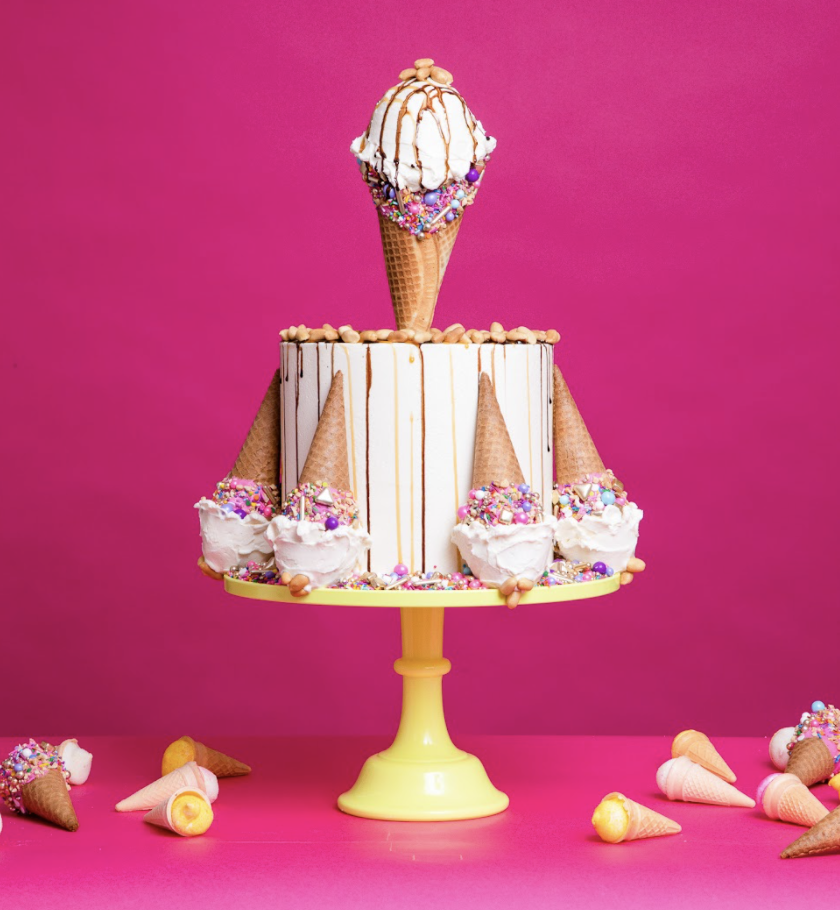
To cake my Caramel Ice Cream Cone cake, I began by baking 3lbs of my Ultimate Vanilla Cake and 4.5lbs of my Ultimate Chocolate Cake. This cake is stacked with alternating flavours and filled with not only Chocolate Ganache but also layers of homemade ice cream cones drizzled with chocolate sauce, caramel sauce, and chopped up peanuts. The cake is then surrounded by upside down sugar cones filled with sculpting Rice Krispie balls to resemble ice cream scoops. Lastly, the cake is topped off and decorated with loads of sprinkles and peanuts – the perfect ice cream toppings!


Ingredients
Cake
- 3lbs Yo's Ultimate Vanilla Cake
- 4.5lbs Yo's Ultimate Chocolate Cake
Icing
- 1 batch of Yo's Simple Syrup
- 1 batch of Yo’s Italian Meringue Buttercream
- 1lb ratio Yo’s Chocolate Ganache
- ½ recipe of Sculpting Rice Krispies
Decorations
- 2 cups of chopped peanuts
- Caramel sauce
- Chocolate sauce
- Pink candy melts
- Sugar cones
- Sprinkles
- Gold dragees
Homemade Cones
- 2/3 cups of all-purpose flour
- ¼ tsp of salt
- 2 eggs
- ½ cup of sugar
- 4tbs (1/2 stick) of unsalted butter melted
- ¼ cup of milk
- ½ tsp of Vanilla
**Makes 8-10 cones

Tools
- 3 x 8" Round Cake Pans
- Simple Syrup Squeeze Bottle
- Parchment paper
- Small Straight & Offset Spatula
- Large Straight & Offset Spatula
- Waffle Cone Maker
- Waffle Cone Roller
- Piping Bag
- #806 Piping Tip
- Large Serrated Knife
- Small Serrated Knife
- 7" Round Cake Pan
- Mixing Bowls
- Bench Scraper
 Gourmet Cake Slices with Yolanda Gampp
$29.99
Gourmet Cake Slices with Yolanda Gampp
$29.99


Read It!
-
Start by making 3lbs of Ultimate Vanilla Cake batter and baking it in an 8” round pan lined with parchment paper for 1 hour and 40 minutes at 350 degrees Fahrenheit. Then make 4.5lbs of Ultimate Chocolate Cake and pour 3lbs into an 8” round pan lined with parchment paper baking for 1 hour and 20 minutes at 350 degrees Fahrenheit. Pour the remaining 1.5lbs in another 8” round pan lined with parchment paper for 40 minutes at the same temperature.
-
Remove all three cakes from their pans and level the two taller cakes. Remove the caramelization from the bottom of the vanilla cake as well. Now using a large serrated knife, cut both the vanilla and 3lb chocolate cake into two layers. Level the last chocolate cake to the same height as your other layers, creating a total of 5 layers. Place a 7” round pan upside down on each layer then cut away the caramelization from the sides with a small serrated knife.
-
Use Sir Squeeze-A-Lot to shower all of your layers with simple syrup then let them absorb for a few minutes.
-
Turn on your waffle cone maker to heat it up (usually a light will come on when it is ready). In the meantime, mix together your flour and salt in a small bowl then set it aside. In another bowl, whip the eggs with the sugar for one minute. Stir together your milk, melted butter and vanilla. Alternate adding the flour mixture and the wet ingredients into your egg mixture. Stir until combined. Once your waffle cone maker is hot, pour a scoop of batter onto the centre then spread it with an offset spatula. Close the waffle cone maker and leave it for approximately 1 minute. You want the cone to be cooked but not too crispy then remove it and repeat. These cone sheets will be layered inside the cake so make sure they are a suitable size.
-
We also want to make cones that we will roll up for the top of this cake. This time, spread the batter to the very edge of the waffle cone maker and cook them for longer until they are brown and crispy. You may need to hold the lid of your cone maker down to make sure the cone gets browned on both sides. Take your waffle cone roller then carefully roll up your larger cones pressing down at the seams on the bottom.
-
Lay the flat cones on a board or pan. Drizzle the chocolate sauce in one direction then drizzle caramel sauce over it in the other direction. Let them chill so that the sauces set.
-
Fill a piping bag with chocolate ganache. The cake will begin with a chocolate layer so spread some ganache onto the layer then pipe a fence of ganache along the edges. Place a flat drizzled cone layer inside the fence and sprinkle on chopped peanuts. Add a dollop of IMBC then spread it evenly so it is flush with the top of the fence. Then add a layer of vanilla cake. Repeat this process, alternating flavours, until you reach the top.
-
Crumb coat the cake with IMBC then place it in the fridge until firm.
-
Remove your cake from the fridge and ice it with some more IMBC using a bench scraper to smooth out the edges. TIP: You can flavour your IMBC with vanilla bean for more of an ice cream taste
-
Melt your pink candy melts and dip the open end of your sugar cones into the melted chocolate using a spatula to clean up the edges. Hold the cone over a baking tray then sprinkle on various sprinkles and chopped peanuts. Complete them with larger gold dragees then let them sit to dry in an upright position. For the larger waffle cones, use a spatula to spread the melted chocolate rather than dipping then sprinkle on the toppings.
-
Make ½ the recipe for my Sculpting Rice Krispie Mixture.
NOTE: You can find the recipe here
-
Roll your Rice Krispies to make 6 balls of equal size (they should fit perfectly into your sugar cones) then with the leftover, roll one large ball for the top waffle cone.
-
Ice the Rice Krispie balls with IMBC. Let them chill for a bit then use my invention – a piece of acetate, to smooth out the edges. Touch them up with a spatula and more IMBC until you are satisfied with how they look.
TIP: The balls will be very light making them easy to move around so you can use a silicone mini cupcake pan to hold them in place while handling.
-
Drizzle the top of your cake with both chocolate and caramel sauces following the same pattern as with the flat cones.
-
Place your cake onto a cake stand. Pour a bed of sprinkles around the base along the bottom of the cake then top it off with gold dragees.
-
Add a “scoop” (Rice Krispie ball) at the base of the cake with the un-iced part facing upwards. Place an upside down sugar cone on top to hide the un-iced part of the scoop then press it into the side of the cake to secure it. Repeat this until you have all 6 sugar cones equally spaced apart around your cake.
TIP: Use a spatula and extra IMBC to fill in the gaps between the scoops and cones.
-
Add on a row of peanuts around the top edge of the cake then add a few to the “top” of each ice cream scoop (really at the bottom of the cake because the ice cream cones are upside down!).
-
To reinforce your rolled up homemade waffle cone, take some melted chocolate and pipe it on the inside then place a sugar cone (with the tip of it cut off) inside of the waffle cone for support. Make sure that there is a hole at the bottom of your cone that a dowel can fit through.
-
Drive a dowel into the centre of the cake. Place the waffle cone on top.
-
Add the last big “scoop” into the top waffle cone then spread on some IMBC to fill in any gaps. Drizzle on some chocolate and caramel sauce to the top ice cream cone and top it off with peanuts!
Congratulations you did it!
