Leprechaun Hat Cake!


Accessories , Buttercream , Chocolate , Clover , Collection--novelty-cake-recipes , Fondant , Holidays , Irish , Leprechaun , Novelty cakes , Pot of gold , Recipes-export , Saint patrick s day , Saint patrick's day , St paddy , St paddys , St patrick s day , St pats , St. paddys day , St. patricks day

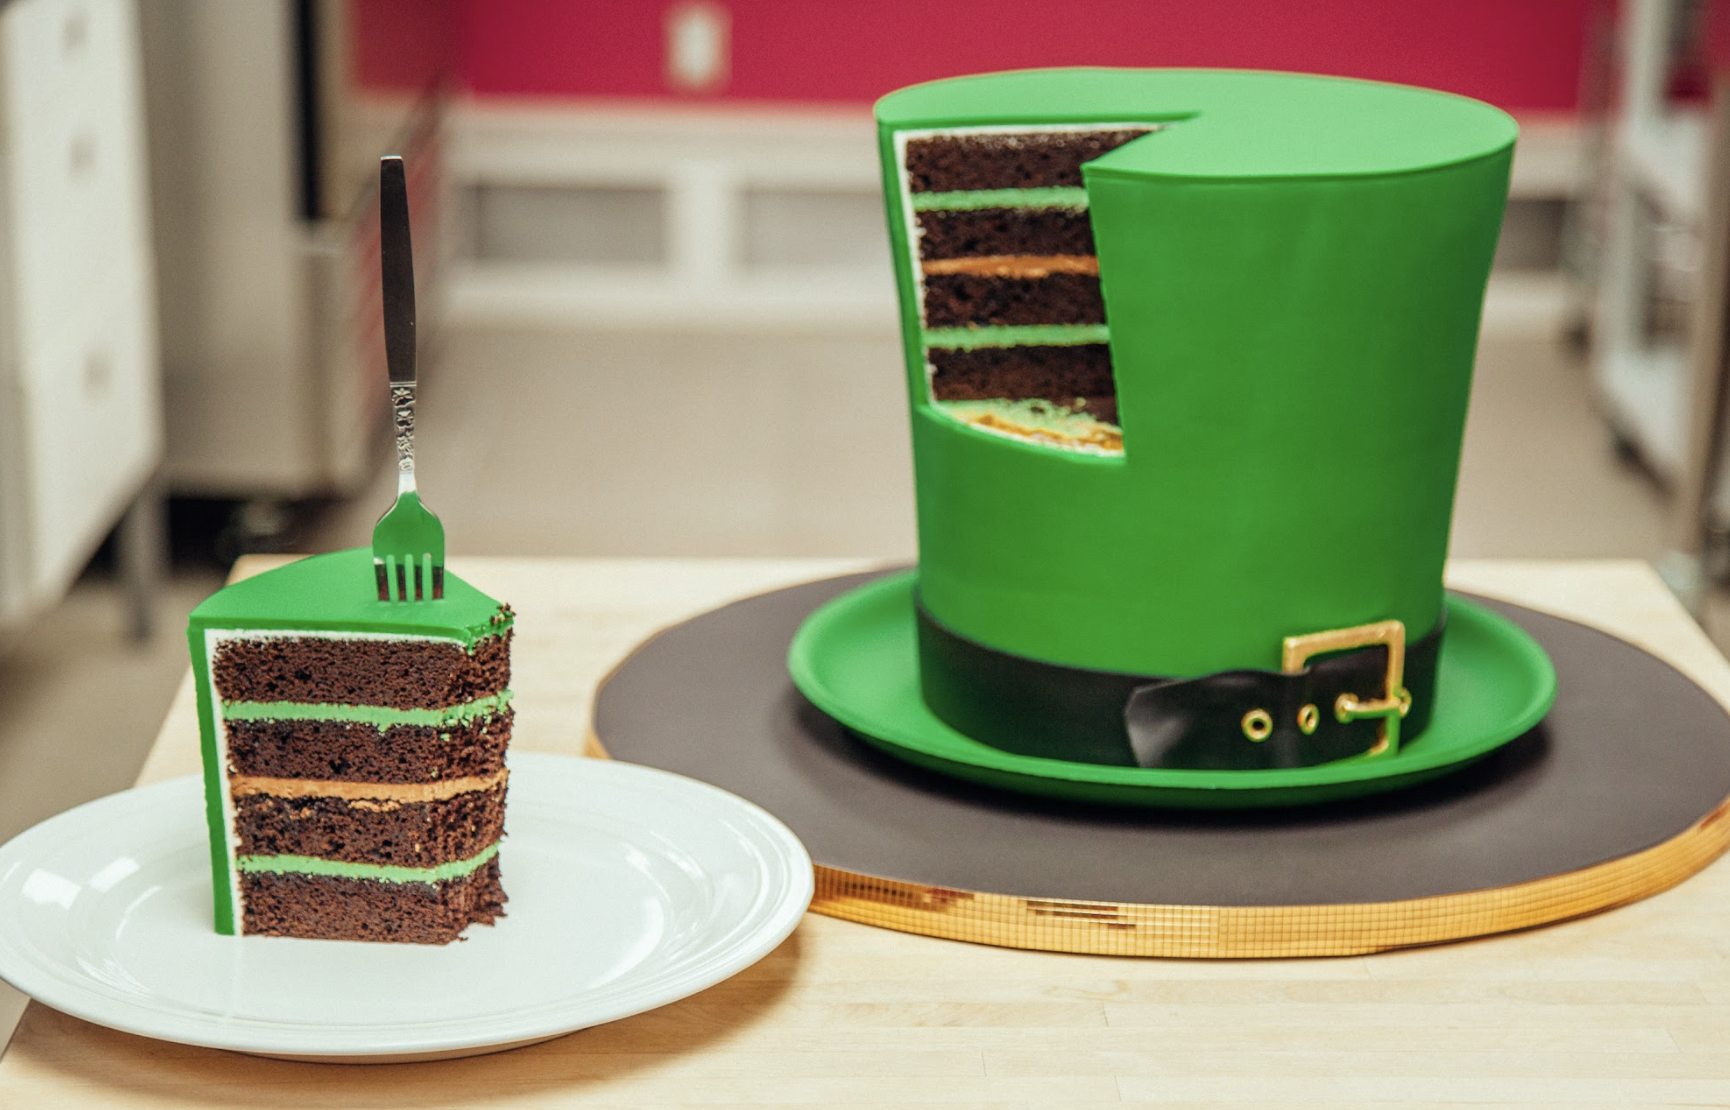
The latest in leprechaun fashion is, apparently, height. Tall hats with some sort of bling. Green, naturally. I am making a tall, green hat with a black belt and a shiny gold buckle. Because, honestly whats better than fashion you can eat!


Ingredients
Cake
- 14 lbs of Yo's Ultimate Chocolate Cake
Icing
- 1 batch Italian Meringue Buttercream
- 1 batch Chocolate Italian Meringue Buttercream
Decorations
- 5 lbs of fondant (mostly green with enough black for the base)
- Leaf Green gel food colouring
- Icing Sugar
- Gum Paste
- Edible Gold Leaf

Tools
- 4 x 9" round cake pans
- Parchment paper
- Simple syrup squeeze bottle
- 3-inch and 2 1/2-inch square cutters
- 13-inch round platter
- 8-inch round cake board
- Small Offset Palette Knife
- Sharp Paring Knife
- Piping Tips
- Soft Bristle Brush
 Gourmet Cake Slices with Yolanda Gampp
$29.99
Gourmet Cake Slices with Yolanda Gampp
$29.99


Read It!
-
For the hat brim, roll out a portion your green fondant and place it on a large platter to dry. Sprinkle the platter with icing sugar to help you remove your hat brim later on. Trim around the edges of the fondant with a sharp knife.
-
For the main buckle use a 3-inch square cutter, and for the inner square of the buckle use a 2 1/2-inch cutter. I used the extra gum paste to form the prong for the buckle and cut out the loops with piping tips. Once your buckle parts are dry, you can rub them with a bit of shortening, and cover them with edible gold leaf. Make sure to use a soft bristle brush as not to damage the texture.
-
Prepare four 9-inch round cakes. Mix Ultimate Chocolate Cake batter, and divide evenly among pans. Bake at 350 degrees for 1hr 10 mins, or until a toothpick comes out clean. Set aside to cool completely in pans.
-
Remove your cakes from their pans, levelling them with a ruler and a serrated knife, and cutting them in half.
-
Prepare your buttercream. Stir some Wilton Leaf Green gel food colouring little by little into one batch of buttercream, and stop when you reach your desired hue.
-
We are going to fill this cake in two parts. We will assemble them as two 4 layer cakes at the moment. Alternate your buttercreams between the tiers. You will have two layers of green buttercream, and one of chocolate in the middle. Place both cakes in the fridge to chill.
-
Place an 8" round cake board on top of one of your cakes. Carve around the cake slowly, using the board as your guide and tapering in at the bottom.
-
Dowel the bottom half of the cake to help support the upper half. Once complete, stack your second cake on top. Place an inverted cake board on top of the entire cake and flip.
-
Carve around the sides, this time flaring out. Carve out from the middle and leave the base the same circumference. Flip the cake back over. Take the time to refine you carving.
-
Crumb coat your cake, and place it in the fridge.
-
Ice your cake once more, using a small offset palette knife.
-
Measure the circumference of your cake at the top, the widest point. Roll out your green fondant according to your measurement. Use a rolling pin to roll up the fondant on itself, pick it up and quickly wrap it around your cake. Use a fondant smoother to help smooth your fondant around your cake. Use a sharp knife to trim away the excess fondant.
-
Roll out more fondant in a circle a little larger than your measurement, and place it on top of your cake. Once again, place an inverted cake board onto your cake and flip the whole thing over. Trim away any excess fondant, and flip your cake.
-
Remove your now set brim from its platter and set it on a cake board. Carefully lift your cake and place it in the middle of the brim.
-
Measure the circumference of your cake at the base above the brim. Roll out your black fondant according to your measurement.
-
Measure the inside of your belt buckle. Cut a band of black fondant according to your measurement. Wrap the band around your hat, and add the buckle front and centre.
-
Add a much shorter band, of the same width, starting at the inside edge of your buckle. Place your gold loop along the belt, starting in the centre of the buckle. Add the prong between the centre loop and the buckle edge.
Congratulations you did it!
