Squash Cakes


Acorn , Butternut , Collection--novelty-cake-recipes , Collection--novelty-recipes , Fall baking , Fall flavors , Gingerbread , Gingerbread cake , Holiday , Holiday baking , Holiday recipe , Holidays , Kabocha , Pumpkin , Pumpkin spice , Pumpkin spice cake , Spice , Squash , Squash cake , Squash cakes , Thanksgiving
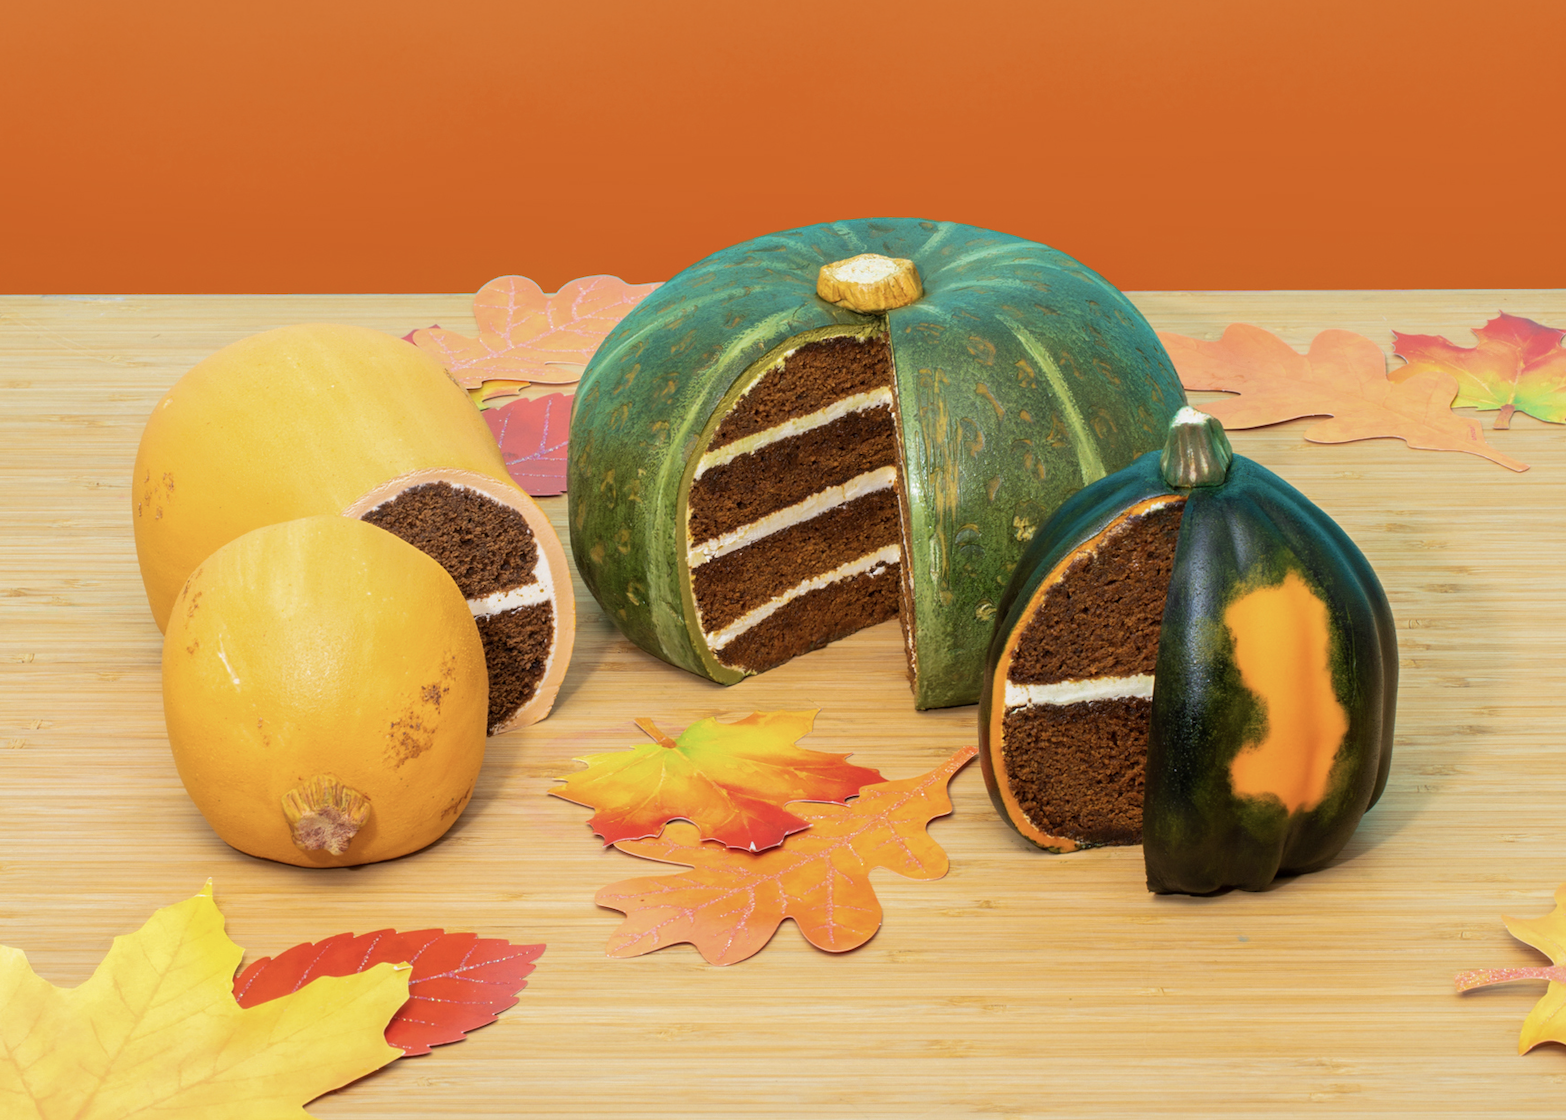
#SquashGoals! You all know I love making any cakes with a nub or any giant food for that matter… so all I’ve got to say is that I SQUASHed this cake!
These Squash Cakes are bursting with fall flavors! I carved my Kabocha Squash out of Pumpkin Spice cake as well as my Acorn Squash, and my Butternut Squash out of Gingerbread cake! Each is stacked and iced with Italian Meringue Buttercream then dressed up in various colored fondant and painted to perfection! I also dusted the Kabocha Squash with icing sugar to give it an extra dusty look!


Ingredients
Cake
- 6lbs Yo’s Pumpkin Spice Cake
- 3½lbs Yo’s Gingerbread Cake
Icing
- 1 batch of SImple Syrup
- 1 batch of Italian Meringue Buttercream
Decorations
- 2lb peach/ivory fondant (for the butternut squash)
- 1lb orange fondant
- 2½lb moss green fondant
- Fondant: ivory, peach, brown, yellow with red, red, lime green, brown, white
- Gel food coloring: leaf green, ivory, white, holiday green, fog, black, brown, egg yellow
- Black color dust
- Ivory color dust
- Icing sugar

Tools
- 2 x 8" Round Cake Pan
- 2 x 5" Sphere Cake Pan
- 2 x Egg Pans
- Simple Syrup Squeeze Bottle
- Parchment Paper
- Square Piece of Acetate
- Offset Spatula
- Serrated Knife
- Paint Brushes
- Small Paring Knife
- Sculpting Tools
 Gourmet Cake Slices with Yolanda Gampp
$29.99
Gourmet Cake Slices with Yolanda Gampp
$29.99


Read It!
-
Line your pans with parchment paper then preheat the oven to 350 degrees Fahrenheit. Prepare 6lbs of Pumpkin Spice cake and 3½lbs of Gingerbread cake. Bake your cakes as follows:
8” round cake pan → 2lbs pumpkin spice cake batter → 1 hour and 10 minutes
8” round cake pan → 2lbs pumpkin spice cake batter → 1 hour and 10 minutes
5” sphere cake pan → 1lb pumpkin spice cake batter → 1 hour
5” sphere cake pan → 1lb pumpkin spice cake batter → 1 hour
Egg cake pan → 1¾lb gingerbread cake better → 1 hour
Egg cake pan → 1¾lb gingerbread cake better → 1 hour
Leave your cakes in their pans to cool.
-
Remove your two 8” round pumpkin spice cakes from their pans then stack one on top of the other - flat bottoms together (without levelling them). Start carving your cake by rounding off the top edge then flip it over and repeat on the other side. Cut a small dip in the centre for a nub. Create dents and imperfections along the sides. Layer each of your cakes into two to create a total of four layers.
-
Level your two 5” sphere pumpkin spice cakes in their pans then remove them. Carve the top half into an egg shape - thinner on top than the bottom, then unstack the cakes. Add vertical indents to the bottom half of the cake around the sides, then stack the cakes back together and carve the rest of the way up on the squash.
-
Level your 2 egg cakes in their pans then remove them. Use a butternut squash template to outline the shape onto your cake - starting with one half first. Continue to round down the sides of the cake then carve it so that the top is thinner and the bottom is wider. Create an indent in the center - like a waist, then repeat the carving on the other half. Hold the cakes together then carve further until you are satisfied with the shape.
-
Use Sir Squeeze A Lot to soak all of your cake layers with simple syrup then set them aside for a couple of minutes to absorb.
-
Fill and stack each of your squash cakes with Italian meringue buttercream.
-
Crumb coat each of your squashes with IMBC then let them chill in the fridge until firm. Ice each one again with more IMBC using my invention - a square piece of acetate, to smooth out all the edges.
-
Cover each of your cakes with their proper color of fondant.
Kabocha - moss green
Acorn - orange
Butternut - ivory peach
-
Kabocha
Paint your kabocha squash with taupe, fog, and green. Scrape off bits of the fondant then mix together dark green, leaf, and holiday green and speckle them in the scraped off areas. Dry paint the entire cake with icing sugar, ivory dust, and black dust then accentuate the veins more with a sculpting tool.
Acorn
Paint your acorn squash with a mix of leaf green, holiday green, and black.
Butternut
Paint your butternut with ivory and white.
-
Mix your butternut and kabocha squash fondants together then add a bit of CMC if it’s too soft. Sculpt it into nubs to fit each squash. Use various veining tools to texture each one then paint each nub with a mix of wet and dry paints. Add them onto their appropriate cakes.
Congratulations you did it!
