Slithering Snake Cake


Animal , Banana , Buttercream , Chocolate , Collection--novelty-cake-recipes , Creepy , Dinosaur , Fondant , Halloween , Holidays , Lizard , Novelty cakes , Recipes-export , Snake , Snake cake

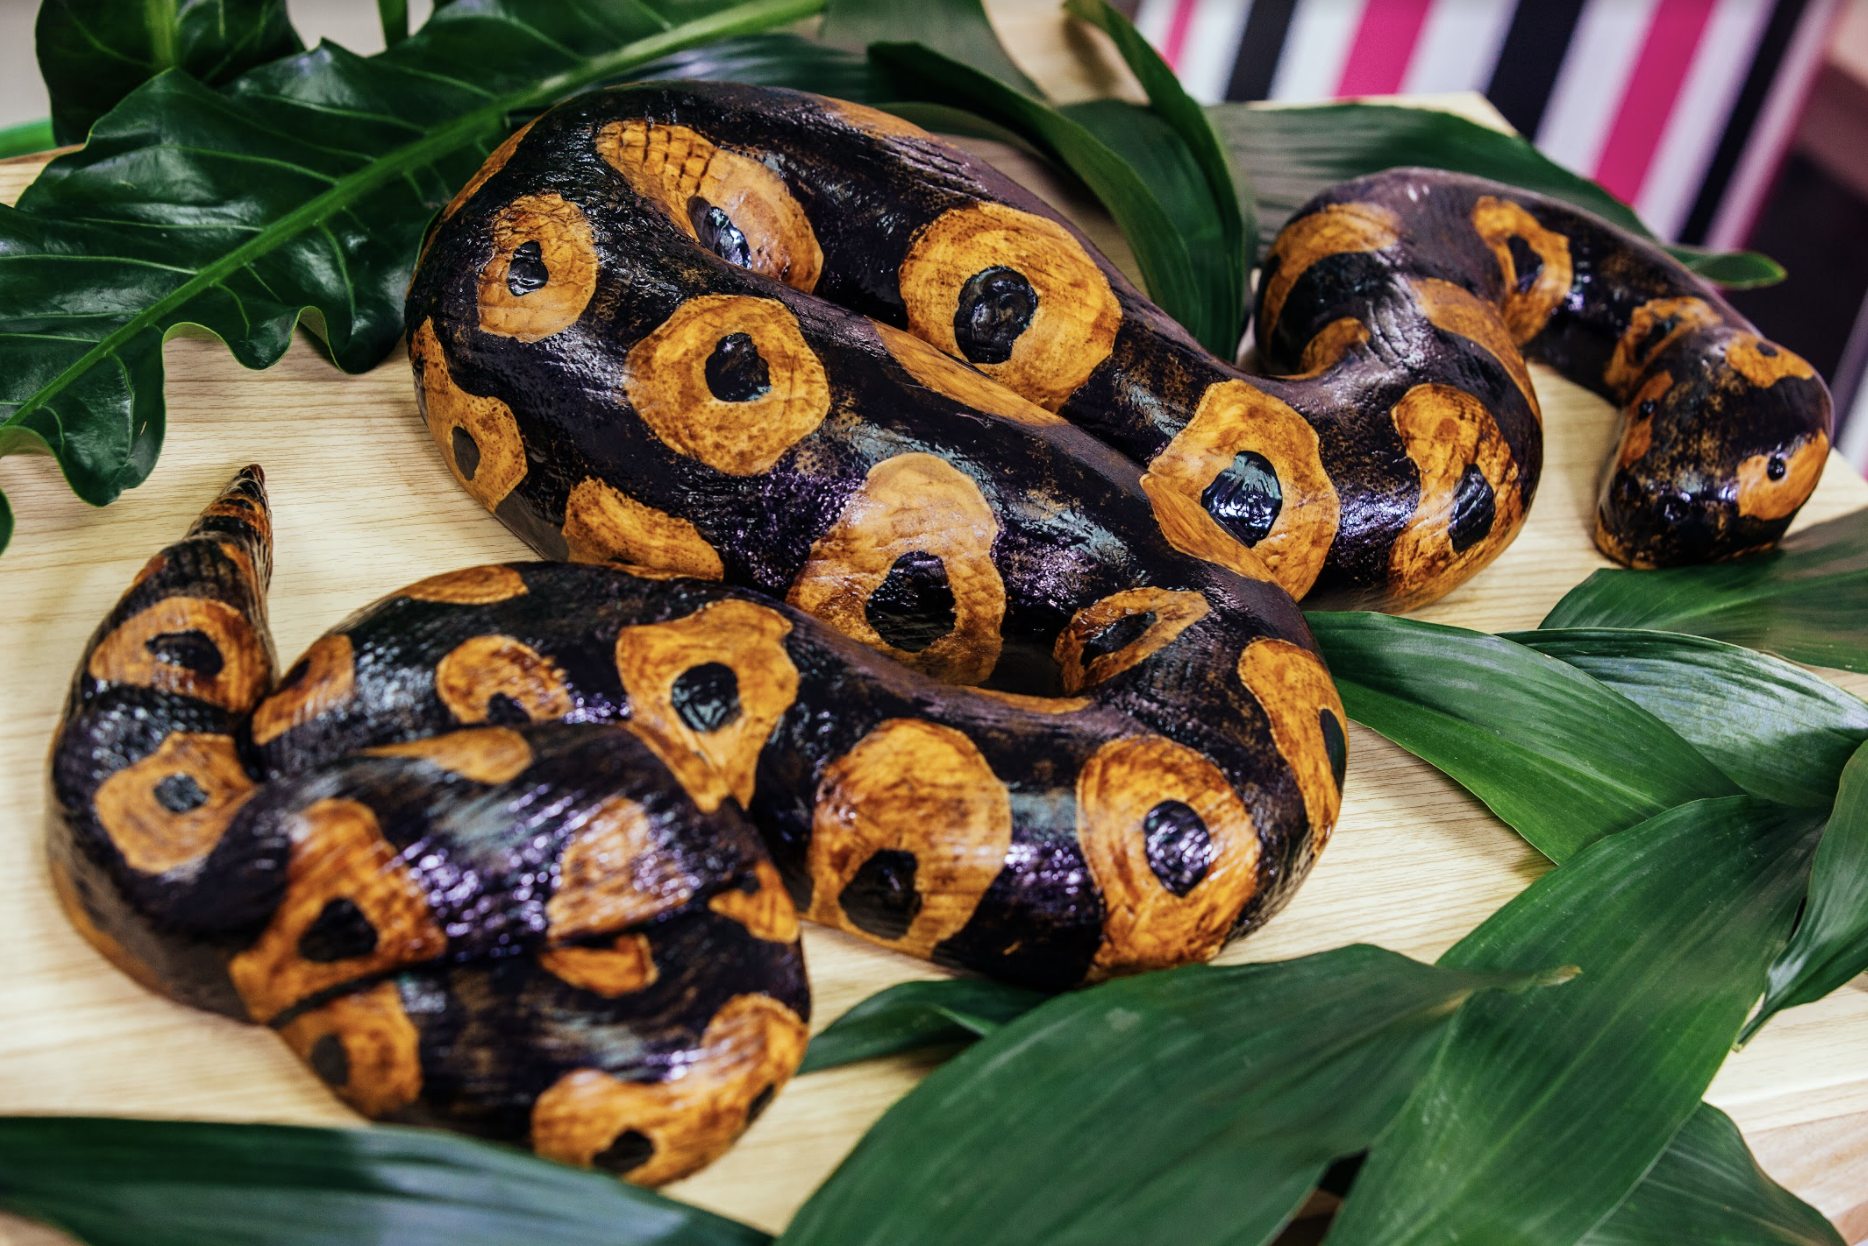
This cake is s-s-s-slithering with details! The skin of a snake is so gorgeous! Especially up close. Its really soft and full of texture and colour. I couldnt wait to cake a snake on How To Cake It! The inside will be banana cake speckled with chocolate chips. Ill create texture on the skin with a rolling pin sleeve and paint on all of the rich colours.


Ingredients
Cake
- 3 x 6lb portion of Yos Banana Cake (18lbs in total)
- 3 cups Mini Semi Sweet Chocolate Chips
Icing
- 2 cups Italian Meringue Buttercream
- ¼ cup Instant Coffee
Decorations
- Clear Food Grade Alcohol
- Icing Sugar
- 4 lbs Fondant
- 2 x Red or Black Candy Beads (or two small black balls of fondant)
- Ivory Icing Color
- Brown Icing Color
- Black Icing Color
- Buttercup Yellow Icing Color

Tools
- 2 x 10 Round Cake Pans, Lined with Parchment Paper
- 2 x 9 Round Bundt Pans, Lined with Parchment Paper
- 7" Round Bundt Pan
- 5" Round Cake Pan
- Serrated Knife
- Small Serrated Knife
- Small Offset Spatula
- Small Icing Spatula
- Rubber Spatula
- Paring Knife
- 18 Diamond Sleeve
- Rolling Pin
- Paint Brushes
- Paper Towel
- Dental Floss or String
 Gourmet Cake Slices with Yolanda Gampp
$29.99
Gourmet Cake Slices with Yolanda Gampp
$29.99


Read It!
-
Prepare the 18lb portion of Yos Banana Cake. Fold in the mini chocolate chips using 1 cup of chocolate chips per 6lb recipe. Divide the batter as follows:
- 4 lbs per 10 round pan
- 3 lbs per 9 bundt pan
- 2 lbs in the 7 bundt pan
- 1 lb in the 5 round pan
-
Bake the cakes at 350 degrees until a toothpick inserted in the centre comes out clean.
5 round 40 minutes
7 bundt 50 minutes
9 bundt 1 hour & 10 minutes
10 round 1 hour & 20 minutes
Let cool completely in their pans, and chill for a few hours.
-
Remove all the cakes from their pans. Level the two 10 and the 5 round cakes and cut the caramelization off the bottom. Level all of the bundt cakes.
-
Starting with the two 10 round cakes, place one on top of the other. Trim around the top of the cake rounding the edges down. Flip both cakes over as one, and carve rounded edges again. Flip the cake back, and carve a gap out of the middle of the cake. Try to create a 3D letter C.
-
Cut the 9 bundt cake in half, but not necessarily two equal pieces. Round the edges of this cake in the same way as the 10 rounds.
-
Place one half of the bundt cake beside one end of the C cake you created, and the other half at the other end. Cut the cakes where they meet to have them join together. Try to create an S formation for the body of the snake. Continue to cut and carve the cakes the fit together.
-
Move on to the next 9 bundt pan and repeat the same process. Form the S formation however you like, and of course, to fit your cake board. Continue carving the snake cake by adding the 7 bundt and the 5 round cakes. Use these cakes to form the tail.
-
Carve the tail of the snake into a sharp little point. Carve the head from the top cake, or use a large cake scrap to form and carve the head.
-
Once all of your cakes have been carved, make your final carving adjustments.
-
To make the coffee buttercream, place the instant coffee in a glass jar. Boil some water and pour 2 tablespoons into the jar. Close the jar so that the lid is secure and give it a good shake, letting the coffee dissolve. Let cool, then whisk into the buttercream.
-
Fill the 10 cakes that form the C in the middle of your snake with coffee buttercream. Spread a little buttercream between all the cake joints where two cakes meet. Crumb coat the entire snake cake with coffee buttercream. Let set, then ice again.
-
Dye 4lbs of fondant a very light shade of yellow. Roll out the fondant in sections, about 1lb at a time.
-
Cover the centre of the snake cake, and tuck the fondant underneath. Cut the fondant where the seams meet.
-
Once completely covered, make a fondant paste by adding water to a small piece of fondant. Ice this paste onto the seams. Use a wet paintbrush to blend the paste into the snake.
-
Use a piece of the diamond sleeve to create texture. Stretch and press it all around the surface of the cake creating diamonds that flow in one direction.
-
Dilute a touch of ivory, brown and black with clear alcohol. Paint the entire snake with this light tan/brown colour.
-
Darken the paint by adding more brown. Begin to paint the snake pattern by adding soft blob like shapes all along both sides of the length of the snake. While painting, lay pieces of paper towel onto the pattern and peel them back off, this will create texture and colour variances
-
Create a darker paint by mixing black and brown. Dilute it slightly with alcohol. Paint this colour in between the pattern along the whole snake. Use the paper towel method again.
-
This snake needs to see. Add the two eyes to the head of the snake using red or black candy beads. Paint them with black food colouring to give them shine. Poke two nostrils into the front of the face.
-
Use a piece of dental floss to gently press in the marking of a mouth on the head of my snake.
-
If necessary, paint a second coat onto the snake if the colours lighten when dried. Repeat the paper towel method as well.
Congratulations you did it!
