Reese's Peanut Butter Cups


The RIGHT Way to Eat a Reese’s. They say there’s no wrong way to eat a Reese’s but I believe the only RIGHT way is in a giant caked up version… or two! I personally know I can’t stop at just eating one (maybe that’s the REESE-on they come in twos!) so it only made sense to cake up TWO giant peanut butter cups!
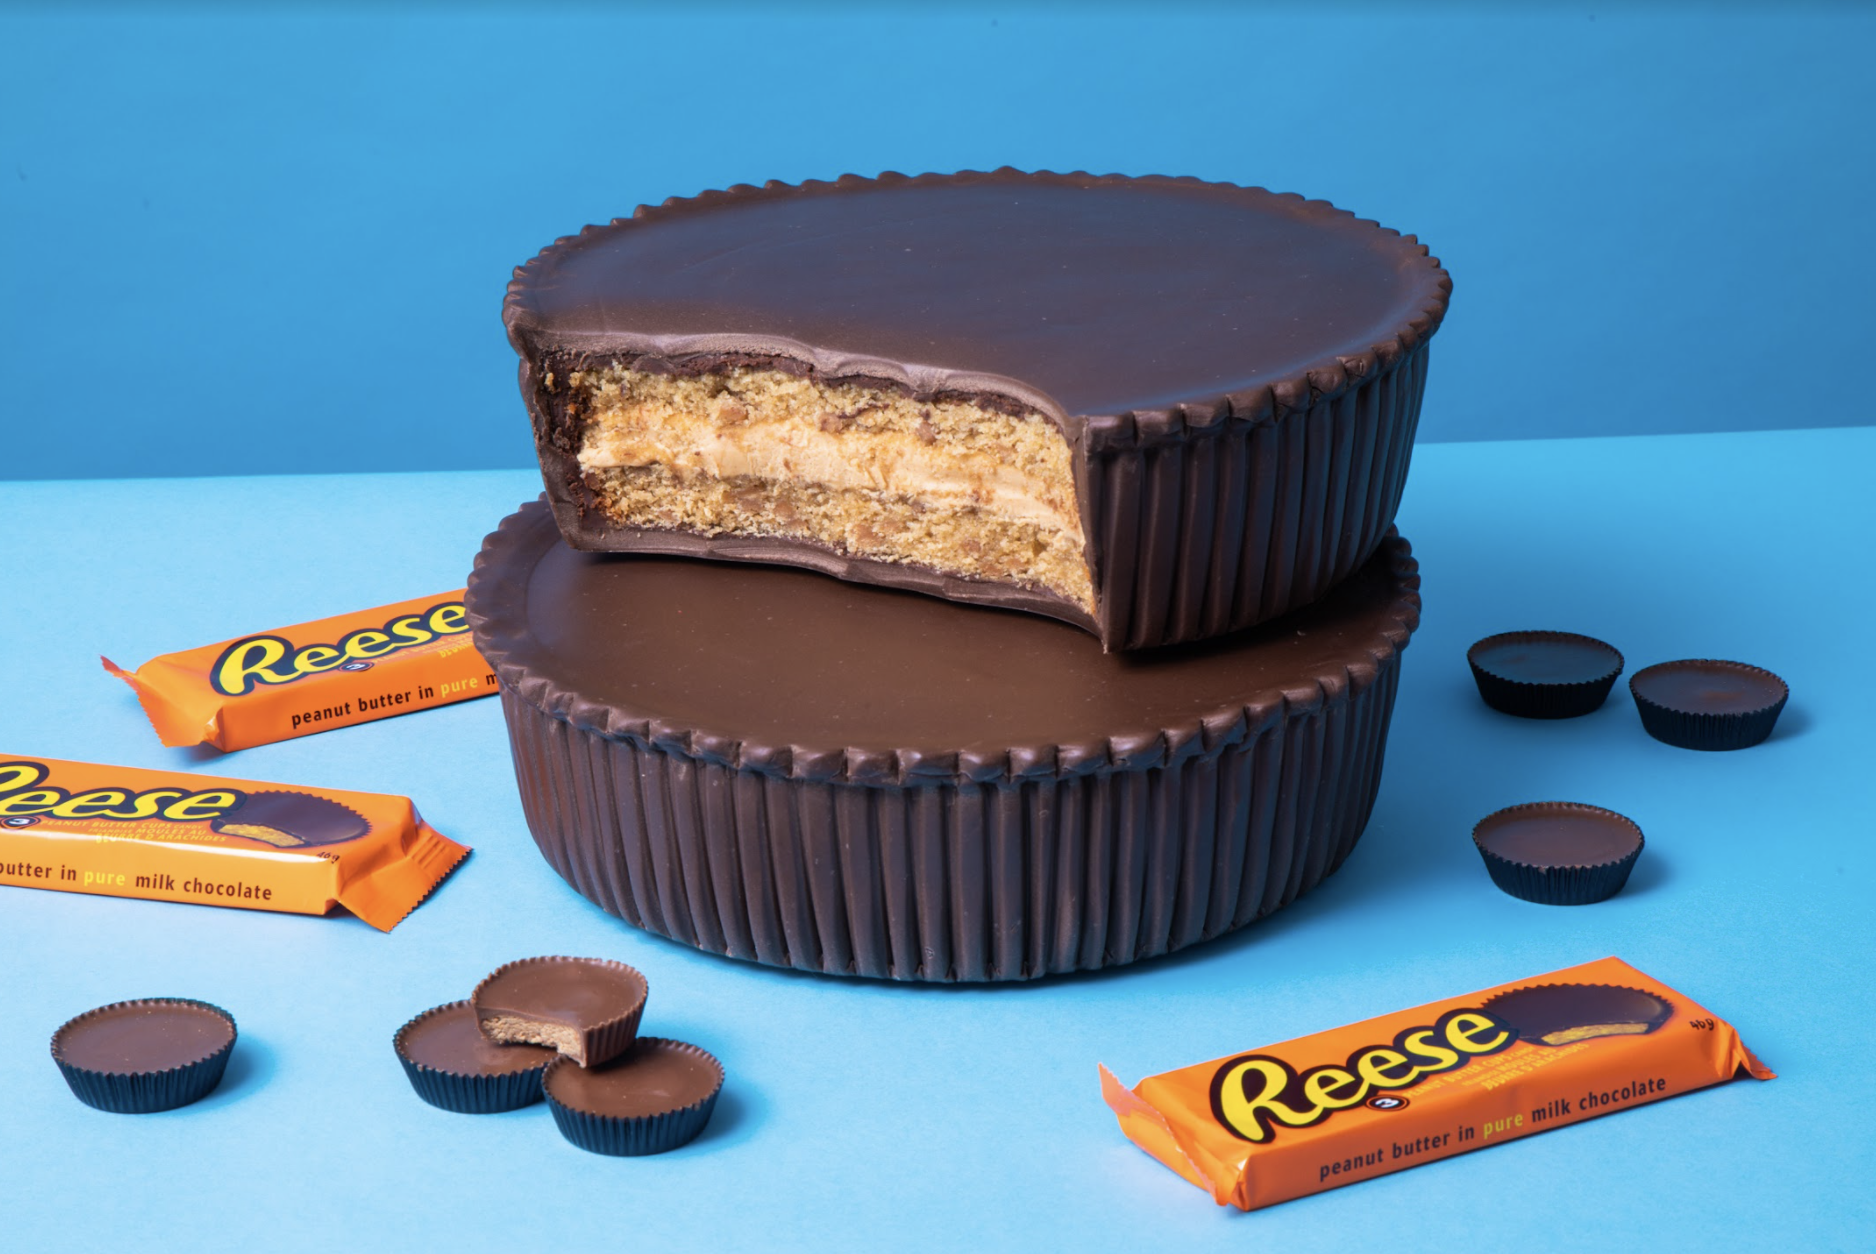
What comes to mind when you think of Reese’s Peanut Butter Cups? Peanut butter and chocolate, of course! To give the perfect amount of nutty-ness, my Giant Reese’s Peanut Butter Cups are made of Peanut Butter Cake - baked in fluted tart pans to give the classic peanut butter cup ridges, and are filled with peanut butter filling. They’re each then crumb coated in chocolate ganache and draped with a mix of modeling chocolate and chocolate fondant for a smooth chocolatey coating.


Ingredients
Cake
- 7lbs Peanut Butter Cake
- Peanut Butter Chips
Icing
- 1 batch of simple syrup
- 1 batch of chocolate ganache
- 3 cups peanut butter (smooth)
- 3 cups icing sugar
- ¾ cup unsalted butter
Decorations
- 3lbs dark modeling chocolate
- 3lbs chocolate fondant

Tools
- 2 x 9" round x 3" high fluted tart pans
- Parchment Paper
- Simple Syrup Bottle
- Fondant Smoother
- Scissors
- Large Serrated Knife
- Stand Mixer
 Gourmet Cake Slices with Yolanda Gampp
$29.99
Gourmet Cake Slices with Yolanda Gampp
$29.99


Read It!
-
Preheat your oven to 350 degrees Fahrenheit then line the bottoms of your cake pans with parchment paper and grease the sides as well. Prepare 7lbs of peanut butter cake batter than divide it equally between your two pans. Bake each for 1 hour and 15 minutes.
TIP: Let your cakes cool in their pans before removing.
-
Remove your cakes from their pans (use a blow torch if necessary). Level both cakes then remove the caramelization from the bottoms.
-
Use a large serrated knife to cut each cake into 2 layers.
-
Use Sir Squeeze A Lot to soak all four of your layers with simple syrup then let them sit for a couple minutes to fully absorb.
-
In a stand mixer, combine your smooth peanut butter, icing sugar, and unsalted butter together.
-
To assemble your cakes, we’re going to fill and stack them upside down - so place the larger layer on the bottom then fill it with a generous amount of peanut butter filling and top it with the second cake layer. Repeat for the second cake then chill them.
-
Crumb coat your cakes with chocolate ganache (don’t worry about the ridges - just fill them in and we’ll re-indent them later) then place the two cakes in the fridge to chill. Ice your cakes once again with more ganache including the bottoms of the cakes.
-
Knead your modeling chocolate and chocolate fondant together (50/50 ratio) then carefully flip your cakes over onto a silicone mat. Roll your modeling chocolate and fondant mix out into two sheets then cover the bottoms and sides of each cake. Smooth them out using a fondant smoother leaving some excess at the base.
NOTE: Be careful with how you handle the cake as it’s very easy to leave fingerprints.
-
To create the ridges around the peanut butter cup, use the edge of a ruler to press into the sides. Go all around each cake then trim away the excess fondant - leaving a ¼” lip.
-
Flip the cakes back right side up then use a ruler to further indent the lines.
-
Roll out more of your modelling chocolate and fondant mix large enough to cover the top of the cakes. Spread a thin layer of ganache on the top of the cake then brush the edges of the fondant sheets with water as well as on the excess lip from the previous step (this will allow the fondant/modelling chocolate to stick together). Drape the fondant onto each cake then smooth it out VERY carefully (even the fondant smoother will leave marks if pressed too hard). Trim the excess where it meets the fondant underneath then press the edges together.
-
Use a V-shaped petal of a flower cutter to mark along the edge created a zigzag formation. Use scissors to cut the pattern out then smooth it out and pinch the edges with your fingertips. Use a sculpting tool to define. Make sure you repeat the same steps on the second cake.
-
All that’s left to make these giant Reese’s Peanut Butter Cups perfect is to take a giant bite (or two) out of one cake to show the delicious insides!!!
Congratulations you did it!
