Rainbow Icebox Cookies with Marshmallow Buttercream


Collection , Collection--easy , Collection--other-recipes , Colorful , Colourful , Cookies , Easy , Easy baking , Easy cookie , Easy cookies , Easy recipe , Easy recipes , Jessica , Mini treat , Rainbow , Rainbow cookies , Sprinkle , Sprinkle service , Sprinkles , Tie dye , Tiedye , Turbo-legacy , Tyedye
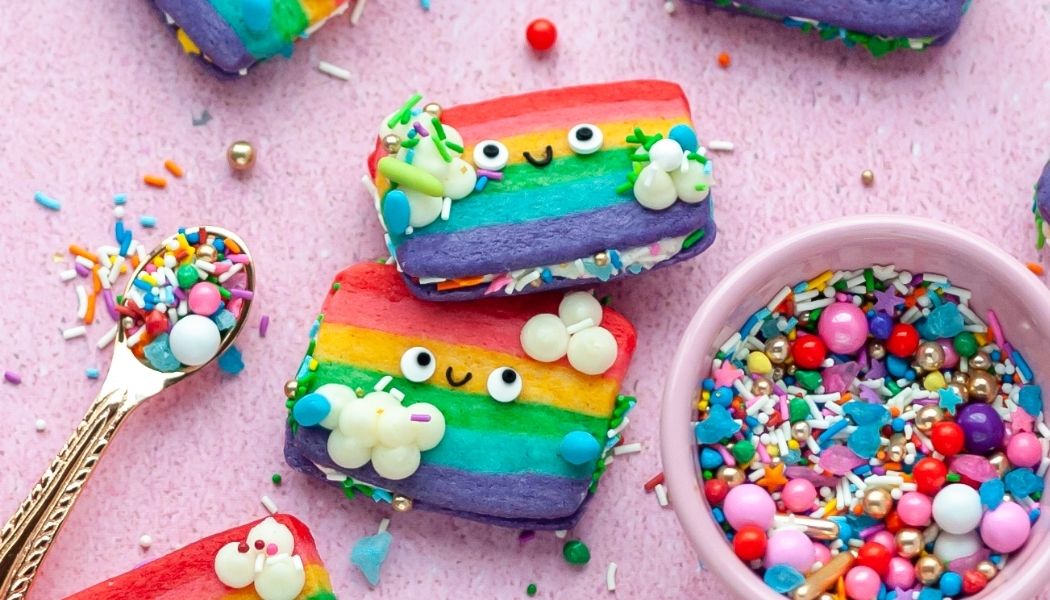
Sweet rainbows and fluffy clouds! You never know when you'll need a little colorful pick-me-up and this Rainbow Icebox Cookies recipe is the perfect solution!
Add some color to your day and try out these bold sugar cookies which we sandwiched with fluffy marshmallow buttercream and decorated with tons of yummy sprinkles!
Icebox cookies are designed to be refrigerated and ready-to-bake whenever you want! Make them now, freeze them, and bake when you need a sweet treat (your future self will thank you)!


Ingredients
Rainbow Sugar Cookies
- 4 ½ cups all-purpose flour
- 1 teaspoon baking powder
- ½ teaspoon salt
- 1 ½ cups unsalted butter, softened
- 1 ½ cups sugar
- 2 large eggs
- 1 tablespoon vanilla extract
- ½ teaspoon almond extract* (optional)
- Red, pink, yellow/orange, green, blue, and purple icing gel colors
Marshmallow Buttercream
- 1 cup unsalted butter, softened
- 1 7oz. jar marshmallow crème
- 2 cups powdered sugar
- 1 teaspoon vanilla extract
Decorations
- Pot of Gold and Lucky Charm sprinkle mixes
- Black royal icing or decorating icing
- Sprinkle eyes
- White fondant (optional)
- Marshmallow Buttercream


Read It!
-
This cookie dough works best when it’s kept very cold. If it starts to get too warm or sticky just pop it into the freezer for 5-10 minutes.
Gel food coloring is preferred here as you only need a little to achieve a saturated hue and it doesn’t add a lot of liquid to the dough.
-
In a medium size mixing bowl, whisk together the flour, baking powder, and salt. Set aside.
-
In the bowl of a stand mixer, use the paddle attachment to cream the butter and sugar on medium speed for 3 minutes.
-
Add the eggs and extracts to the butter mixture and mix on low until incorporated.
-
Add the flour to the wet ingredients and mix on the lowest speed just until the batter begins to come together into a dough.
-
Wrap the dough in plastic wrap and pop into the freezer for 5 minutes to firm up a bit before coloring.
-
Divide the dough into 6 even portions (you can use a food scale to help make the sections exact). Color each portion: red, pink, orange or yellow, green, blue, and purple. Wrap each colored section of dough in plastic wrap and chill them in the refrigerator for a minimum of 30 minutes.
-
Roll each color of dough out between 2 sheets of parchment paper into an 8 x 4 ¾” rectangle (you can cut a template out of parchment or kraft paper as a guide). Stack and transfer all of the rolled-out dough to the freezer for 15 minutes.
-
Line a 9 X 5” baking dish with parchment paper (you can make it fit tighter by cutting a line directly into each corner of the paper). Remove your chilled dough and add them one at a time to the baking pan pressing them down firmly. I went from red to purple, but you can go in any order you’d like.
-
Wrap the pan in plastic wrap and transfer back to the freezer for at least 90 minutes.
-
While the dough chills you can make the buttercream! Use a paddle attachment to cream the marshmallow and butter on medium until light and fluffy (about 3 minutes).
-
Slowly add the powdered sugar in (about a cup at a time) and mix on low until incorporated. Once all of the sugar is added mix on medium for 2 minutes.
-
Add the vanilla and mix again until thoroughly combined. Transfer to the refrigerator until ready to decorate and fill the cookies.
-
Preheat the oven to 350 °F. Remove your chilled dough and cut it in half lengthwise. Then cut ¼” inch thick rectangles from each half (you should get about 14 per half).
-
Arrange the cookies onto a parchment lined baking pan, about an inch apart, and transfer to the freezer for 15 minutes.
-
Bake for 9-12 minutes or until the edges are just starting to become crisp and golden.
-
Allow the cookies to cool for 5 minutes on the pan before transferring them to a wire rack to cool completely.
-
Transfer the buttercream to your prepared piping bag and pipe the filling onto 28 of the cookies. Add the top cookie and roll the edges in the sprinkle mixes.
-
Pipe dots onto the top of the cookie sandwiches to resemble clouds on the ends of a rainbow. Add sprinkles.
-
Use the royal icing to attach the sprinkle eyes and pipe the mouth in between. To add even more personality, I like to attach the sprinkle eyes with the blank side facing up so I can also pipe on my own eye shapes.
-
If you’d like, you can make arms using the fondant (color it with any of the gels from the dough). Simply roll little balls of the dough between your thumb and forefinger to form tiny cylinders. Attach, and enjoy your cute and colorful cookies!!
Congratulations you did it!
