Star Wars Porg Cake


Baking , Baking chart , Buttercream , Cake , Cake batters , Cake recipes , Chocolate , Chocolate ganache , Collection--novelty-cake-recipes , Fondant , Food , George lucas , Hans solo , Holidays , Hollywood , Icing , Luke skywalker , Movie characters , Movies , Novelty cakes , Obi-wan kenobi , Porg , Porg star war , Princess lea , Recipes-export , Simple syrup , Simple syrup bottle , Star wars , The last jedi , Vanilla , Yoda

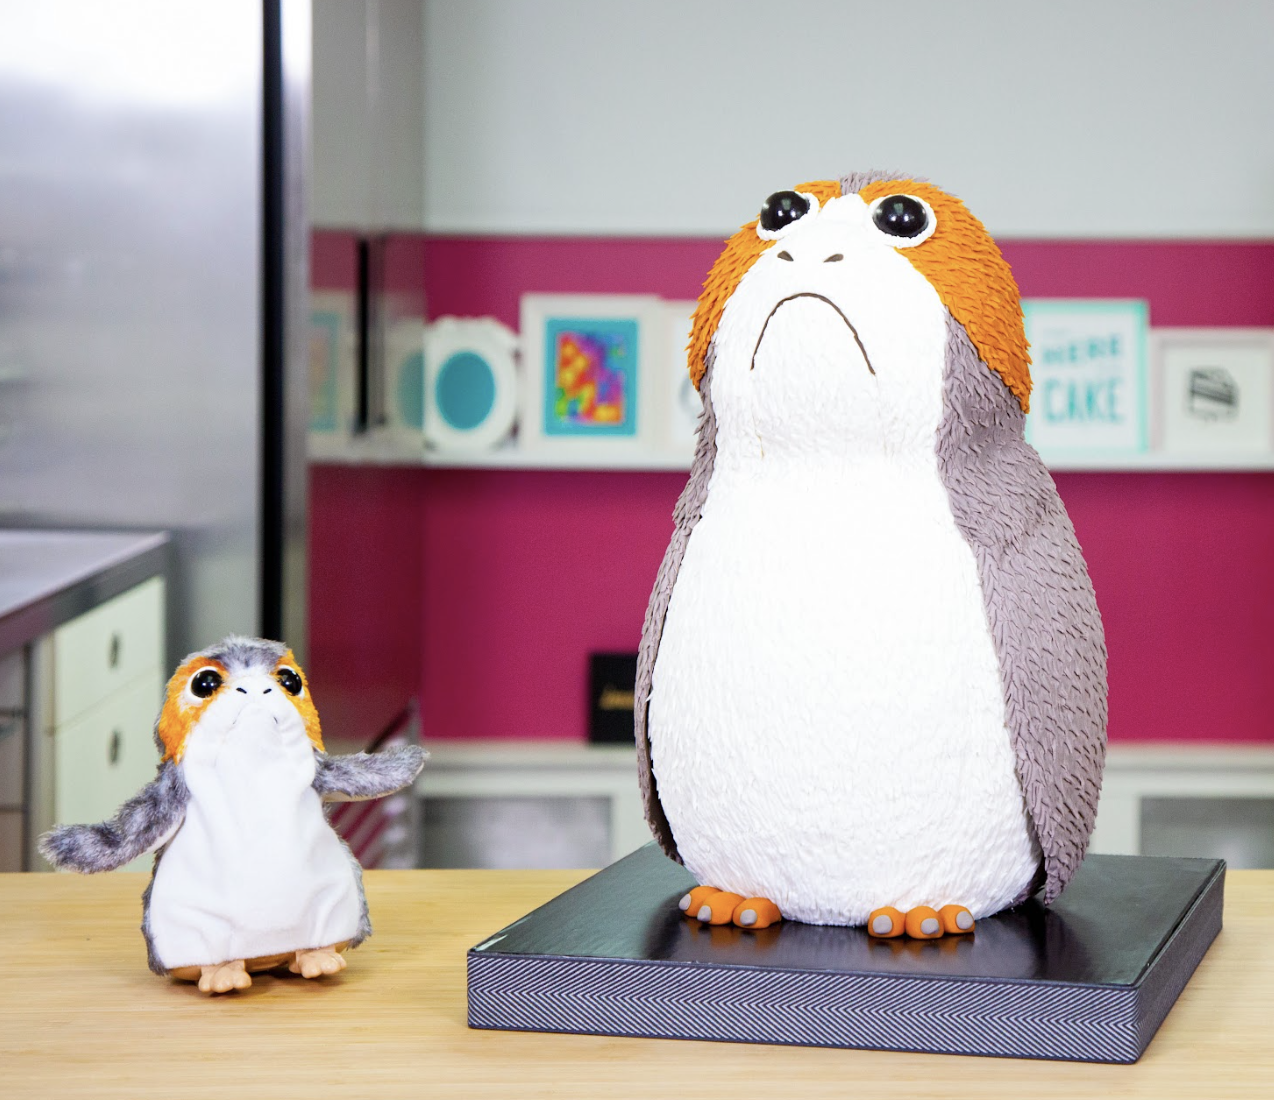
May The Cake Be With You! With the release of the movie Star Wars: The Last Jedi, I wanted to make a cake that would REALLY get my friends & family excited. And, what better way to say “May the CAKE be with you” than with Star Wars’ newest addition to the team? YoYo’s - meet Porg. He’s fluffy on the outside and sweet on the inside... just like the perfect CAKE!
To make my Star Wars Porg Cake, I baked 21lbs of Ultimate Chocolate & Vanilla Cake, iced each layer with Italian Meringue buttercream, and decorated it all with Rice Krispie treats and SWEET fondant fur details. This cake is truly outta this WORLD!


Ingredients
Cake
- 10.5lb portion of Yo's Ultimate Chocolate Cake
- 10.5lb portion of Yo's Ultimate Vanilla Cake
- Rice Krispies Mixture
Decorations
- 1 1/2 lbs Gumpaste
- 2 lbs White Fondant
- 3lbs Grey Fondant
- 1/2lb Orange Fondant
- 1 Tbsp Black Fondant
- Chocolate Ganache
- Clear Piping Gel

Tools
- 2 x 10” Round Cake Pan
- 2 x 9” Round Cake Pan
- 2 x 8” Round Cake Pan
- Sir Squeeze A Lot Bottle
- Sharp Paring Knife
- Rubber Spatula
- Small Straight Spatula
- Small Offset Spatula
- Brushes
- Piping Bag
- Ruler
- Sculpting Tool
- Cake Board


Read It!
-
Prepare 10.5 lbs of Yo’s Ultimate Vanilla Cake. Pour batter into 1 x 8”, 1 x 9” and 1 x 10” round pans. Bake at 350 degrees for 1 hour and 30 minutes each, or until a toothpick comes out clean. Cool cakes entirely in their pans sitting on a wire rack.
-
Prepare 10.5 lbs of Yo’s Ultimate Chocolate Cake. Pour batter into 1 x 8”, 1 x 9” and 1 x 10” round pans. Bake at 350 degrees for 1 hour and 30 minutes each, or until a toothpick comes out clean. Cool cakes entirely in their pans sitting on a wire rack
-
Prepare Italian Meringue Buttercream. Once the buttercream is prepared, put the bowl aside to set at room temperature
-
Prepare simple syrup and set it aside at room temperature
-
Once the chocolate and vanilla cakes are completely cool, remove them from their pans. Remove caramelization from the bottoms. Set aside. Level the smallest chocolate and vanilla cake to create two layers.
-
Create the bottom of Porg by stacking 1x 10”, 1x9” and 1x8” cakes with Italian Meringue buttercream and alternating between chocolate and vanilla. Create the torso by stacking 1x10”, 1x9” and the remaining 8” cakes with Italian Meringue buttercream and alternating between chocolate and vanilla. If you would like to see how I do this please watch the video here.
-
To carve the bottom of this cake, flip the base so that the smaller end is at the top. Shave down the sides to smooth out the edges. The cake should look like an upside down bowl.
Carve the taller cake which will make Porg’s torso so that it is narrower at the top and wider at the bottom. If you want to see what this looks like take a look at the video here.
-
Stack the two cakes so that the base has the wider end facing up. Add dowels to the base in a circular fashion. Attach a circular board with a layer of ganache on top and on the bottom. Then stack the torso so that the wider end is facing down. Add dowels to the torso in a circular fashion.
-
Melt marshmallows and rice krispies and sculpt mixture into the shape of Porgs head making sure the diameter matches the diameter of the top of the cake. Attach a circular board by adding ganache to both sides and placing it on the top of the torso. Place the rice krispies head on top of the board.
-
Ice this cake with Italian Meringue Buttercream and then place it back in the refrigerator to chill.
-
Secure the entire cake by inserting a dowel from the top of Porg’s head to to the very bottom of the cake.
-
Now we’re going to cover Porg in fondant and create the furry texture. It’s best to add the fondant and create the fur texture in sections while the fondant is still soft. Do not put it in the refrigerator during this process. Start by rolling out white fondant for the front. Use a template to create the shape. Use a sculpting tool to create the texture of the fur. Use a pair of manicure scissors to cut into the fondant and give the fur a 3 dimensional look. Cover the back with grey fondant and repeat texturizing technique.
For more direction on how to create Porg’s fur you can watch this week’s video here.
-
Add grey colour to some gum paste. Roll out the gum paste and cut it into the shape of wings using a template. Use a sculpting tool and manicure scissors to create fur texture. Glue the wings on to Porg’s body with royal icing. Remember to move quickly when using gum paste.
-
Roll rust coloured fondant into 6 cords. Create Porg’s feet by pressing three of the fondant “cords” together to create toes. Attach to the cake with clear piping gel.
-
Create toenails by rolling out grey fondant into a thin cord and cutting it into 6 small pieces. Roll the small grey balls of fondant into the shape of toenails and attach them to the feet with a bit of clear piping gel.
-
Use a circle cutter to shorten Porg’s toes. Then use the circle cutter again to add notches into the toes for texture. Attach the feet to Porg’s body with a bit clear piping gel.
-
Roll out rust coloured fondant and use a template to cut 2 almond shaped pieces. Add to either side of Porg’s face by brushing on a light layer of clear piping gel and texturize with a veining tool.
For more direction on how to create Porg’s face you can watch this week’s video here.
-
Accentuate Porg’s nose by inserting dark brown fondant into his nostrils. Then, roll out a thin piece of dark brown fondant and place in the shape of an upside down “U” below Porg’s nose.
-
Create Porg’s eyes by filling a round measuring spoon with black fondant. Chill it and then tap it out of the spoon. Secure the eyes on Porg’s face using half a toothpick on either side of his nose. Paint the eyes with clear piping gel to make them shiny. Roll two thin pieces of white fondant and texturize it using white the manicure scissors. Place a piece of the textured fondant around each eye. And now, our Star Wars Porg Cake is complete and true to form!
Congratulations you did it!
