Lobster


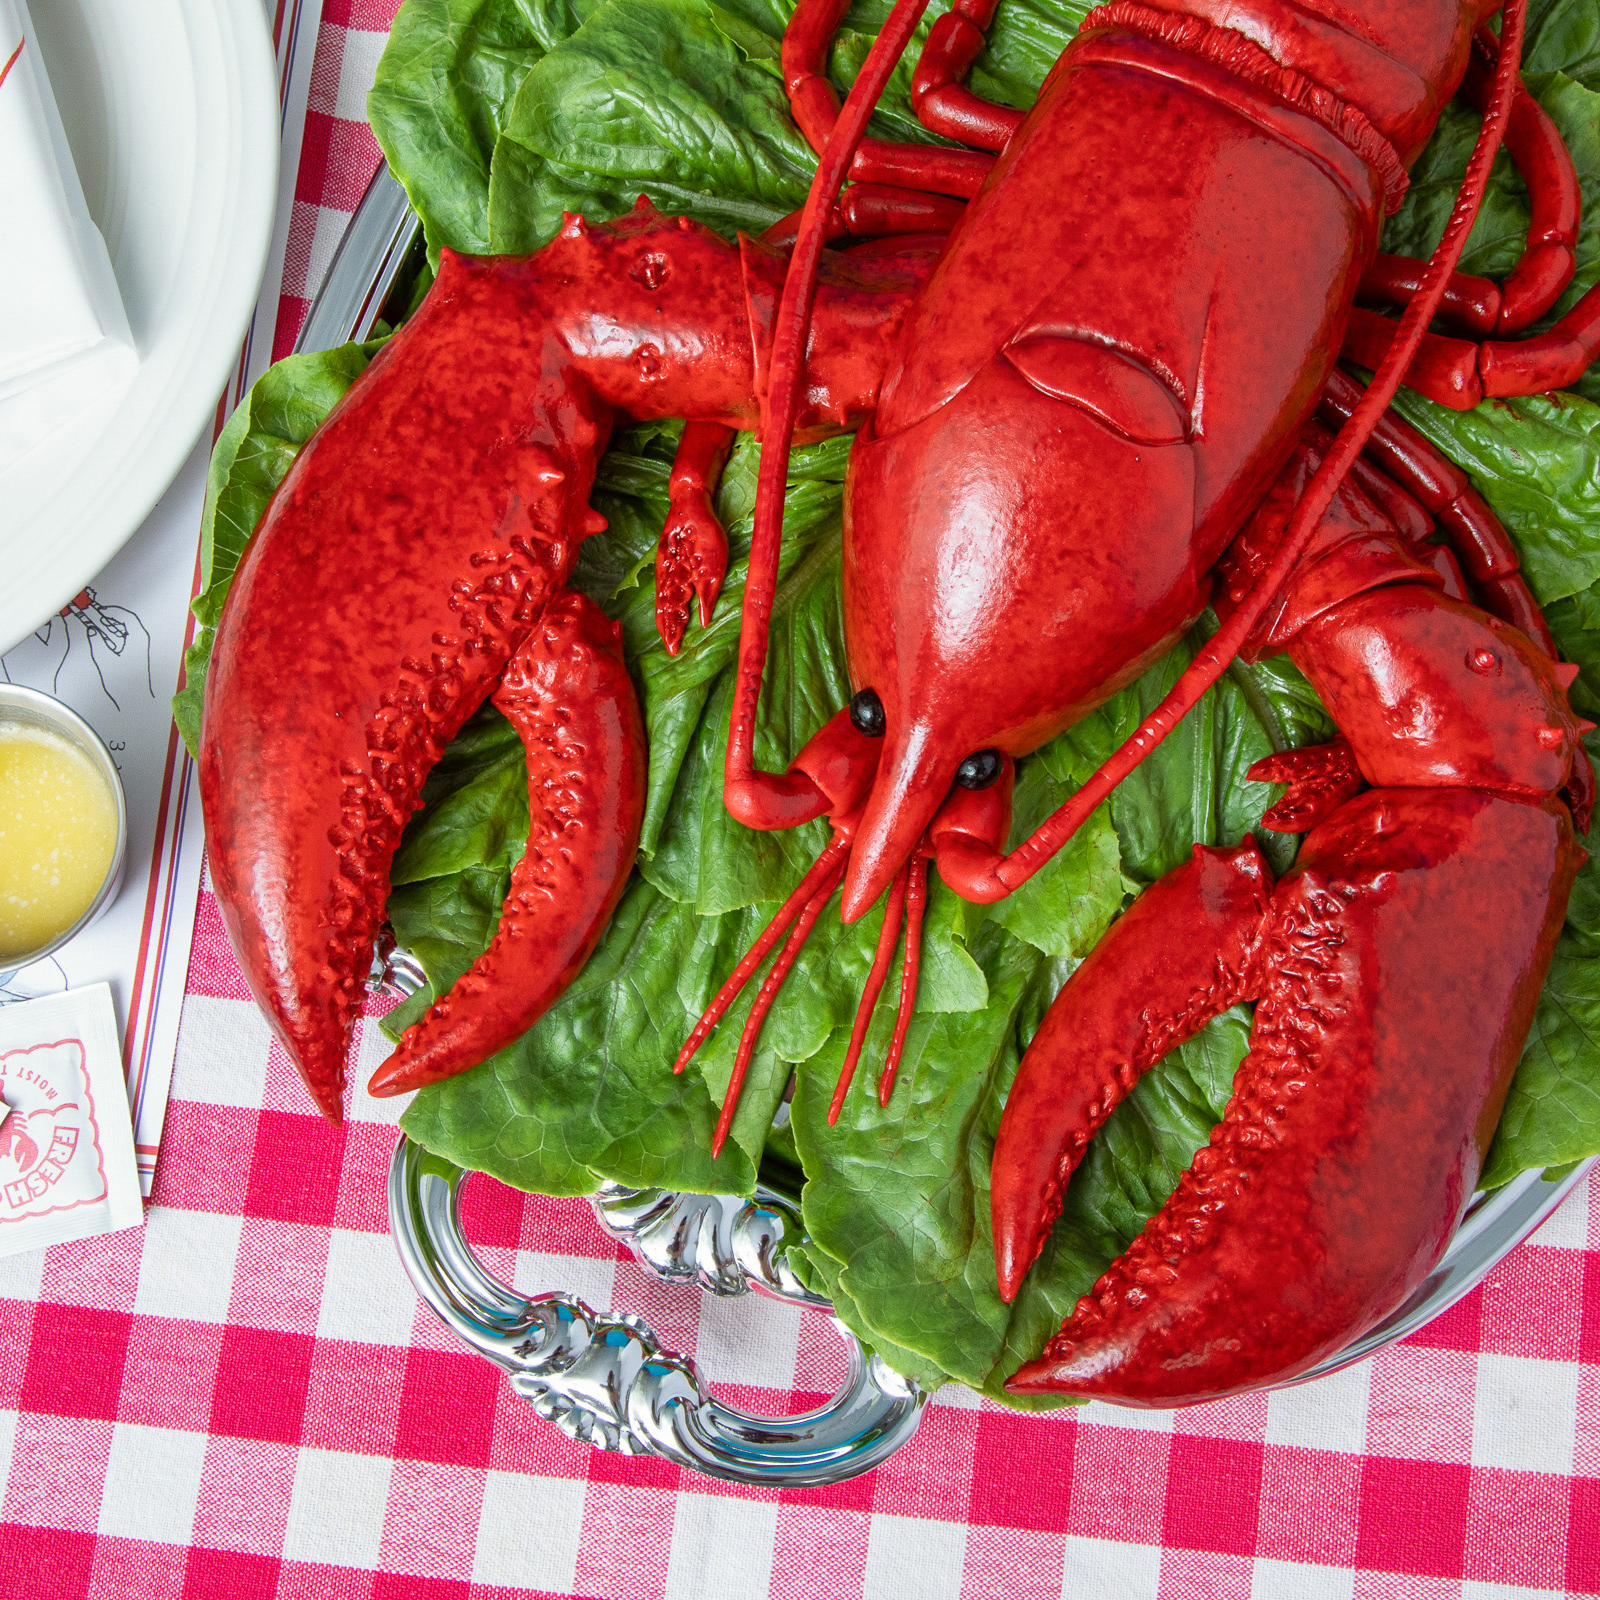
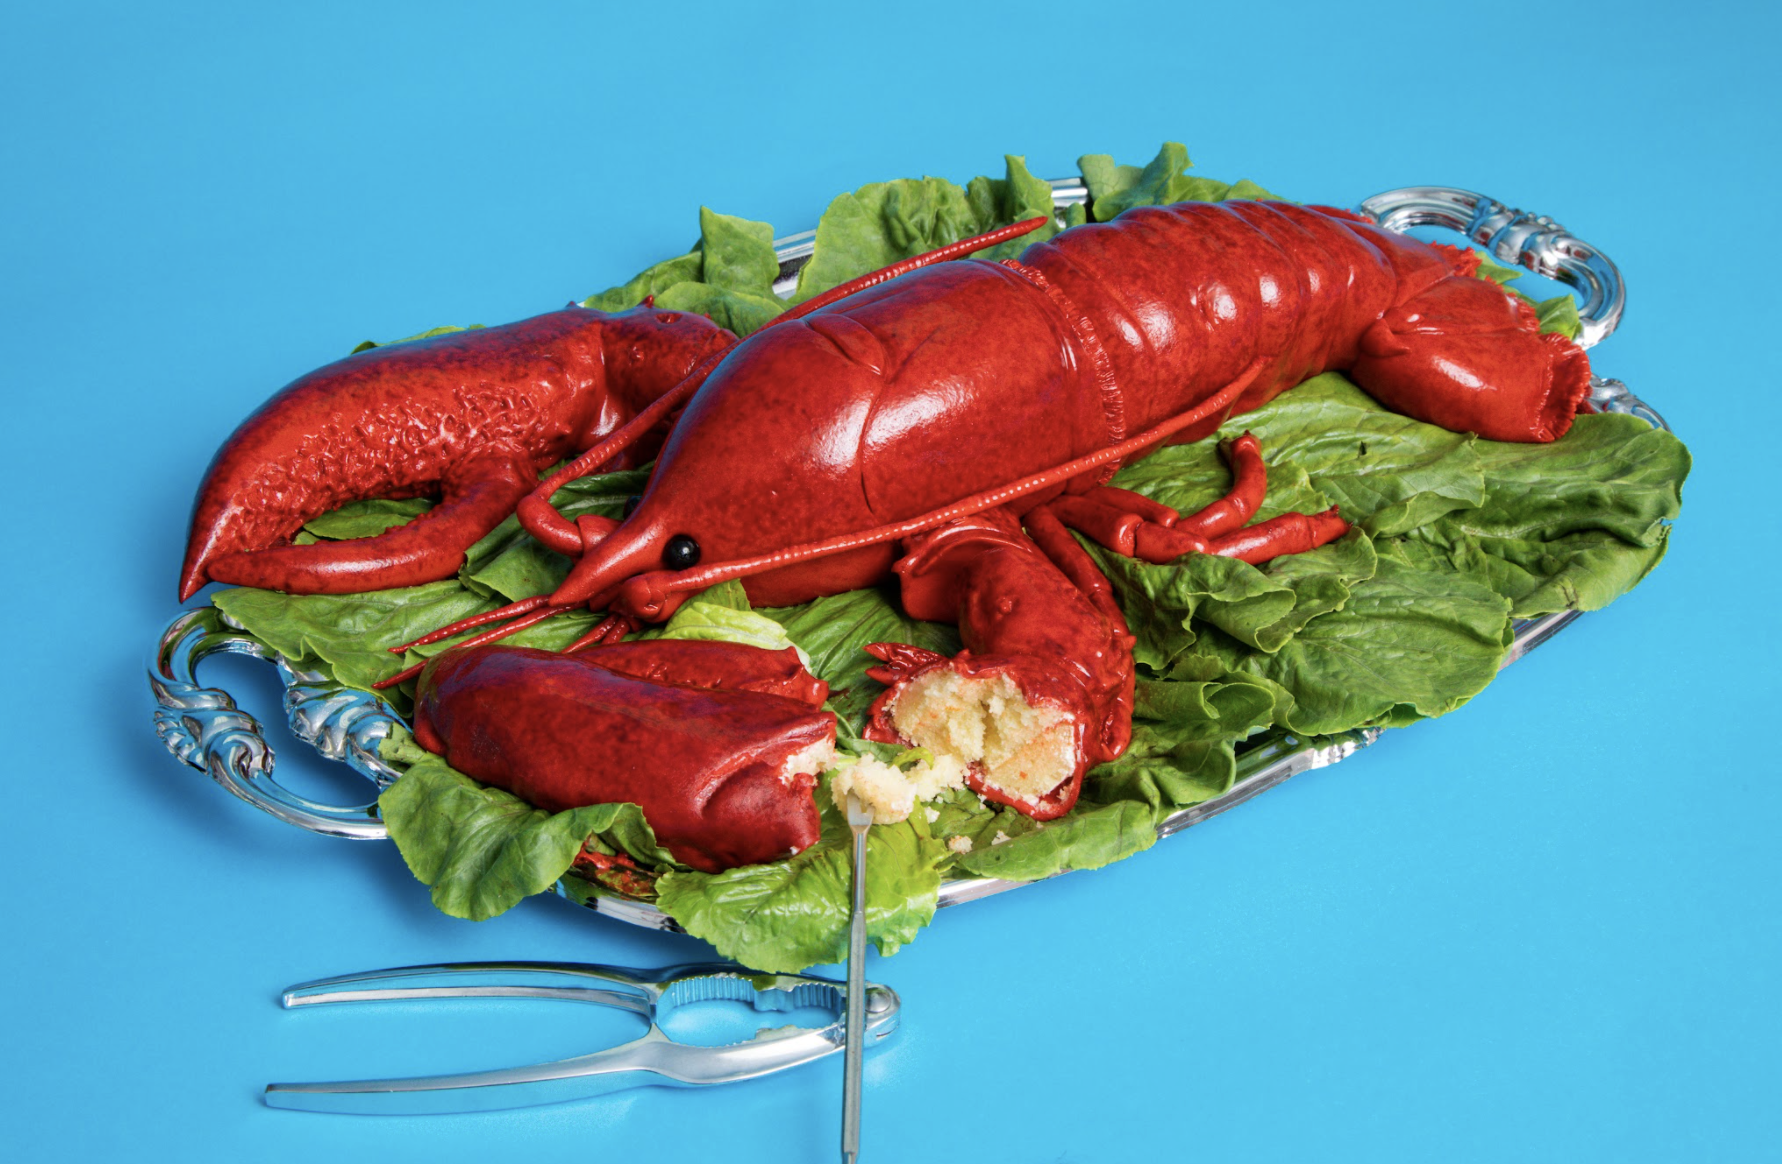
You’re My Lobster! This cake is being served on a silver platter – literally. Lobster is a very popular dish – and is definitely up there as one of my favourite treat dinners so why not cake it up!
To make my lobster cake, I began by making 10lbs of my Ultimate Vanilla Cake then filled each layer with a sweet Italian Meringue Buttercream. The entire cake is coated in bright red fondant with moulded out extremities as well a top layer of orange and copper paint giving it an extra realistic touch.


Ingredients
Cake
- 10lbs Yo’s Ultimate Vanilla Cake
Icing
- 1 batch of Simple Syrup
- 1 batch of Yo’s Italian Meringue Buttercream
Decorations
- 2.5lbs red fondant
- ½ oz black gumpaste
- Orange gel food coloring
- Copper gel food coloring
- Black gel food coloring

Tools
- 12 x 18" rectangular cake pan
- Simple Syrup Squeeze Bottle
- Parchment Paper
- Vein tool
- Ball tool
- Ribbed rolling pin
- Floral wire (18 and 24 gauge)
- Manicure scissors
- Tweezers
 Gourmet Cake Slices with Yolanda Gampp
$29.99
Gourmet Cake Slices with Yolanda Gampp
$29.99


Read It!
-
To make this lobster cake, begin by making 10lbs of my Ultimate Vanilla Cake. Pour all of your batter into an 12x18” rectangular pan lined with parchment paper then bake for 1 hour and 35 minutes at 350 degrees Fahrenheit.
-
Remove your cake from the pan then level it and remove the caramelization from all of the sides.
-
Cut your cake in half lengthwise then stack your two halves on top of one another.
NOTE: I realized I hadn’t levelled my cakes enough, so I re-levelled each half so do so if you think necessary.
-
Using a template, begin carving away each section of your cake (from the two stacked layers) to create the head/torso, claws, and tail.
-
Once you have carved the general shapes from the templates out of the cake, use a small serrated knife to round out all the edges. For the tail, taper it out so that the outer end is flatter than the inner and carve out small ridges down the spine of the tail for extra details. For the claws, follow the template as closely as possible to create the claw and arm part of the lobster.
TIP: Use photos of actual lobsters for better reference
-
Remove the top layers from the body and tail then using Sir Squeeze-A-Lot, soak all of your separate layers in simple syrup then let them sit for a couple of minutes to absorb.
-
Fill and stack all of your layers back accordingly with Italian Meringue Buttercream.
-
Using some more IMBC, crumb coat all of your lobster parts then lets them sit in the fridge to chill until firm.
-
Remove your cake parts from the fridge and ice them once again using some more IMBC. Once you have coated each piece, place them back in the fridge to chill.
-
Roll out some red fondant and begin draping it over each piece individually. To make it easier, cover the lower portion of the tail with one piece then cut strips of fondant to drape over the rest of the tail. Allow them to overlap then use a small paring knife to trim away the excess.
TIP: Use a veining tool to define the details in the tail some more – especially over the ridges.
-
Using some more red fondant, cover the lobster’s head with one piece then make sure to trim away the excess.
-
Roll out some more fondant to cover more claws then cut it in half. Drape it over one claw at a time then to make the fondant wrap around the whole claw, flip it over gently onto a sponge and tuck it under and cut away the excess making a seam along the centre.
NOTE: Don’t let your claw sit on the sponge too long or else it’ll start to break as it reaches room temperature.
-
To add more detail and dimension to the lobster cake, roll out some more red fondant. The lobster’s tail is divided into “petals” so cut your fondant into the same petals and cover each one and let them overlap. On the two outer petals, drag a paring knife across it to create a slash on each one. Next, use manicure scissors on the bottom of each petal to create a fibrous look.
-
Use photos of lobsters as reference then take a sculpting tool to create various indents around the tail.
-
Roll out some thick red fondant and add it to the head of your lobster. This extra layer of fondant will be used to create the front point on the face. Following an image as guide, cut out the edge of the lobster face then form the pointed end. To support the hollow pointed end, insert a lollipop stick carefully into the front of the cake so that the extra point is resting on top of the stick. Once the peak is secure, trim away the excess at the bottom of the lobster.
-
Lobsters have sort of thorn like bumps around the bases of their claws so use tweezers to grab and pull spots of fondant then use your fingers to shape them into little thorns. Do this only around the base where the claw would meet the rest of the body.
-
For the actual claws, use the tweezers again to pinch the fondant, creating a bumpy pattern on the bottom side of the claw.
-
The rest of the cake will be sculpted out just out of fondant so to make the remaining fondant sturdier, add some CMC to it and mix it in.
-
To make the bottom half of the claw, mould the shape out of fondant then use the tweezers again to match the same bumps you created on the other half. Use your sculpting tool as an assistant to attach the bottom claw to the rest of the claw and blend it so that it looks seamless.
-
Roll out some more red fondant into a thicker tube then cut it in half creating two equal parts. Cut it into smaller tubes if necessary, then add them to the ends of each claw and attach them to the body. Mould them with your fingers so that they look more natural and add some pinching as well to create the lobster thorns. Use the sculpting tool to create extra details according to the images.
-
Roll a piece of fondant into a flattened ball and cut it into 8 pie slices to make 8 equal parts. Roll one piece of the fondant into a tube then use a cell stick to create indents where all the joints on the legs are. Once you create the indent, roll it out with your fingers so that one side of the indent is thinner than the other then push it up against the other to create a lobster joint. At the end, flatten the end out then use mini scissors to cut it into half creating a mini claw. Use the same scissors to pinch the ends to roughen up the ends of the mini claw just like the larger ones. Repeat this step 7 more times creating 8 legs with mini claws at the ends!
-
Roll out a sheet of fondant then brush on some clear piping gel over the base of the torso and place the sheet of fondant on it. To cut a clean edge, place a circle cutter underneath it and trim it.
NOTE: If you are missing a piece of the tail like I was, add an extra layer of fondant now to create an extra overlap.
-
At the base of the extra sheet of fondant you added in the previous step, use your manicure scissors to create the same fringe sort of pattern.
-
Lobsters have two long antennas as well as four shorter ones. Starting with the two longer ones, roll out a tube of fondant then cut it in half so that you have two equal pieces. Roll them out super thin then cut them in half down along the spine and insert thick floral wire and mould it back to the wire. Use a ribbed rolling pin to add texture to your antennas. At the base of your antennas, add a little thicker tube of fondant so that there is a base to attach the antennas to the body with. For the four smaller antennas, repeat the same steps but with smaller pieces of fondant and thinner floral wire. Because these antennas are thinner, it’s easier to just feed the wire through the tube rather than cut it so carefully do so then roll it in between your fingers. Make sure you use the ribbed rolling pin for these as well then use the base fondant to attach two together.
TIP: Lobster antennas are not perfect so don’t worry if yours aren’t even.
-
Roll a teeny bit of black gumpaste out to create the lobster eyes.
-
Using orange gel food colouring, paint the entire surface of the lobster except for the eyeballs. To add a speckle pattern to the lobster, use some copper gel food colouring and a makeup brush to speckle all over the cake. Continue this until you are satisfied with the pattern. Lastly, use some black gel food colouring to paint the lobster eyes.
-
Lay the main body of the lobster down first then attach the mini claws. Next, add the larger claws and once those are in place, complete the lobster by adding in the antennas and the eyes.
Congratulations you did it!
