Ladybug Cake


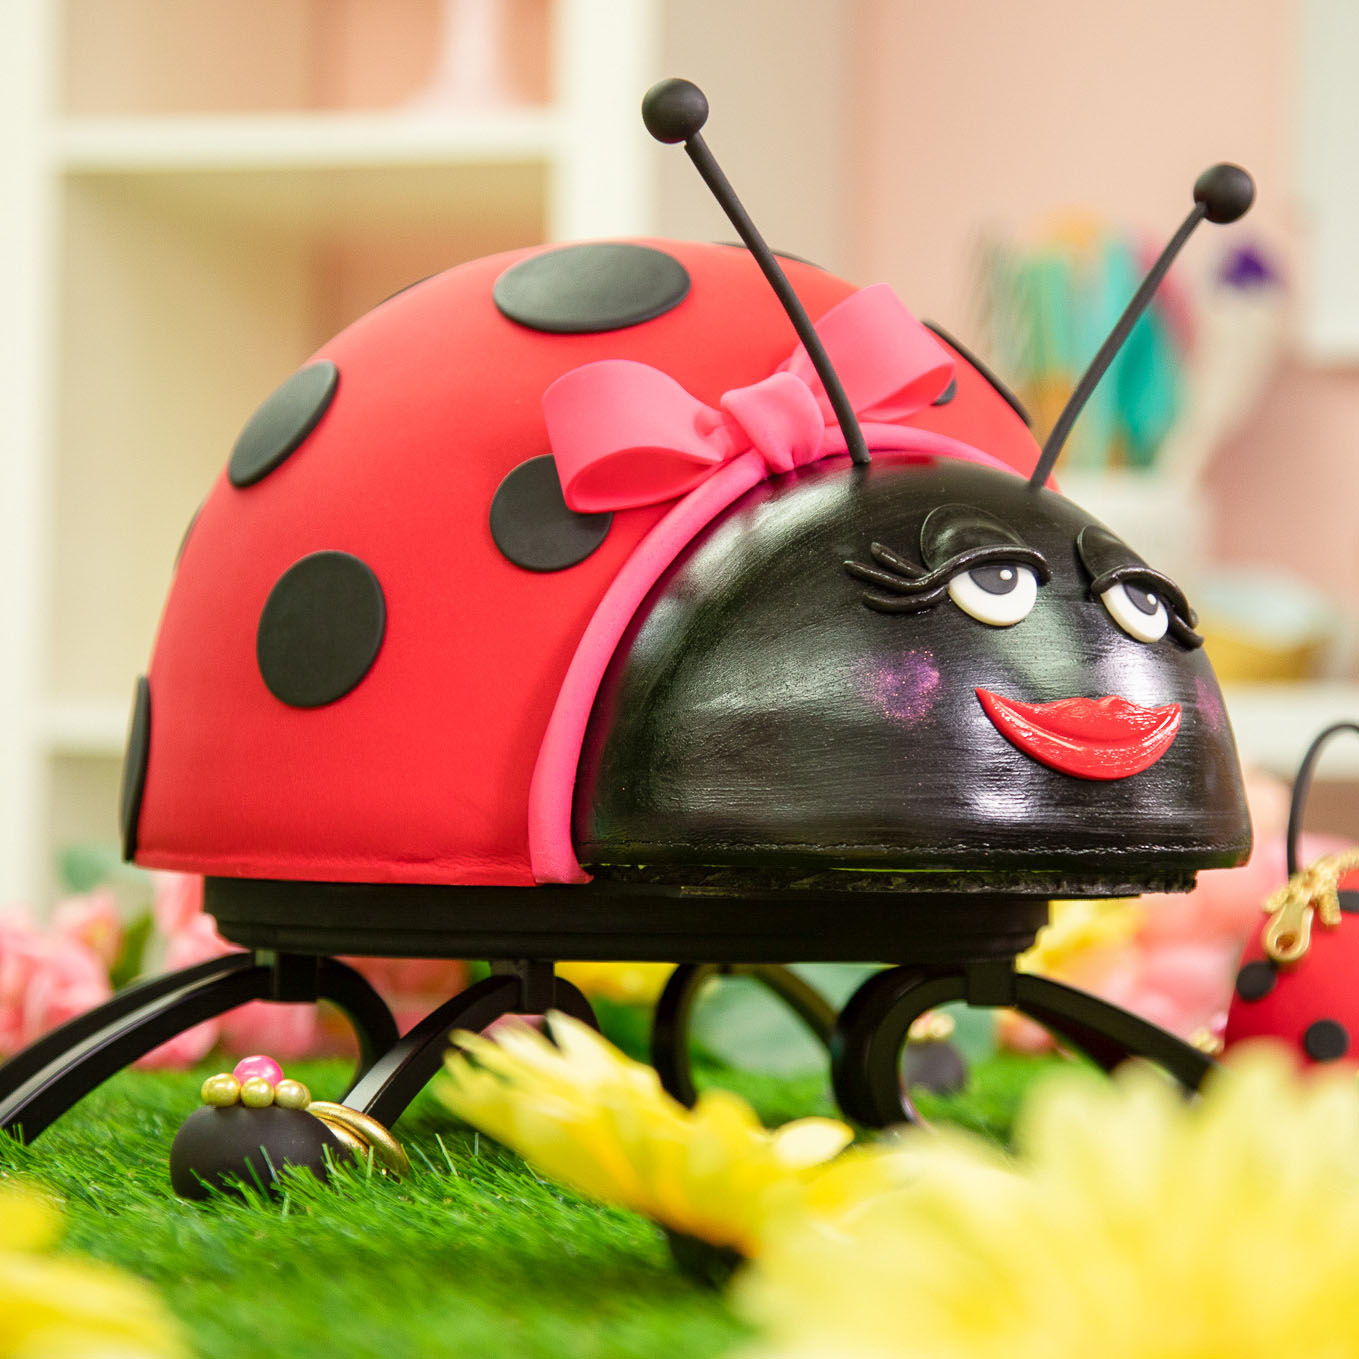
This cake is a REAL Lady. This week’s Ladybug Cake is not your average insect! She’s a REAL LADY, complete with attitude and handbag too! She’s got her heels and anklets on… this lady is ready for spring and thanks to the Watermelon Cake Pan, this lady’s perfect!
Starting with 4.5lbs of my Ultimate Vanilla Cake dyed red and 4.5lbs of my Ultimate Chocolate Cake dyed black, I’m taking this ladybug cake seriously and caking up a real LADY! I’m stacking this cake up with Italian Meringue Buttercream and finishing it off with some red and black fondant and some gorgeous accessories that are perfect for this ladybug!


Ingredients
Cake
- 4.5lbs Ultimate Vanilla Cake dyed red
- 4.5lbs Ultimate Chocolate Cake dyed black
Icing
- Simple Syrup
- Yo’s Famous Italian Meringue Buttercream
Decorations
- Red food coloring
- Black food coloring
- 3lb Red Fondant
- 3.5lb Black Fondant
- 1oz yellow gumpaste
- Zipper mold
- Gold dragees
- Pink dragees
- Clear Food grade alcohol
- White fondant
- Clear piping gel
- Hot pink fondant
- Gold lustre dust
- Pink lustre dust

Tools
- 9” Sphere ½ Cake Pan
- 9" Circular Cake Pan
- 8” Sphere ½ Cake Pan
- 4” Sphere ½ Cake Pan
- Simple Syrup Squeeze Bottle
- Ruler
- Small Serrated Knife
- Small Straight & Offset Spatula
- Large Straight & Offset Spatula
- Parchment paper
- Small Paring Knife
- Protractor
- Black Foam Board
- Paintbrush
- Pizza Pan
- Oval Cutter
- Circle Cutter
- Piping tip #805
- Piping tip #4
- Piping tip #807
- Piping tip #809
- Zipper mold
- Small paintbrush
- Ball tool
- Floral wire
- Paper towel
- Black spray paint
- 8" circular wood plate
- 6x coat hooks
- Fondant smoother
- Bench scraper
- 8" circular wood plate
 Gourmet Cake Slices with Yolanda Gampp
$29.99
Gourmet Cake Slices with Yolanda Gampp
$29.99


Read It!
-
Prepare all 4.5lbs of Ultimate Vanilla Cake dyed red and 4.5lbs of Ultimate Chocolate Cake dyed black. Dollop 6lbs of batter, alternating vanilla and chocolate to the 9” ½ sphere pan, 2.5lbs in the 9” circular cake pan and 0.5lbs in the 4” sphere pan. Bake at 350 degrees Fahrenheit for 2 hours for the 9” ½ sphere pan, 1 hour and 10 minutes for the 9” circular pan and 45 minutes for the 4” ½ sphere pan.
-
Use a serrated knife and level your 9” and 4” ½ cake spheres in the pan using the top of the pan as a guide. Level your 9” circular cake as well so you’re left with a 1” layer and cut the top layer in half showing 2 half moons.
-
Cut ¾” off the bottom of the 9” ½ sphere and layer into thirds. Place the cake on top of the 1” layer of your 9” cake to create a hump.
-
Using the half moon shapes cut from step 2, use them to build the head. Stack the half moons to create head and carve out the back of the cakes with an 8” sphere pan to fit to her body. Make sure her head is proportional!
Tip: Check out the video to make sure you’re on the right track!
-
Using the small 4” sphere pan, place a protractor onto the flat surface of the cake and slice perpendicular to the flat edge of the protractor. Cut the bottom of the cake thinner.
-
Use Sir Squeeze-A-Lot to soak all of your cake layers with Simple Syrup.
-
Fill and stack the 9” sphere and head using IMBC.
-
Crumb coat all your cakes with a thin layer of buttercream, and chill for 20 minutes or until firm.
-
Remove your cakes from the fridge and place on a black foam board and apply another layer of Italian Meringue Buttercream onto the cake. Create a smooth layer to get ready for decorating by using a bench scraper! Chill for another 20 minutes to firm up. Repeat for the ladybug’s head and handbag.
-
Roll out your black fondant to a thickness of ⅛” and place on top of your 9” sphere cake trim, smooth out with a fondant smoother and trim the excess. Repeat for her face.
Tip: Make sure your fondant is slightly larger than your cake and when you place it on your cake, quickly smooth it!
-
Roll out your red fondant to a thickness of ⅛” and cover the flat part of the 4” sphere (back of the handbag) flatten with a fondant smoother and trim the excess. Roll out another piece of red fondant and place onto the domed part of the cake and trim the excess.
-
If your fondant had wrinkling (due to dryness or breakage), mix the same colour fondant with a bit of clear food grade alcohol to create a paste and use a small spatula to ice and apply directly onto the fondant to hide any seams or wrinkles.
-
Mix black food colouring with some clear food grade alcohol and paint the entire body and face.
-
Attach the body together with the head and place both cakes on a foam board resembling the number “8” but with a smaller top to reflect the size of the cakes. You may need to carve out the back of the face to fit perfectly to the body.
Note: If you need to trim the fondant from the back of the face, you can do so in this step.
-
For the ladybug’s wings roll out some red fondant. In order to create a curve in the wings, lay a pizza pan on top and cut out the shape. Then, wet the surface of the black fondant with a paintbrush and drape one side of the ladybug with the red fondant to create her wings while making sure you leave an opening at the back so you see a bit of black underneath. Trim at the bottom and the back of her head. Repeat on the other side.
Note: Near the back of the ladybug’s head, the red wings should be close together. As they get farther away from her head, the red wings should be farther apart to give the illusion that her wings are open.
-
Roll some white, black and red fondant and cut out her facial features. Use the oval cutter to cut 2 oval eyes from the white fondant, 2 oval eyelids from the black fondant and use a round tip in #805 for her black pupils with a round tip in #4 for the white catchlight. From the oval eyelids, use an oval cutter and cut a portion away to create a half-opened eye effect.
-
Using a template, cut out this lady’s lips to your preference using a small sharp paring knife and use a circle cutter to gently indent the center of the lips to create a mouth.
-
If your fondant is a bit dry again, mix black food colouring with some clear food grade alcohol and moisturize like a lady! Apply the mixture onto the face of the ladybug and apply her facial features while still wet. Paint her eyelids to create a seamless finish.
-
Using 3 different sized circle cutters, cut out different spots of black fondant for the ladybug’s wings. Using a small paintbrush and piping gel, glue these spots to her wings in a random pattern.
-
Roll a thin cord of black fondant for her eyelashes and glue onto her eyelids with piping gel.
-
Roll black fondant into a slight teardrop shape and since the cake will be on a stand, using the coat hook “legs”, indent into the thinner part of each shoe where it will rest.
-
Using a ball tool, make a slight indent into the center of the shoe and using piping gel, glue a pink dragee into the indent. Create indentations around the pink dragee for smaller gold dragees and glue using piping gel.
-
Roll out hot pink fondant and cut into 2 bands using a small paring knife. Fold in both of the long sides to the center and attach to the cake around her neck. To create the bow, cut 2 bands the same size in length, loop around and pinch at both ends. Add the bow to the cake and use paper towel in the centre of the bow to support it while it dries. To secure the center of the bow, cut another band of the hot pink fondant using a small paring knife and fold in the long sides to the center and place the band in the middle to finish.
-
To create this lady’s antennae, roll out some black fondant and place some clear piping gel on one side of the fondant and place your floral wire in the centre of the band. Fold the band in half and trim off the excess. Then roll 2 evenly sized spheres of black fondant and poke a pilot hole into the center of the ball while it’s waiting to dry.
-
Using the same technique in step 24, roll out some black fondant and place some clear piping gel on one side of the fondant and place your floral wire in the centre of the band. Fold the band in half and trim off the excess, then bend the wire around a circle cutter in order to create a handle for the handbag. Leave aside to dry.
-
Using your yellow gum paste, press it into your zipper mold. Remove from the mold and trim off the excess. Take care to also use a round piping tip to remove the hole out of the zipper pull. Mix gold lustre dust and clear food grade alcohol to paint all surfaces of your zipper. Set aside to dry. Use your extra gum paste to create rings and paint with gold. Set aside to dry.
-
Roll out a thin layer of black fondant and use piping tips in #807 and #809 to punch out different sized dots for the lady’s handbag. Then measure the length of the purse and cut the zipper to the desired length; don’t forget to cut off the end of the zipper as well! Glue both pieces onto the purse using piping gel. Place dots on the purse in a random pattern using piping gel. Place handle of handbag in the center and push into the cake.
-
Using the 8” circular wood plate, glue flat wood circles to the top in order to support the lady’s head. Color the base with black spray paint. Once dry, on the base, drill 3 holes on each side and attach screws through to hold the coat hooks for the lady’s feet.
-
Now it’s time to place the lady on her elevated cake stand! Place each shoe on the end of the coat hooks and add her jewelry as desired. Put her antennae on her head and add piping gel to the end to secure the fondant ball. Add some “gloss” to her lips using piping gel, add some “blush” using pink lustre dust. Set her purse beside her and you’re all set!
Congratulations you did it!
