Kiddie Pool


Backyard , Blow up , Blow up pool , Buttercream , Chocolate , Collection--novelty-cake-recipes , Collection--novelty-recipes , Float , Floatie , Hot , Inflatable , Inflatable pool , Kid , Kiddie , Kiddie pool , Party , Pool , Recipes-export , Summer , Summer party , Swim , Swimming , Swimming pool
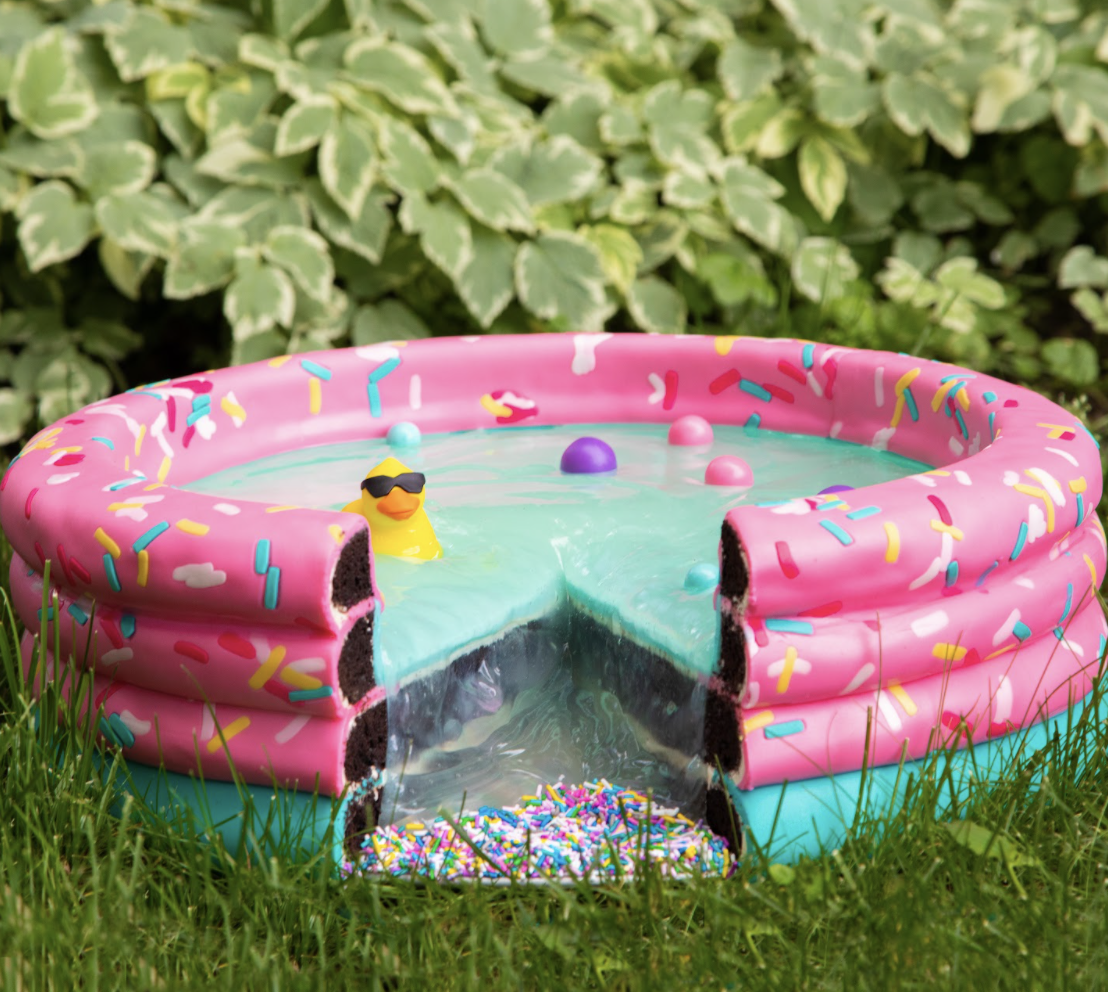
Summer days just got sweeter! I caked up a classic backyard summer essential - a Kiddie Pool, but gave it a sweet How To Cake It twist! The coolest part about this cake is i used 16” cake pans which I never use because they’re massive!!
This Kiddie Pool Cake is stacked with 24lbs of my Ultimate Chocolate Cake with sweet Italian meringue buttercream between each layer. I had to give my kiddie pool a sweet touch so I decorated it with teal and sprinkled up pink fondant - in true How To Cake It fashion, then added tons of clear piping gel on top as the water (which spilled out with every slice just like water too) and a bunch of cute fondant toys! What a perfect way to celebrate summer!


Ingredients
Cake
- 24lbs of Yo’s Ultimate Chocolate Cake
Icing
- 3 batches of simple syrup
- 1 batch of Italian meringue buttercream
Decorations
- 1 ½ lbs teal fondant
- 4 ½ lbs pink fondant
- 2 oz white fondant
- 2 oz light pink fondant
- 2 oz hot pink fondant
- 2 oz yellow fondant
- 2.5lbs light teal fondant
- 6lbs clear piping gel
 Gourmet Cake Slices with Yolanda Gampp
$29.99
Gourmet Cake Slices with Yolanda Gampp
$29.99


Read It!
-
Line your pans with parchment paper then preheat your oven to 350 degrees Fahrenheit. Prepare 24lbs of chocolate cake batter then divide evenly amongst two 16” round cake pans and bake each for 1 hour and 30 minutes.
-
Remove your cakes from their pans then level at the highest point - this will help leave the edges rounded. Use a large serrated knife to cut each cake into two layers.
-
Round the top and bottom edges of each cake with a serrated knife.
-
Use Sir Squeeze A Lot to soak each of your cakes with simple syrup then set them aside to absorb.
-
Crumb coat each cake with Italian meringue buttercream then chill in the fridge. Once firm, remove the cake and ice once again using my invention (a square piece of acetate) to smooth out all of the edges. Place each cake onto a pizza pan or a cake board of the same size then chill in the fridge once again.
-
Measure the circumference of your cake then roll out a teal fondant band using the measurement. Roll the band onto a french rolling pin then unravel it around your cake. Smooth it out and cut a clean seam. Use a bowl as a guide to trim away the excess from the top centre of the cake leaving a 1” border. Tuck and trim away any excess at the bottom of the cake.
-
Use the largest multi hole faceplate to clay extrude 5 colors of fondant: white, yellow, light pink, hot pink, and teal. Separate the cord from each other then use a ruler to cut each one to ½” lengths to create sprinkles. Mix all of them together.
-
Roll out a pink fondant band to the same length as the teal band then sprinkle the fondant “sprinkles” on top. Use a fondant smoother to press them into the fondant band then use a rolling pin to roll the fondant some more. Wrap the band around a French rolling pin and unravel it around the next two cake layers. Trim away all the excess.
-
Fill in the top of your teal cake with a layer of Italian meringue buttercream then do the same for one of your pink sprinkle cake layers. Stack your cakes as follows (starting from the bottom):
- Teal layer with buttercream
- Sprinkle layer with buttercream
- Covered sprinkle layer
- Uncovered layer
-
Lay a bowl or pan on top of the cake and cut out a large opening. Remove two layers of cake from the inside of the opening then crumb coat the hole with IMBC.
-
Roll out your light teal fondant then lay your 12” cake board on top. Gather the fondant over top of the board then pick it up and lay it into the cake opening. Let the fondant loose and remove the cake board then smooth the fondant out along the bottom and up the sides. Use a cake dummy or board as a guide to trim away the fondant along the inside of the opening.
-
Roll out another band of pink fondant and create the same sprinkle pattern. Make sure this band is thick enough to drape down into the pool. Trim the inside with a cake dummy to overlap the light teal fondant. Trim the outside and tuck it under carefully. Create a fondant paste then seam hide where necessary.
-
Create a few fondant balls and a duckie or whatever pool toys you’d like!
-
Use a piping tip to create an opening. Fill it in with white then form a plug.
-
Fill in the entire opening with piping gel then add your toys!
Congratulations you did it!
