Galaxy Mega Cake


Chocolate ganache , Collection--mega-cake-recipes , Earth , Fault line , Fault line cake , Faultline , Galaxy , Planets , Simple syrup , Solar system , Space , Stars

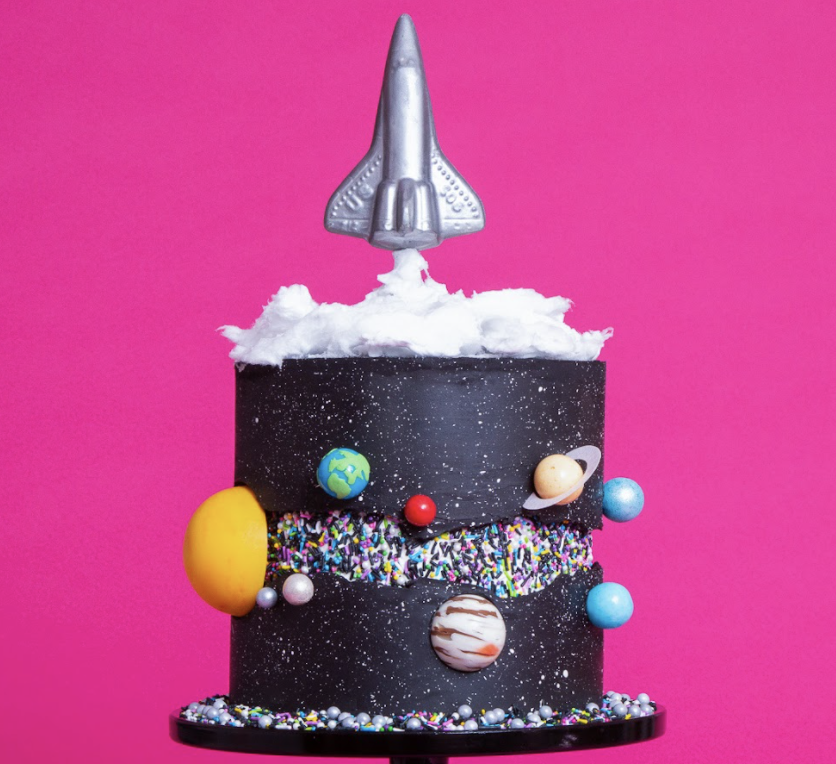
This Cake is Out of this World! It’s time to take baking to a whole new level… or galaxy! This Galaxy Mega Cake is MEGA out of this world from its bright colours to sparkling planets, it is sure to be a party favourite!
To make my Galaxy Mega Cake, I began by caking 10lbs of my Ultimate Vanilla cake but dyed each a marbled bright colour. This cake is coated in a black chocolate ganache yet, the inner bright colours are matched by the featured fault line that exposed the colourful sprinkles. The cake is decorated in planets then topped off with a sparkling rocket ship.


Ingredients
Cake
- 10lbs Yo’s Ultimate Vanilla Cake
Icing
- 1 batch of Simple Syrup
- 1 batch of Yo’s Italian Meringue Buttercream
- 2 batches of black ganache
Decorations
- White cotton candy
- Wafer paper
- Silver lustre dust
- Almond lustre dust
- Blue lustre dust
- Gumballs
- Green gumpaste (only a pinch)
- White candy melts
- Chocolate candy melts
- Yellow candy melts
- White food colouring
- Orange colour dust
 Gourmet Cake Slices with Yolanda Gampp
$29.99
Gourmet Cake Slices with Yolanda Gampp
$29.99


Read It!
-
To make this galaxy mega cake, begin by making 10lbs of my Ultimate Vanilla Cake. Each of your five layers will be marbled with black sprinkles and a bright colour. To marble your cakes, divide your batter into five equal portions and dye each one a different colour – pink, purple, blue, green, and yellow. One pan at a time, pour in a bit of your coloured batter and sprinkle in some black sprinkles then repeat until you use all of your batter. Repeat this for all of your coloured layers until you have five colourful marbled cakes. Bake each of your cakes for 1 hour and 15 minutes at 350 degrees Fahrenheit.
TIP: The colour can dissolve off of the sprinkles when they are folded into batter. Since we are using black sprinkles, it is safer to layer them into your cake batter and not disrupt them. The colour will melt and spread naturally as the cakes bake.
-
Remove your cakes from their pans then level each and remove the caramelization from the bottoms. To remove the caramelization from the sides, use a template or a 6” round cake pan as a guide.
-
Using Sir Squeeze-A-Lot, soak each of the 5 layers with simple syrup then let them sit for a couple of minutes.
-
Use a 2” circle cutter to cut out a secret chamber hole from the centre of all your layers. Make sure you save the cut-out circle tops as you will be using them later.
-
Fill and stack your cake layers with IMBC in order of pink, purple, blue, green, then yellow on top of a cake board cut to size. While icing, make sure to keep the inside of the secret chamber clean then ice away any of the excess IMBC around the sides of the cake. Place your cake in the fridge until it is firm.
-
Fill your secret chamber with the Sprinkletonium sprinkle medley until it reaches the top.
NOTE: if you do not have these sprinkles, you can use any of your choice!
-
Cut your yellow cake cut-out in half to create two disc layers then place it on top of the cake to seal the chamber off.
-
Crumb coat your entire cake with black chocolate ganache then place it in the fridge until firm.
-
Remove your cake from the fridge and ice it once again with some more black chocolate ganache. Use a bench scraper to smooth out all of the edges then place it back in the fridge to chill.
-
Pipe a line of IMBC around the middle of the cake. Using a small offset spatula and bench scraper, spread the line smoothly.
-
Press your Bake to the 80s Sprinkles onto the IMBC line until the IMBC is not showing. Chill your cake to let it set.
TIP: Place your cake in a large cake pan to collect the fallen sprinkles.
-
To create the rocket, fill the rocket shaped mold with white chocolate. Add a dowel into one of the halves then let them set.
-
Use a large blue dragee as the base of the planet then paint it entirely with silver lustre dust mixed with food grade alcohol.
-
Take a gumball and paint the entire thing with almond lustre paint mixed with food grade alcohol.
-
Using a blue jumbo gumball as the base, roll out some green gumpaste and cut shapes out to represent the continents (follow the shapes of the continents as closely as you possibly can). Use some clear piping gel as glue then glue the green shapes onto the gumball.
-
For mars, you will just be using a red gumball as the planet. No need to add anything else to it.
-
Take a dome shaped chocolate mold and drizzle in white and brown candy melts to create an abstract print. Let your mold sit until it settles.
-
Use a tan speckled gumball as the base of Saturn. You will create the rings later.
-
Use an ice blue jumbo gumball as Uranus.
-
Take a jumbo grey gumball and paint the entire gumball with blue lustre dust.
-
Pipe on some more black chocolate ganache onto the cake above and below the sprinkle line you created in the previous step. Use a bench scraper to smooth it over leaving the sprinkles exposed. This will create a sprinkle fault line which is exactly what you want.
-
Lay a piece of paper on top of your cake to protect the face then use some white food colouring to splatter the cake.
-
Once your rocket has set, carefully remove it from the mold. Use a small paring knife to clean up any excess pieces and edges. Next, use some excess white chocolate to glue the two halves together then use the knife again to clean it up. Once it is ready, coat your rocket in silver lustre dust to give it a shine. Add some lustre dust to the dowel as well.
-
Carefully remove Jupiter from the chocolate mold. Paint on the “eye” of Jupiter with some orange colour dust.
-
Remove the Sun from your chocolate mold and paint it with the same orange colour dust as Jupiter.
-
Carefully poke a hole into each of your planets using a needle then poke a toothpick into each hole as a dowel.
-
Heat a circle cutter up and make an imprint onto your cake to melt the ganache.
-
Use some white chocolate to glue a dowel into the centre of the sun on the inside. Pipe on some black chocolate ganache into the centre of the imprint you made in the previous step and insert the sun’s dowel into place.
-
Add your planets and sun to the cake. To attach Jupiter, heat up a small circle cutter like you did for the sun and attach it the same way.
TIP: Use a photo of the solar system as reference to ensure that you get the planets in the correct order and at somewhat of a realistic distance from one another.
-
Measure out Saturn then cut a ring out of rice paper and place it around the planet.
-
Place your cake on a cake stand then add Bake to the 80s and Sprinkletonium sprinkles to the base of the cake.
-
Mark off the centre of the top of your cake then place tuffs of cotton candy all over. Lastly, use a dowel to add the rocket to the centre of the cake.
Congratulations you did it!
