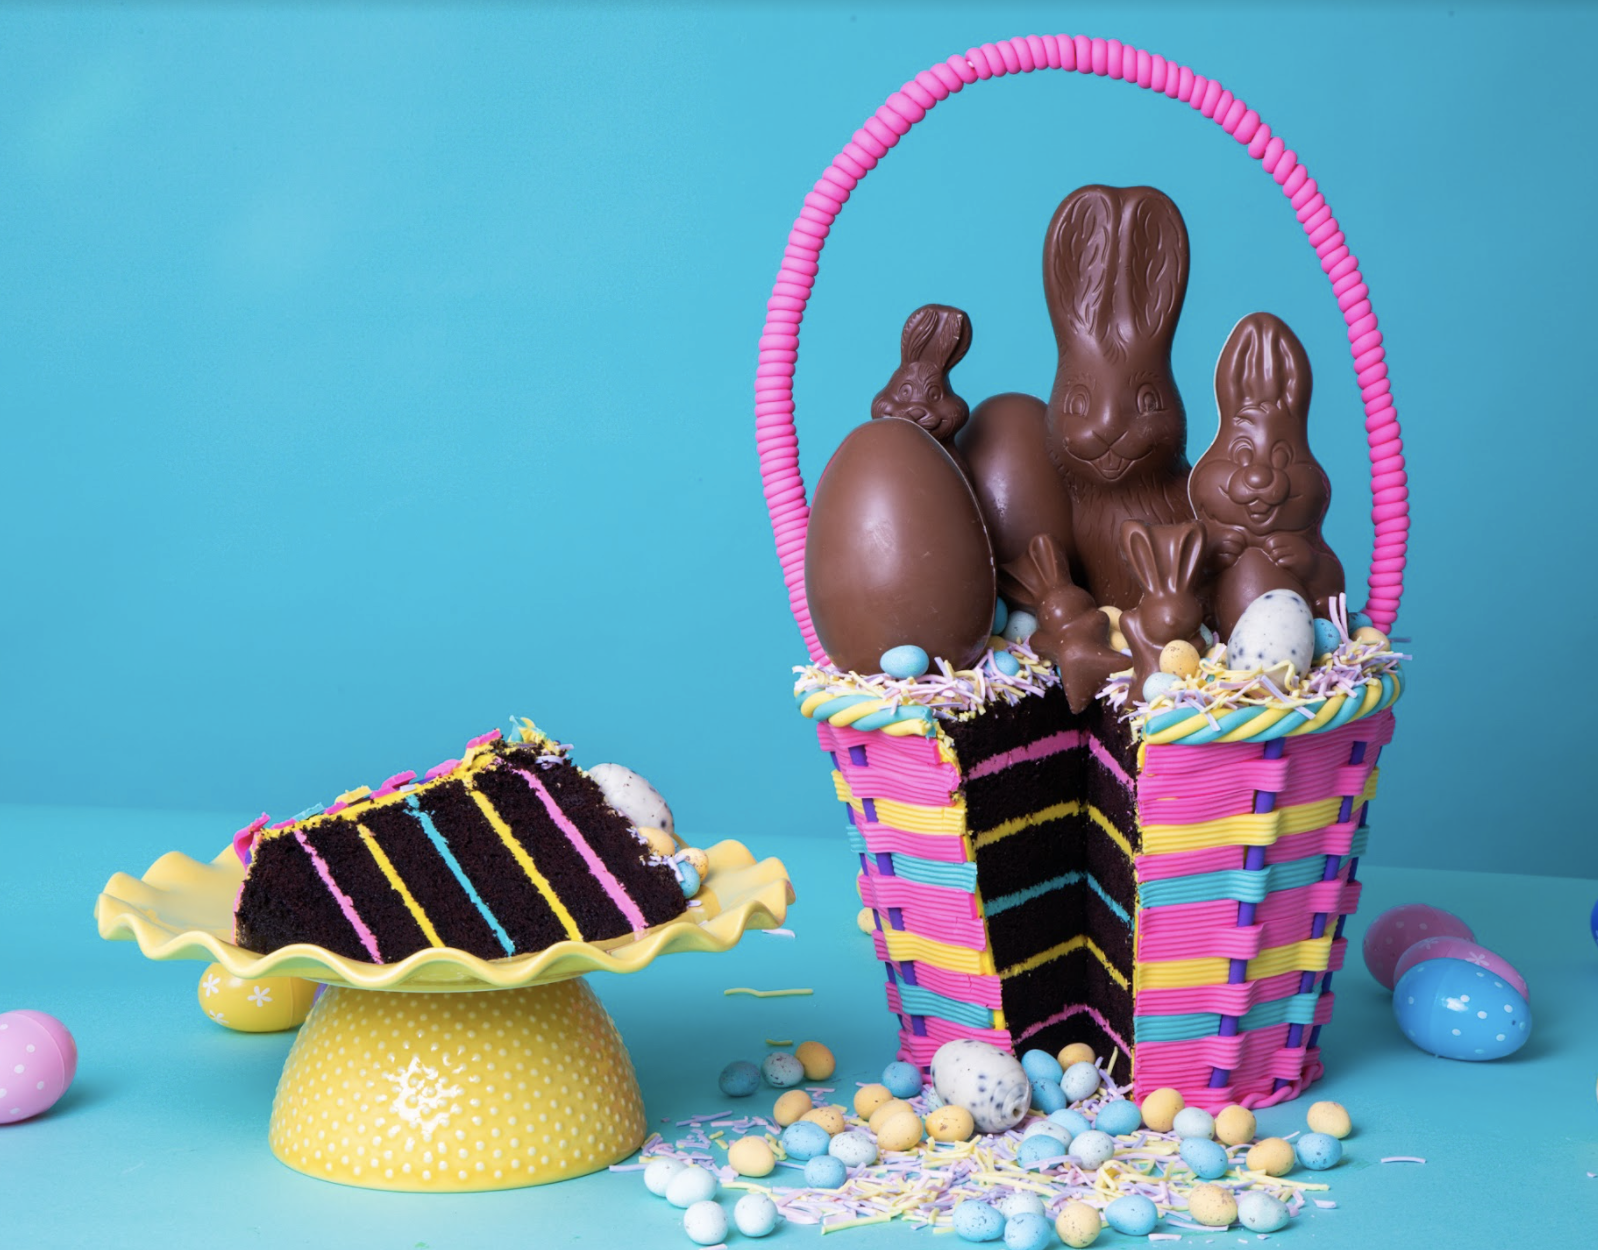
Easter Basket Mega Cake


For EGGspert Egg Hunters! Some bunny is in for an EGGstra special Easter treat this year! Not only will you be filling your Easter basket with sweets but the entire basket will be MADE of sweet cake! Easter-ception!
Chocolate is a must at Easter so this Easter Egg Basket Mega Cake is stacked up with layers of rich chocolate cake filled with vibrant pink, yellow, and teal Italian meringue buttercream. The entire cake is covered in spring colored fondant strips weaved to form the basket, decorated with twisted fondant cords, and filled with colorful crinkled up gumpaste basket grass. It wouldn’t be a successful egg hunt without Easter treats so the cake is then completed with Kinder Egg Surprises, Easter bunnies, and mini chocolate eggs.


Ingredients
Cake
- 9lbs Yo’s Ultimate Chocolate Cake
Icing
- 1 batch of Simple Syrup
- 1 batch of Italian Meringue Buttercream
Decorations
- Gel colors: lemon yellow, pink, fuschia, blue, teal
- 5lbs pink fondant
- 1½lbs yellow fondant
- 1½lbs teal fondant
- 1½lbs purple fondant
- 4oz soft yellow gumpaste
- 4oz soft lavender gumpaste
- 4oz soft pink gumpaste
- Large kinder eggs
- Easter bunnies
- Mini chocolate eggs

Tools
- 7" Round Cake Pan
- 8" Round Cake Pan
- 9" Round Cake Pan
- Strip Cutter #1
- Small Offset Spatula
- Bench Scraper
- Ribbed Rolling Pin
- Clay Extruder
- Wire Hanger


Read It!
-
Roll out your gumpaste colors as thin as possible then use a strip cutter to cut them into lots of thin strips. Crumple the strips up and let them dry to create the crinkled Easter basket grass.
-
Line your pans with parchment paper and preheat your oven to 325 degrees Fahrenheit. Prepare 9lbs of chocolate cake then divide into your three pans and bake as follows:
7” round cake pan → 2.5lbs of chocolate batter → 1 hour
8” round cake pan → 3lbs of chocolate batter → 1 hour and 10 minutes
9” round cake pan → 3.5lbs of chocolate batter → 1 hour and 10 minutes
TIP: Let your cakes cool completely in their pans before removing
-
Remove your cakes from their pans then level each one and layer them into two layers.
-
Use Sir Squeeze A Lot to soak each of your layers in simple syrup then let your layers sit for a couple of minutes to absorb.
-
Divide your IMBC into three, then dye each one a different color: pink, yellow, and teal.
-
Beginning with your largest layers at the bottom and working your way up, fill and stack your cakes with alternating colors as you please. Once you have stacked your cake, chill it until it’s firm (this will make it easier to carve).
-
Remove your cake from the fridge then begin carving in an A-line formation - wider layers on the bottom. Cut a cake board to the size of the top of the cake then glue it on with royal icing (this will be the bottom of the cake).
-
Use an offset spatula to crumb coat your entire cake with yellow IMBC then chill it in the fridge until firm. Remove your cake from the fridge then ice it again with more yellow IMBC using a bench scraper to smooth it out.
-
Roll out your fondant into a sheet over a cake board then use a ribbed rolling pin to texture it. Repeat for each color of fondant. Chill each sheet.
-
Cut each sheet of your textured fondant into ½” strips going along the ribbed lines.
-
Knead your purple fondant until it is soft (add shortening if needed). Using the largest face plate on your clay extruder, clay extrude a bunch of purple cords then chill them.
-
Cut out a circle the same size at the top of your cake then fold it into 8 equal parts - this will act as your template. Lay it on the top of the cake and use a paring knife to mark the 8 sections off then use a fabric measuring tape to mark off the same number of sections at the bottom of the cake. Use a paring knife to connect the marks from bottom to top.
-
Add your purple cords vertically up the sides of the cake along the marks you just made then trim away any excess.
-
Beginning with a pink fondant strip, lay it along the bottom edge of the cake meeting the first purple cord then laying it over the second cord. Trim the strip once it gets to the third cord then begin again with another pink strip. Repeat this around the cake to create a weaving pattern and continue making your way up the cake but alternate your starting point.
Be as creative as you want but create a color pattern -
Carefully flip your cake then spread on some yellow IMBC to the top of your cake.
-
Take a sharp paring knife to the bottom of the cake and trim away the excess purple cords that may be showing. Extrude two thin cords of pink fondant and twist them together then glue it around the bottom of your cake.
-
Extrude two large cords of yellow fondant and two more of teal then twist one of each together for two multi-colored cords. Glue them together with clear piping gel then glue them around the top of the cake.
-
Take a wire hanger and bend it to look like a basket handle then insert each end into the cake. Clay extrude thick pink fondant cords then beginning at the top centre, wrap the cords tightly around the wire hanger until you’ve covered the entire wire.
-
Fill the basket with the crinkled up gumpaste grass then add in your easter goodies!
Congratulations you did it!
