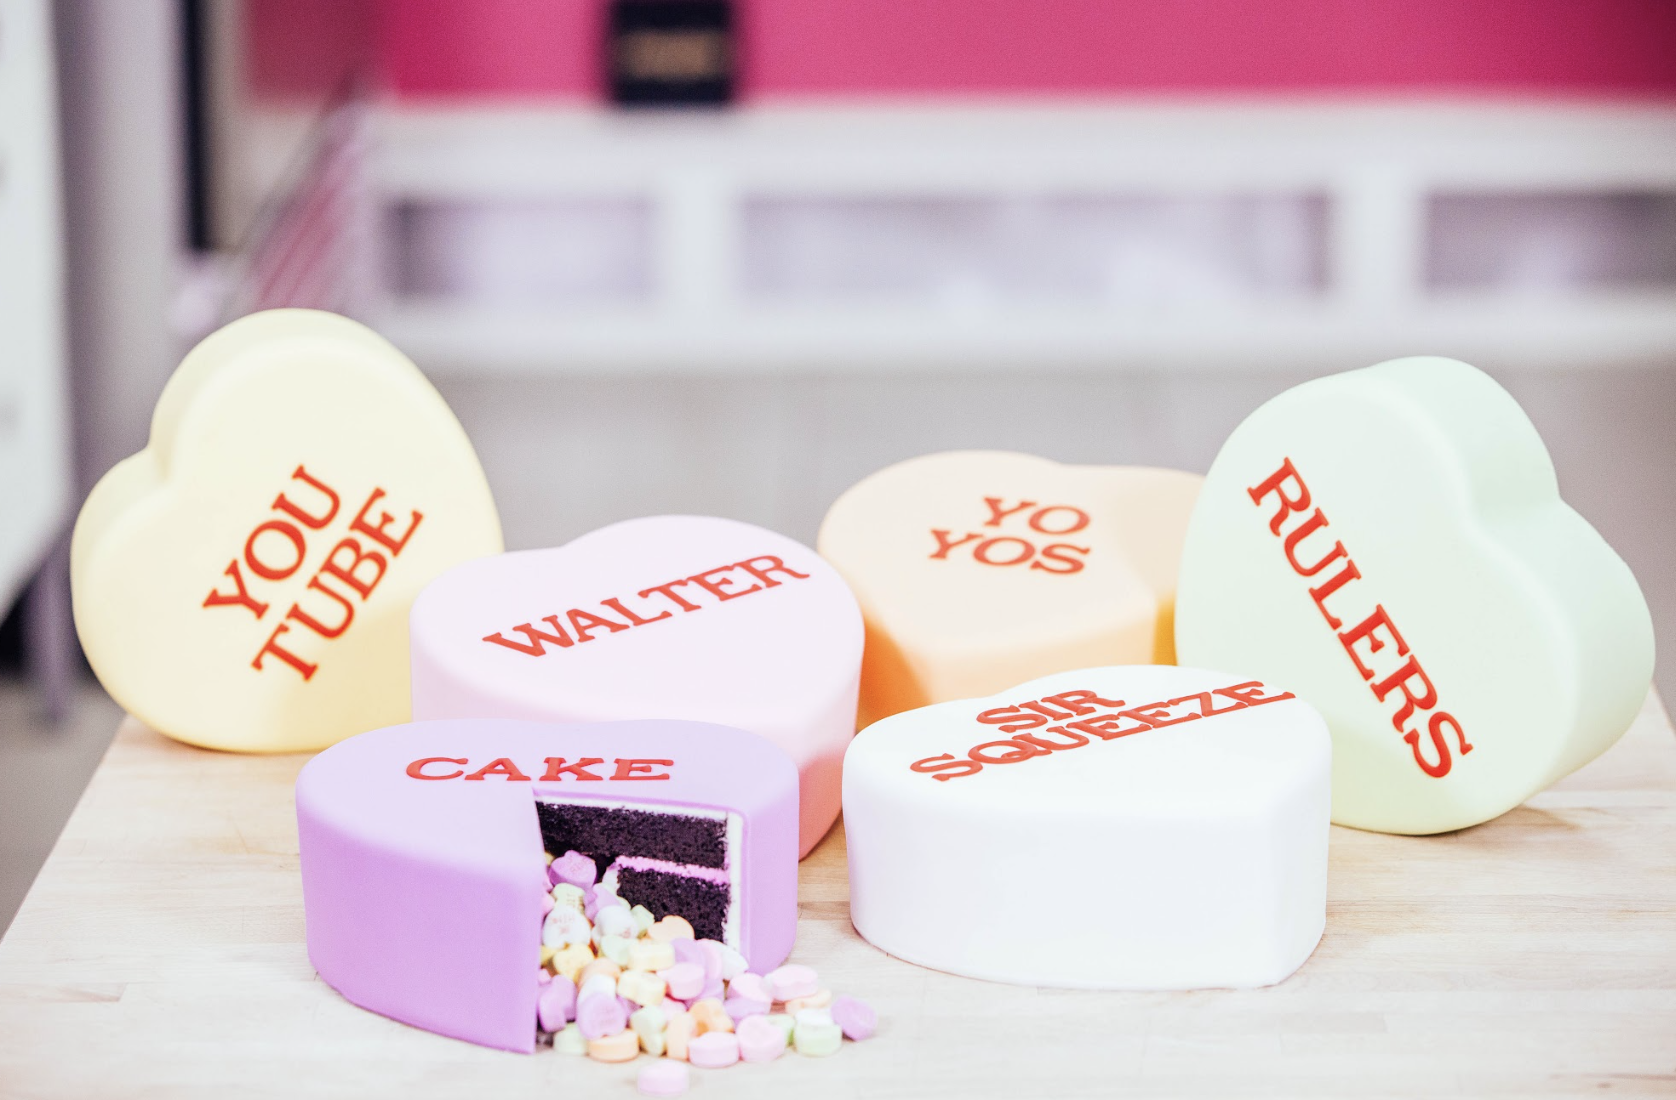
Conversation Hearts Mini Cakes


Candy-Coloured Chocolate Cake Hearts with a Sweet Surprise Inside!
Remember when you used to receive these flirty treats from your secret admirer? This Valentine’s Day, I’m caking them to the next level! I filled six chocolate cakes with conversation hearts, wrapped them in pastel-coloured fondant and wrote a personalized message on top of each one.


Ingredients
Cake
- 2 x 8 lbs Yo’s Ultimate Chocolate Cake
Icing
- Simple Syrup
- Italian Meringue Buttercream
- Gel food coloring: lemon yellow, golden yellow, kelly green, electric green, sunset orange, pink, electric purple
- 1lb Conversation Hearts
Decorating
- 6 lbs White Fondant
- 4 oz Red Fondant
- Icing Sugar
- Clear Piping Gel

Tools
- 6 x 7” Round Cake Pans, lined with parchment paper
- Rubber Spatula
- Ruler
- Serrated Knife
- Small Serrated Knife
- 3” Heart Cutter
- Small Icing Spatula
- Small Offset Spatula
- Heart Template
- 6 x Heart Shaped Cake Boards
- Fondant Smoother
- Paring Knife
- Rolling Pin
- Small Fondant Rolling Knife
- Non Stick Board
- Alphabet Cutters
- Paint Brush
- Simple Syrup Squeeze Bottle


Read It!
-
Separate your white fondant into six equal portions, reserving one portion to remain uncoloured. Using a small conversation heart as a basis of comparison, gently knead the remaining five colours into your pretty pastels. (You'll want to blend the two colours listed above for yellow and green.) Once colour is fully incorporated, roll the fondant into a ball and cover it tightly with plastic wrap. Store in a cool, dry place.
NOTE: This step should be done the day before to save time.
-
Prepare your Ultimate Chocolate Cake batter and divide evenly between your prepared 7” cake pans. (Make sure to pour a bit more batter into each 7-inch cake pan than usual so the cake rises tall, but doesn’t overflow.) Bake at 350 degrees for about 1 hour and 10 minutes, or until a toothpick comes out clean. Cool cakes completely in their pans sitting on a wire rack.
-
Prepare your Italian Meringue Buttercream. Once complete, divide out ½ cup of buttercream into 6 separate mixing bowls. Keep the remaining buttercream in the original bowl. If you have a StayBowlizer, this is a great place to use one to keep your bowl in place while you mix!
-
Colour each ½ cup of Italian Meringue Buttercream in the same 5 conversation heart colours using the same formula as you did with the fondant (yellow, green, peach, pink & purple). Keep the rest of the buttercream uncoloured.
-
Prepare your simple syrup and set aside at room temperature.
-
Once your cakes are completely cool, remove them from their pans and level with a ruler and serrated knife.
-
Cut a ‘lid’ on each cake about 1 inch from the top and leave in place. Do not separate into two cakes at this point.
-
Using your serrated knife, cut each cake into the shape of a heart. You can either do this freehand or with the help of an online template.
-
Remove each heart-shaped lid from the top and set aside. Use your 3” heart cutter to cut out the centre of the thicker, bottom layer of each heart cake.
-
Shower all of your cake layers with simple syrup, including the top lids. Allow the simple syrup to soak in completely before moving on to the next step.
-
Ice each cake in the appropriate colour using your small offset spatula. Make sure to take away any excess buttercream within and around the heart-shaped hole and get as smooth as you can.
-
Fill the heart-shaped hole with conversation hearts.
-
Mark your coloured heart cakes on a cake board so you can remember which colour icing is filled inside each cake! This is especially important once all of your cakes are iced with the rest of the plain Italian Meringue buttercream.
-
Put the lids on top of each cake. Crumb coat all six cakes with Italian Meringue buttercream using your small icing spatula & chill in the fridge for about 20 minutes.
-
Remove cakes from the fridge and ice again, making sure that the buttercream is completely level and even on all sides. Chill for another 20 minutes. Once the buttercream is chilled and firm, smooth out any ridges and set aside.
-
Roll out each of the six colours of fondant to be about ⅛ of an inch thin and cover each heart using a fondant smoother to get the fondant flush to the cake. Bring the smoother over the top edges of the heart, smoothing out the crease in the middle first and then moving down to the bottom.
-
Prepare the lettering that goes on each heart by rolling out some thin red fondant. Cut out each letter you need using the appropriate alphabet cutters and set aside.
-
Use a ruler to measure the length of each word so that you can properly centre it out on each heart. Begin placing each fondant letter onto your hearts with the help of a brush and some clear piping gel. These cakes are so much fun to customize, so design your sweet hearts for your sweetheart!
Congratulations you did it!
