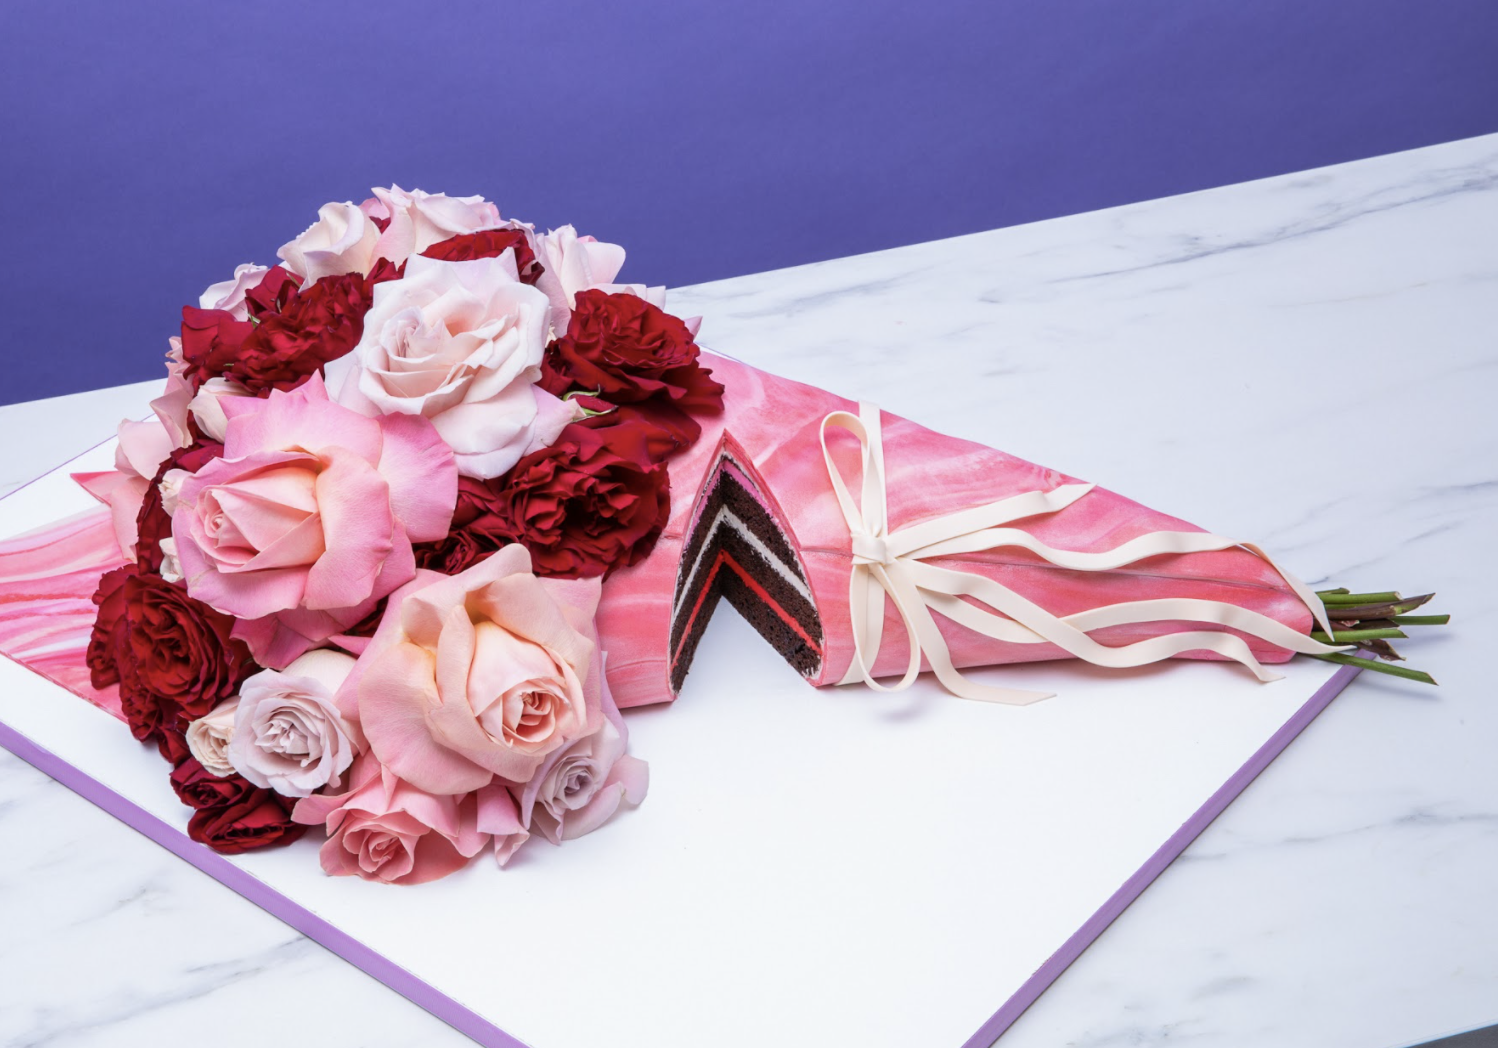
I want a bouCAKE and I want to eat it too! Can't decide between a classic bouquet of roses or a sweet dessert? I say combine them! This Bouquet of Flowers Cake makes for the most romantic surprise ever! With rich layers of chocolate cake (the official flavor of love) and Italian meringue buttercream - this cake could win anyone's heart over! But what will really seal the deal is the gorgeous array of fresh cut roses that my good friend Caspar helped me arrange into a gorgeous heart! There is no sweeter way to say "I love you" - period.

Ingredients
Cake
- 2 ½ batches of Yo’s Ultimate Chocolate Cake
Icing
- 1 batch of Yo’s Simple Syrup
- 1 batch of Yo’s Famous Italian Meringue Buttercream
Decorations
- Gel food coloring: red and pink
- Piping Gel
- Pearl Lustre Dust
- 1lb beige fondant
- 1lb off white fondant
- 1lb pink fondant
- 1lb hot pink fondant
- 1/4 red fondant
- Beige gumpaste 2 oz
- Makeup sponge
- Floral tubes or bubble tea straws
- Flowers of your choice (make sure they are organic and non toxic!)
Read It!
-
Line a 9” round pan with parchment paper and preheat the oven to 350°F. Prepare 2 ½ batches of Yo’s Ultimate Chocolate Cake batter then weigh out 3 ½ pounds of batter into the pan and bake for 75 minutes, or until a toothpick inserted into the center comes out clean. Rotate the pans halfway through.
For your 9x13” cake, line your pan with parchment paper and weight out 6 pounds of batter. Bake for 90 minutes or until a toothpick inserted into the center comes out clean. Rotate the pan halfway through.
Transfer your cakes to a wire rack and let cool completely in the pan(s). Cover tightly with plastic wrap and refrigerate overnight.
To remove the cakes, loosen the edges with a straight spatula and invert the pan(s), then carefully peel off the parchment.
-
To start your “bouqcake”, use a large serrated knife to level your 9” round and 9x13” cake. Cut your rounds in half, and your rectangle diagonally, then layer the cakes into two.
-
Use Sir Squeeze-A-Lot to soak all of your layers with simple syrup, then let them sit for a few minutes to absorb.
-
Divide your buttercream evenly into three bowls and colour two of the bowls pink and red.
-
Start filling and stacking your cakes with the semi circle placed at the end of the triangle, similar to the shape of an ice cream cone. Alternate your buttercream colours while stacking! Once your layers have been stacked, place it into the fridge and let chill.
-
Once your layers are chilled, use a large serrated knife to carve your cake and round down the edges to resemble a bouquet.
-
Crumb coat the outside and chill. Once your crumb coat has chilled, ice your cake with Italian meringue buttercream, then use a square piece of acetate to smooth it all out!
-
To create the “paper” of your bouquet, start by rolling out your two tones of pink, red, white, and beige fondant into four tubes of fondant. Then with one tube of each color, group them together into one large tube. Twist the colors together and press them down, then begin rolling them out. The more you roll them back up and roll it out, the finer the marbling will become.
-
Cover one long side of the cake, and trim the top on a diagonal, then repeat on the other side. This will look like the “paper” is folded over! Make sure to save a section of the rolled out fondant for later, after the roses are placed into the cake.
-
In a small bowl, mix some pearl lustre dust with a few drops of clear food grade alcohol, and use a clean paint brush to paint your fondant. To add a more textured look, go in with a clean makeup sponge and blend the lustre dust in.
-
It’s time to add your fresh flowers! It is important to make sure your flowers are organic and non-toxic. The best way to achieve a full looking rose, is to remove the outer layer of petals and start gently folding back the petals. Start by inserting your floral tubes (or bubble tea straws) into the top of your “bouqcake”, then trim your stems to fit, then insert!
-
For the “bow” on your bouquet, start by rolling out your beige gumpaste thin. With a sharp paring knife, cut even strips and create loops by pinching the ends and folding together. Set aside to dry completely!
-
Roll out more of your beige gum paste and cut into long strips, and place around the “paper” of your bouquet as the “ribbon”.
-
Attach the bows to the cake with clear piping gel.
-
Finish decorating your “bouqcake” by placing your leftover marbled fondant underneath the flowers to create the illusion of the “paper” being wrapped around the bouquet!
Congratulations you did it!


