Adidas Superstars Cake


-v1575325829682.jpg?1600x1600)
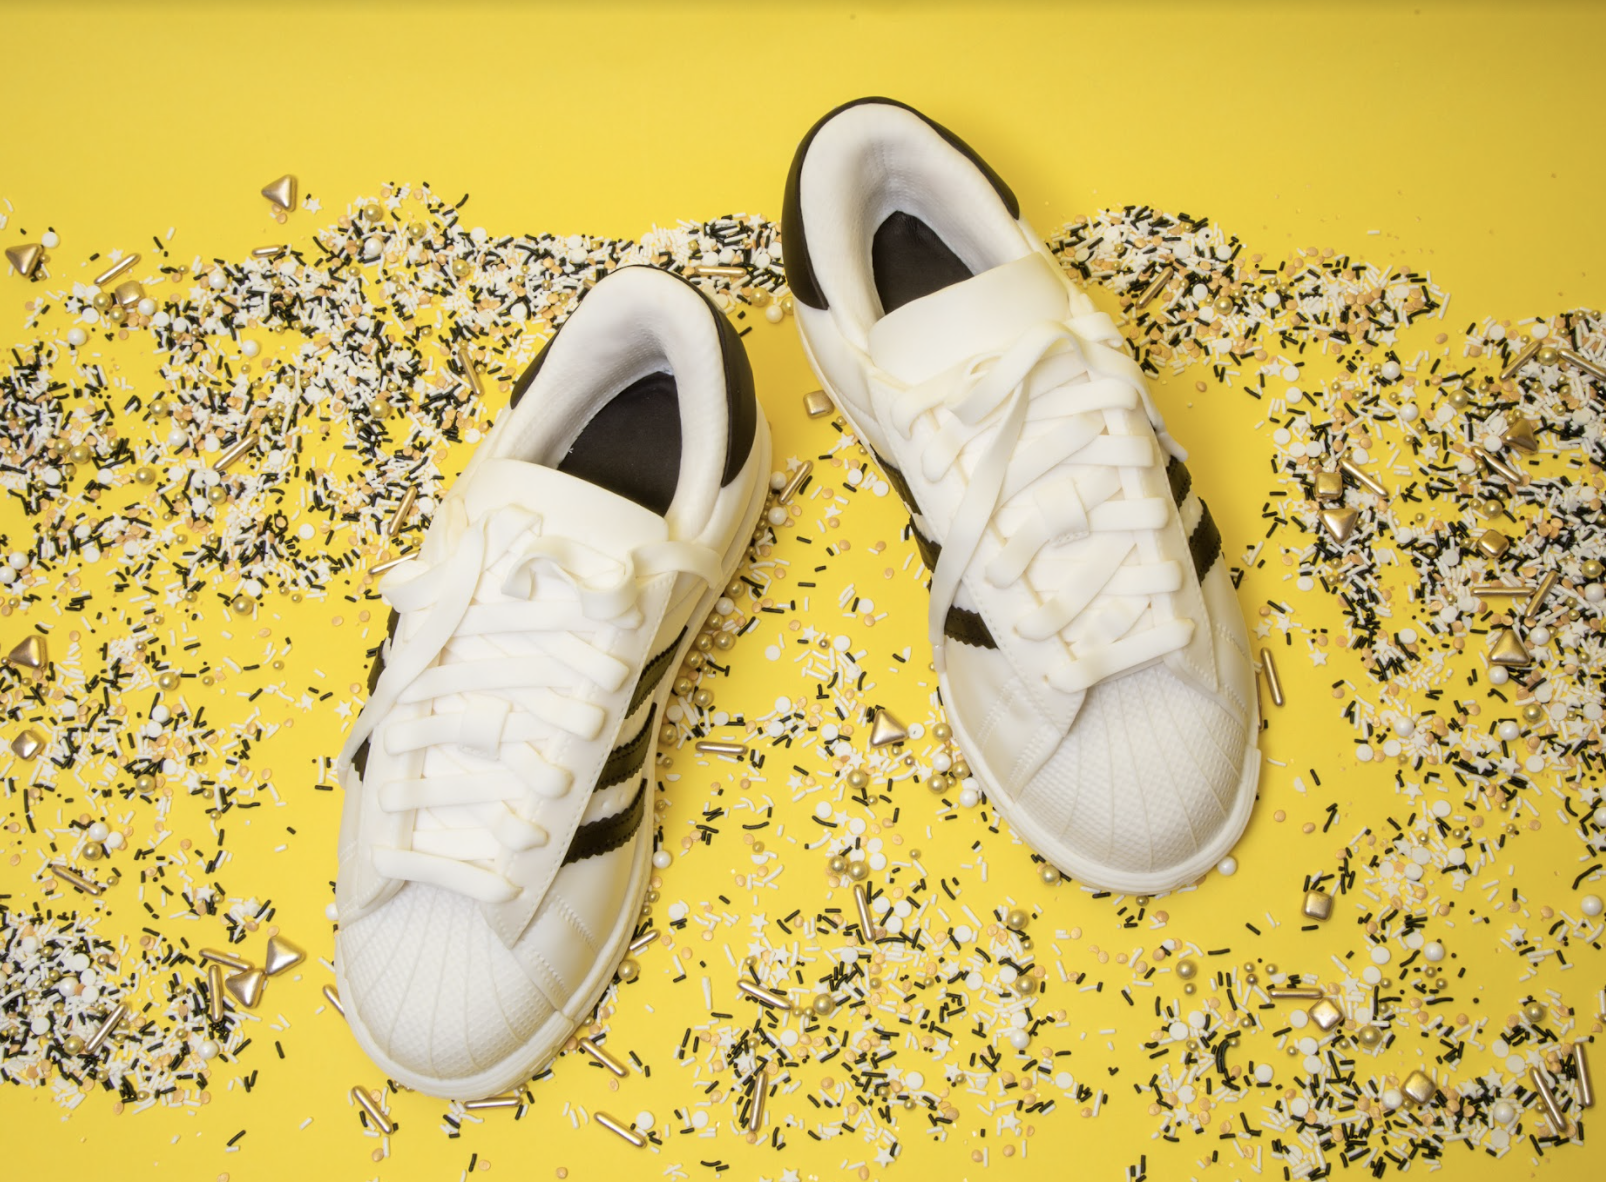
New Trend Alert: Shoes Made of Cake. Oh look at that, it’s just another classic pair of Adidas Superstars… NOT. These sneakers have been some of the most popular shoes for years and I’ve seen everyone wearing them so it was clearly time to cake them up! But they get even better - I made these for the lovely Adelaine Morin so we added our own personal touches and decorated them with fun yellows! Definitely try this recipe out if you want to get your hands on the sweetest new kicks.
To make these trendy Adidas Superstars out of cake, I began with 12lbs of my Ultimate Vanilla Cake dyed a bright buttercup yellow. I stacked each shoe up with 4 layers of sweet cake and filled them with my deliciously fluffy Italian Meringue Buttercream. Though these shoes are some of the most basic and classic shoes ever, there are a lot of details when you look closely. The shoes are covered in layers of fondant which I used various materials such as my turkeyskinator, canvas, and a grid textured rolling pin to texture. I used thin black fondant for the final details and to make the classic Adidas stripes then completed the shoe with a white Adidas logo made of fondant. Can you tell these shoes are made of cake?


Ingredients
Cake
- 12lbs of Yo’s Ultimate Vanilla Cake
- Lemon yellow and buttercup yellow gel food coloring
Icing
- 1 batch of Simple Syrup
- 1 batch of Italian Meringue Buttercream
Decorations
- 5lbs white fondant
- 4oz black fondant
- 1oz white gumpaste

Tools
- 12x18" rectangular pan
- Simple Syrup Squeeze Bottle
- Parchment Paper
- Turkey Skinator
- Textured rolling pin
- Sculpting tools
- Clay extruder
- Overstitch tool
- Strip cutter
- Ravioli wheel
- Canvas
- Grid embosser
 Gourmet Cake Slices with Yolanda Gampp
$29.99
Gourmet Cake Slices with Yolanda Gampp
$29.99


Read It!
-
Line a 12x18” rectangular pan with parchment paper and preheat your oven to 350 degrees Fahrenheit. Prepare 10lbs of my Ultimate Vanilla cake then use lemon yellow and buttercup yellow to dye the batter. Bake for 1 hour and 30 minutes.
Let your cake cool completely in the pans before removing.
-
Remove your cake from the pan then level it and remove the caramelization.
-
Cut your cake in half then cut the two in half again creating 4 equal strips.
-
Layer your cake into two layers to make a total of 8 strips.
-
Use Sir Squeeze A Lot to soak each of your cake layers with simple syrup. Let them sit for a couple minutes to absorb.
-
We’re going to be making a pair of shoes so fill and stack your cakes into two cakes with 4 layers of cake and Italian Meringue Buttercream between each. Place your two cakes in the fridge to chill.
-
It’s time to carve your cakes into one right shoe and one left. I made templates for the soles of the shoes (left and right) out of foam board as well as the side view silhouette of the sneaker out of paper (print out 4). Place your bottom of the shoe templates on each cake then use a small paring knife to carve around each one for the general shape. Ice the top of the cake to glue the template on and carefully flip the cake over. Pin one side view template to each side of the cake then carefully begin to carve following the templates on both sides making it as symmetrical as possible. Use a photo or a real shoe as a model if possible to carve the rest of the shoe.
TIP: I find it easier to go back and forth between carving each cake to ensure that they are symmetrical.
-
Carve out a hole towards the back of each cake for where your foot would go.
-
Crumb coat your cakes with IMBC then let it chill until firm. Remove the cake from the fridge and ice it once again and place it back in the fridge to chill.
-
Roll out some thin black fondant and carefully bend it and form it to the hole you cut out of the cakes to resemble the shoe opening. Carefully trim along the bottom walls and tongue of the shoe leaving black fondant only on the bottom and inner edge.
TIP: To smooth out the fondant, roll up a ball of the excess fondant and use it to carefully smooth out any bumps. This will help you avoid fingerprints.
-
Roll out two long strips of white fondant then use a turkeyskinator and rolling pin to texture them. Once you are done embossing the fondant, run your fingertips over it to smooth them out slightly. Cut two strips from each fondant band in a very slight A-line fashion then wrap one band around the bottom of each cake with the wider end towards the back of the shoe. Cut a seam down the back centre. Set the two remaining bands aside.
-
Roll out some white fondant then use a grid-textured rolling pin to texture the sheet. Cut out two triangles in a way so that the grid is on a diagonal then lay one on the front of each shoe. Trim away the excess where the triangle meets the band that wraps around the cake as well as on the sides. Use a photo of the actual sneaker as reference.
-
Roll out more white fondant and use the same grid-textured rolling pin to texture it. Cut it into two rectangles and carefully wrap it around the inside of each shoe folding over the excess edges. Use a paring knife to cut away the excess, leaving a ¼” border around the top so that the textured inside borders the opening.
-
Roll out some more white fondant and cut out two strips to fit on top of the shoe as the tongue. Then cut out two small strips from the textured fondant and add them to the end of the tongue with a bit of water. I laid the tongue onto each cake in the centre. I made sure that the widest portion of the tongue hung off the cake. It wasn’t flush to the cake to help the illusion of the opening where you would put your foot
-
Use tracing paper and the shoe as a guide to carefully trace the shoe. Trace the side panels of the shoes then mark off where the stitches and holes are in the shoe. Once you are done tracing, cut the side panels templates out of thicker paper and then out of white fondant. Lay it onto the cake and trim away all the excess along the bottoms. Make sure the two panels meet at a nice straight seam at the back of the shoe and line up with the front textured part.
-
Roll out some paper towel into flat strips and tape them shut then carefully place them under the side panels at the top of the cake to create a gap.
-
After laying on the side panels, I realized the soles didn’t stand out as much as I wanted it to so I took the extra strips I had made previously and glued them on top of the previous band. This added thickness to the sole so that it would stick out more.
-
Use a sculpting tool to carefully create a line towards the top edge of the band around the entire shoe.
-
On the front of the shoe, there is a strip with extra stitching. Roll out a bit more white fondant then use a strip cutter to indent the lines and cut two small bands out. Glue them onto the cake with some water so that it fits over the previous textured panel and overlap over the sole of the shoe band. Cut away the excess.
-
Use a clay extruder to make some thin white cords of fondant. Separate them and carefully add each strand into the indented line along the sole band. Next, take your fabric measuring tape and a sculpting tool to mark off every half inch or so to resemble stitching.
-
Use the same clay extruded white fondant cords to add 6 lines down the front of the textured toe panel in A-line pattern to each shoe.
-
To create the extra leather for the shoelaces, cut out 4 strips of white fondant and take an overstitch tool to add stitching around the edges of each. Use the template you made earlier to poke out the holes for the laces in the fondant too using a small piping tip. Glue them onto the top of the side panels of the shoes and take a cel stick to poke the holes all the way through (the fondant layer you just glued it to).
-
Use your template and a cel stick to poke holes along the sides of the shoe. Then take your overstitch tool and add stitching around the cake (use a photo or real shoe as a model).
-
Use tracing paper to trace out all of the black sections on the shoe. Roll out very thin black fondant and cut out the black shapes. Add the back black panel on with a bit of water and carefully trim away the top edges.
NOTE: Make sure to wet the surface of the shoe rather than the black fondant when gluing because there will be a lot of trimming.
-
Roll out 4 more short strips of white fondant (to go on the back of the cake) and use the overstitch tool over the long edges. Cut them to fit on the back of the shoe between the black patch and the top of the sole. Glue in place.
-
Roll out some thin black fondant and mark off every ½” with a ruler. Use the overstitch tool to line each strip then use a ravioli cutter to cut the strips to create a wavy edge. Use water as glue to add the strips to the sides of both shoes. Trim away the excess so it fits perfectly.
TIP: When laying the black fondant strips on, use a piece of paper between the black and white fondant to avoid staining the white.
-
Roll out some more white fondant and texture it with canvas. Cut it into ¼” strips. Instead of making one long shoelace out of fondant and actually lacing the shoe up, we’ll be adding the strips on in parts as if they were really laces. Add the laces onto the shoe’s tongue following the pattern of laces. Finally add one strip vertically to the centre overlapping two other horizontal strips as if holding the shoelaces in place. Pay attention to the way they overlap so that go over and under the laces’ panel.
-
For the ends of the shoelaces, roll out a bit of white gumpaste then cut it into 4 equal lengths and glue it to the ends of the shoelaces and to the side of the cake so it doesn’t fall off.
-
Use a template to cut the entire shape of the adidas logo out of thinly rolled gumpaste then glue it onto the back of the cake. Use your template again to carefully cut out the three lines.
Congratulations you did it!
