Sea Creature Pancakes


Birthday party , Breakfast , Collection--easy , Collection--other-recipes , Fish , Fishie , Fishy , Jessica , Lobster , Luxe and the lady , Luxeandthelady , Ocean , Ocean birthday , Ocean pancakes , Pancake , Pancakes , Sea , Sea creature , Sea creatures , Starfish , Turbo-legacy , Under the sea , Under water , Underwater


Ingredients
Sea Creature Marshmallows
- 1 envelope or 1 tablespoon unflavored gelatin
- 1/3 cup cold water
- ¾ cup granulated sugar
- 3 tablespoons light corn syrup
- ¼ cup cold water
- ½ teaspoon vanilla extract
- Pink & purple icing gel colors (I used Rose & Violet)
- Candy thermometer
- 3 piping bags (fitted w couplers, if using)
- #1A, 5 & 10 round piping tips
- Sprinkle Punch & Sprinkle Surf Sprinkle Mixes
- ¼ cup dark chocolate chips or melting chocolate
- 1/8 cup white chocolate chips or melting chocolate
- Marshmallow coating powder (1/4 cup cornstarch mixed with ½ cup powdered sugar)
Ombré Ocean Pancakes
- 1 ½ cups all-purpose flour
- 1 ½ teaspoons baking powder
- ½ teaspoon baking soda
- ½ teaspoon salt
- 2 tablespoons granulated sugar
- 1 ½ cups buttermilk
- 2 large eggs
- 1 teaspoon vanilla extract
- 2 tablespoons unsalted butter, melted and cooled slightly
- Blue icing gel coloring or natural food coloring powder
Whipped Cream
- ½ cup heavy whipping cream, cold
- 1 ½ tablespoons powdered sugar
- ½ teaspoon vanilla extract
Decorations
- Whipped Cream
- Sprinkle Punch & Sprinkle Surf Sprinkle Mixes
- Chocolate Seashells* (optional)
- Sea Creature Marshmallows
- Mini marshmallows* (optional)
Read It!
-
Warm water makes marshmallow very pliable, so you can easily smooth out any mistakes or mold the shapes, once piped.
Make the marshmallows the night before serving the pancakes so that they have time to dry before handling.
Tweezers help to pick up and transfer the sprinkle decorations to the marshmallow sea creatures.
-
Pour 1/3 cup cold water into the bowl of an electric mixer and stir in the gelatin. Allow the gelatin to soften while you make the syrup.
-
In a medium size saucepan, combine the sugar, ¼ cup water, light corn syrup, and salt. Stir, and cook over medium heat until the sugar dissolves. Turn the heat up to high and continue to cook (without stirring) until the syrup reaches 240° F on a candy thermometer.
-
With the mixer on low, slowly (and carefully) pour the syrup into the softened gelatin. Gradually increase the speed to high, and whip until soft peaks form and hold their shape, about 8-10 minutes. Add the vanilla extract, and whip just until incorporated.
-
Divide the marshmallow between 2 microwave-safe bowls and add pink icing coloring to one and purple to the other. Cover the top of the pink batter.
-
Heat the purple marshmallow batter in the microwave for just 6-10 seconds. This will help keep it smooth while piping. Transfer the marshmallow to the piping bag fitted with the #10 tip.
Pipe a few dots of the batter onto the corners of a baking pan, line with wax paper, and sift the coating powder on top. Using the template (underneath the wax paper), pipe the starfish starting at the tip of an arm and piping from one arm to the next until completely filled in. If you have any areas that need to be smoothed dip a clean finger into a mug of warm water, dab on a towel, and lightly tap on the marshmallows (you don’t want to use too much water, or it will dissolve the marshmallow). Work quickly to pipe as many starfish as you can before the marshmallow batter starts to set.
-
When you are ready to pipe the puffer fish, heat the pink marshmallow batter in the microwave in 7 second bursts, stirring in between, until smooth (you don’t want to overheat it- just melt it enough to make it pipeable). Transfer the majority of the pink batter to the piping bag fitted with the #1A piping tip, and the rest to the bag fitted with the #5 tip.
Prepare a second baking pan as you did for the starfish. Using the template as a guide, first pipe a large round dot (with the 1A tip) for the bodies. Smooth as needed with warm water.
Next, pipe the fins with the #5 tip and smooth again as needed.
-
Use the round sprinkles in the Sprinkle Surf mix to add the decorations to the arms of the starfish (I used 3 per arm) and sprinkle a little of the glittery sugar over each starfish. Then use the jimmies in the Sprinkle Punch mix to add the spikes to the pufferfish (leaving the middle of each empty for the face). Allow the marshmallows to dry overnight.
You can either make the sea creature faces directly on the marshmallows (easier for the puffer fish) or you can make them on a sheet of wax paper and transfer once set.
-
Melt your dark chocolate chips or chocolate wafers until smooth and then use a toothpick to create the designs. For the smoothest details I like to create the design on a sheet of wax paper using the template underneath as a guide. Then I use a toothpick to help transfer the faces to the tops of the sticky marshmallows. I added the fin details directly onto the puffer fish.
You can melt a little white chocolate and dot it onto each eye to create highlights.
-
If you’d like to make the chocolate seashells, pour melted colorful wafer chocolate into a silicone mold and allow it to set before removing. I brushed the inside of mine with a little pearl dust first to make the seashells shimmery.
-
Time for the pancakes! In a medium size mixing bowl, whisk together the flour, baking powder, baking soda, salt and sugar. Set aside.
-
In a large glass measuring cup, whisk together the buttermilk, eggs, vanilla and butter until well combined.
-
Pour the wet ingredients into the dry and whisk together until mostly combined (it’s ok to have some lumps at this point as we will be mixing again to add the color).
Transfer the batter to the refrigerator for 30 minutes.
-
5 minutes before you begin cooking the pancakes heat your griddle or nonstick skillet over medium/medium-low heat. I did not use any butter or oil to grease my pan which also helps to keep the color vibrant. If you notice your first pancake sticking to the pan you can add a tiny bit of oil.
-
Divide the batter evenly between 4 bowls (2/3 cup batter each). Add gradually more of your coloring to each bowl so that the last is the most vibrant, whisking the color in until combined (you don’t need to remove all of the lumps as long as the color is even). I used blue spirulina powder, to naturally color, and added ¼ teaspoon to the first bowl doubling the amount as I went.
-
Working with 1 bowl at a time, scoop 1/3 cup batter into the middle of your prepared griddle or skillet and cook for 2-3 minutes on the first side (until bubbles rise to the surface and begin to pop), then flip and cook for 1-2 minutes on the second side until cooked through. Transfer the finished pancakes to a plate. Continue to cook the pancakes until you’ve used all of the batter.
-
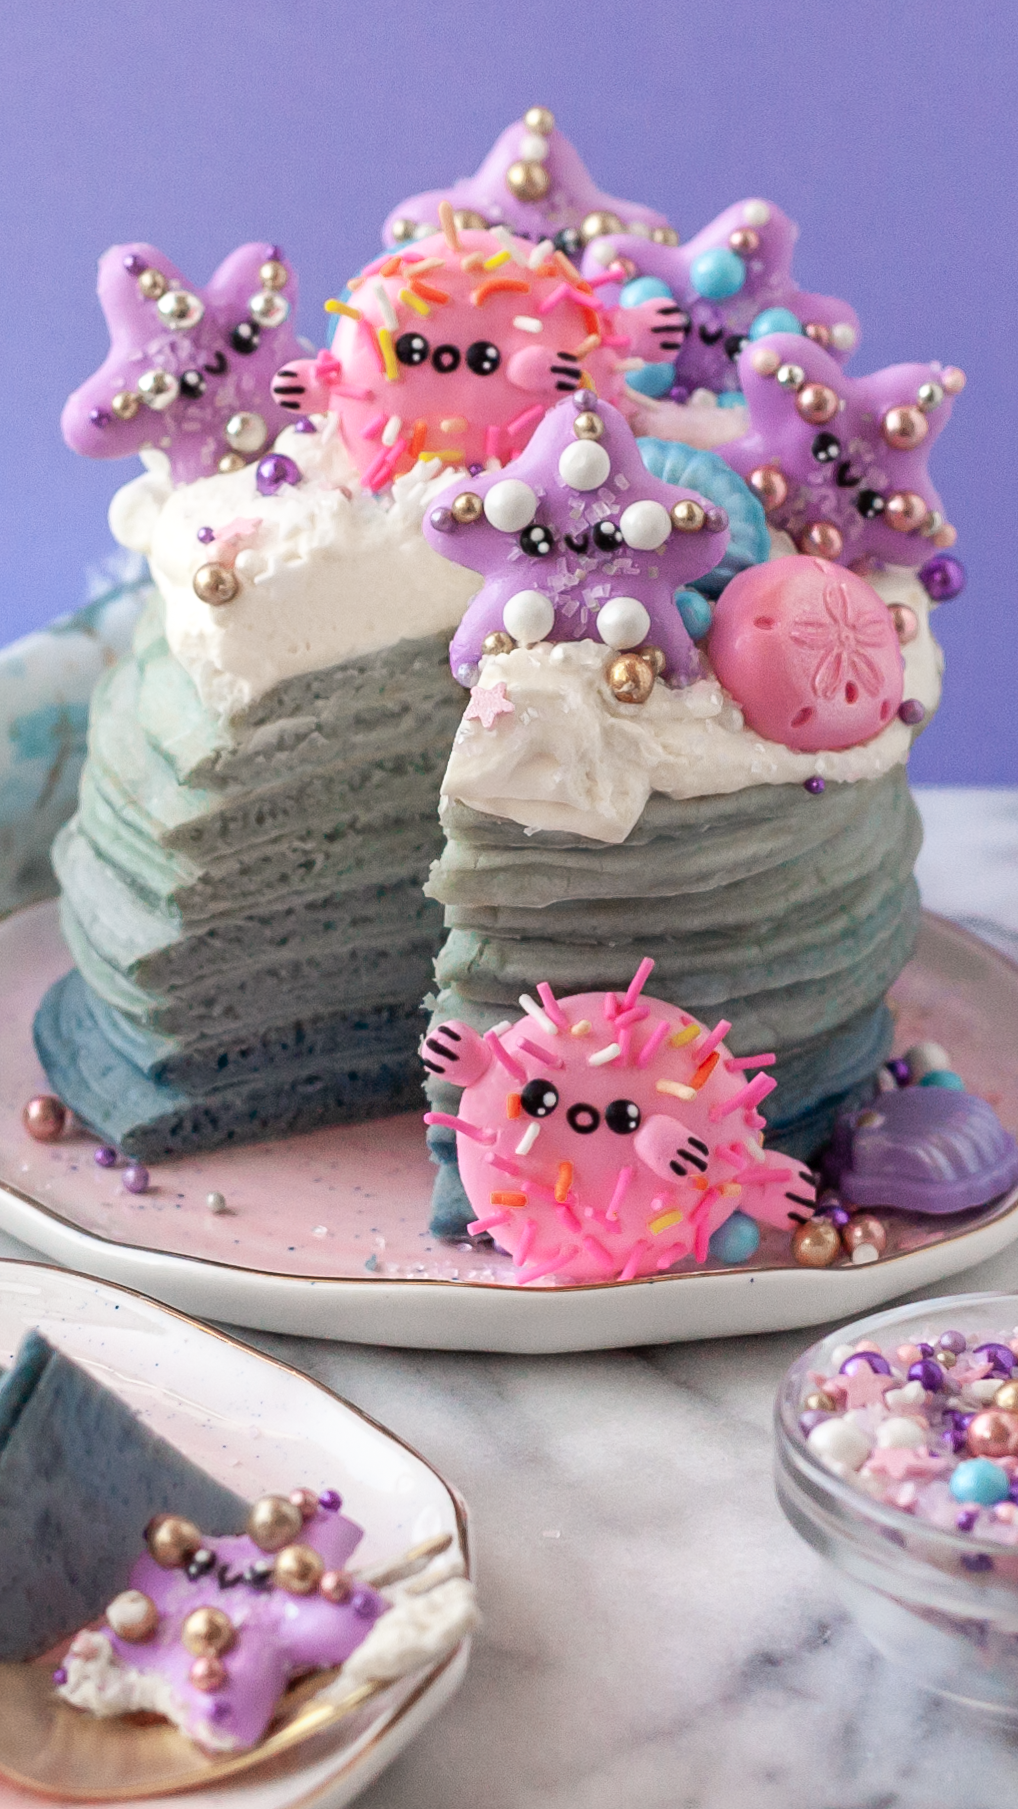
Stack the pancakes with the most vibrant blue on the bottom working your way up to the lightest blue pancakes.
-
Now for the whipped cream, then we can decorate! Transfer your mixing bowl and whisk attachment to the freezer for 15 minutes.
Once chilled, pour the cold cream, powdered sugar and vanilla extract into your mixing bowl, and beat on medium high until stiff peaks form. Use a spatula to spread the whipped cream onto the top of your pancake stack.
-
Add sprinkles over the whipped cream (I used Sprinkle Surf), then your sea creature marshmallows and chocolate shells (if using). I like to add mini marshmallows behind the homemade marshmallows to help position and hold them upright. Dig in!
-
Extra pancakes can be stored in an airtight container and refrigerated or frozen. Leftover marshmallows should be stored in an airtight container with wax paper between layers. They will be softest within the first few days of piping. Marshmallows also freeze perfectly for longer storage (they become soft again at room temp). Any leftover whipped cream should be refrigerated.
Congratulations you did it!
