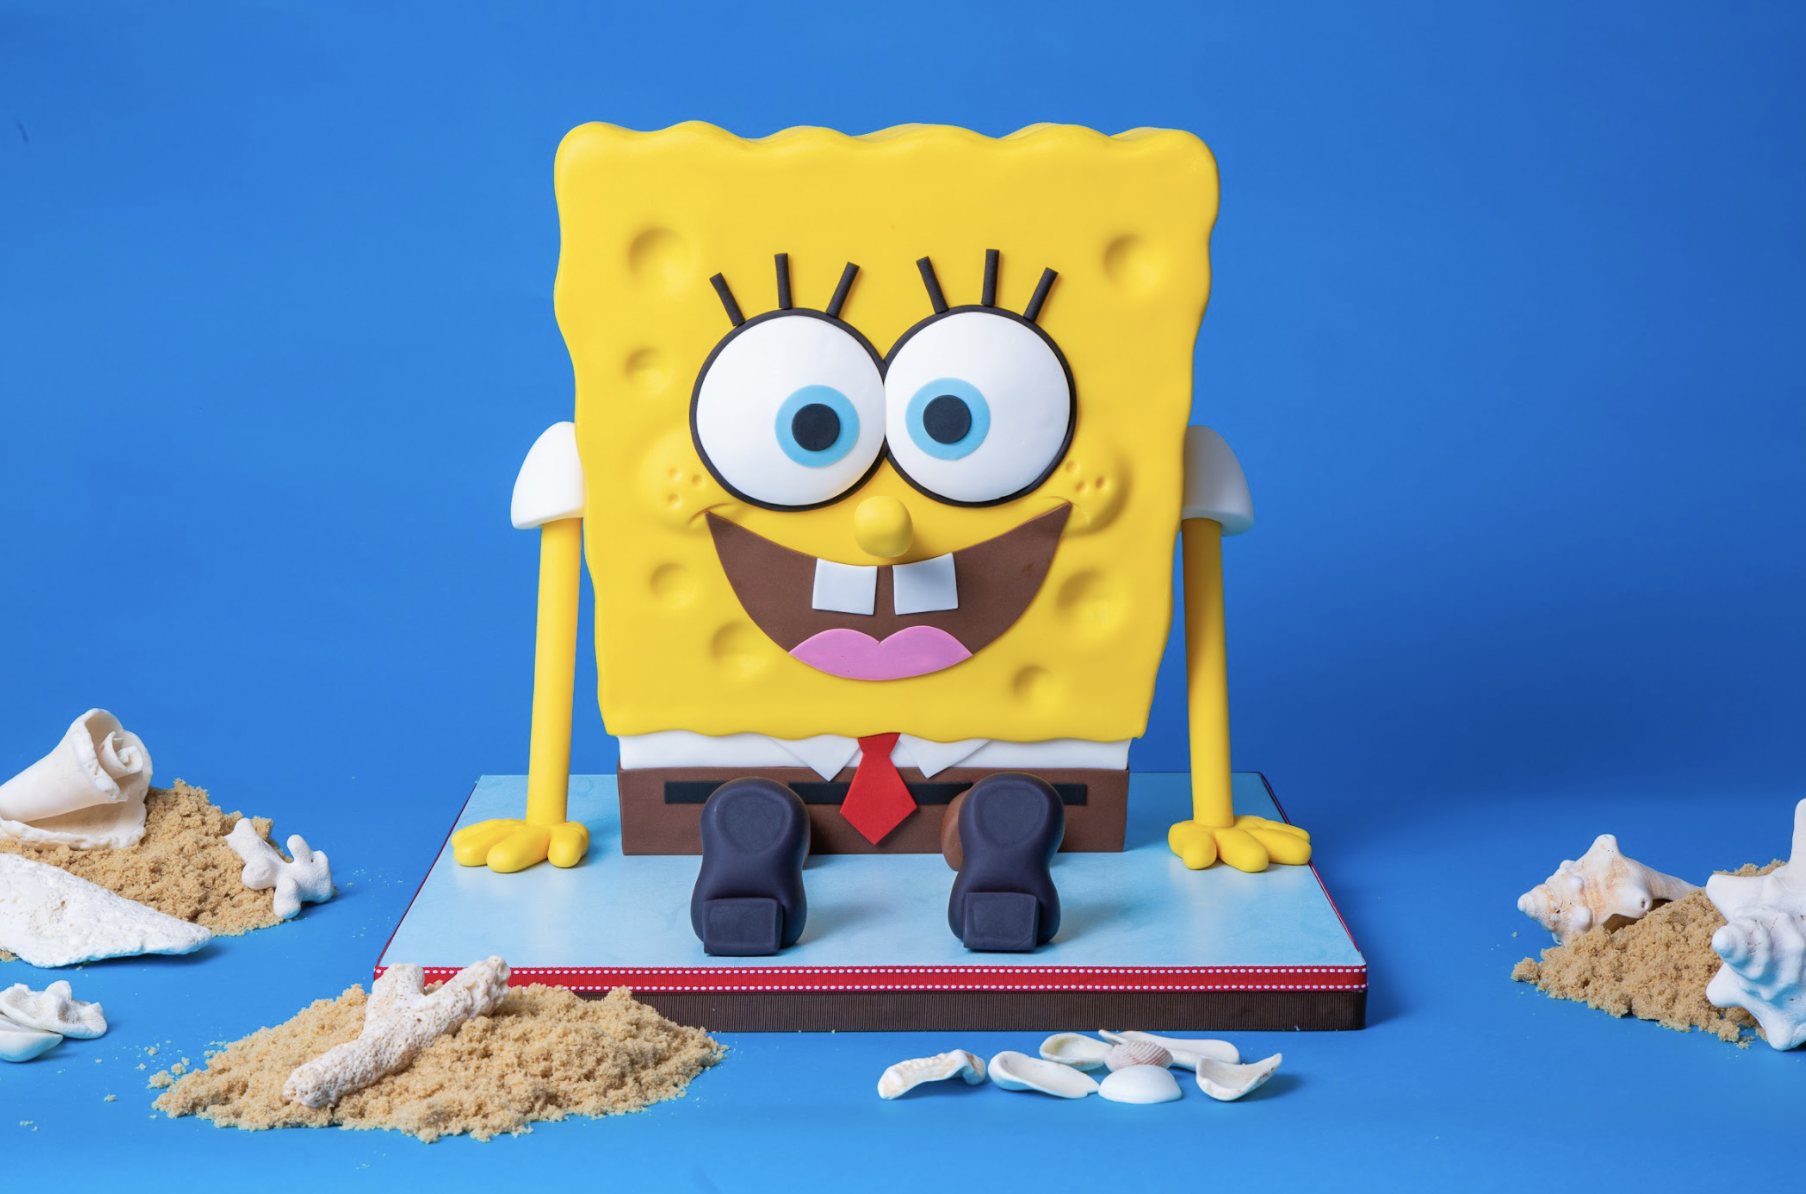
Spongebob Squarepants


Is this the Krusty Krab? No, it’s Yolanda! A cake straight from Bikini Bottom! For my son's birthday party this year, I decided to cake up the man, the myth, and the legend: Spongebob Squarepants!
Ravioli, ravioli, here is the formuoli for this cake! This Spongebob Squarepants cake is made of vanilla AND chocolate cake (I had to please a group of kids) stacked with chocolate Swiss meringue buttercream between the layers. I used rounded measuring spoons to scoop out cake to give him his classic sponge holes then dressed him up in fondant clothing and detailing.


Ingredients
Cake
- 3.5lbs Yo’s Ultimate Vanilla Cake
- 16lbs Yo’s Ultimate Chocolate Cake
Icing
- 1 batch of Simple Syrup
- 1 batch of Yo’s Chocolate Swiss Meringue Buttercream
- 1 batch of Yo’s Italian Meringue Buttercream
Decorations
- 1lb white fondant
- 4lbs yellow fondant
- 1oz pink fondant
- 1oz light blue fondant
- 1oz red fondant
- 1lb brown fondant
- 3oz black fondant
- 8oz black gumpaste
- 6oz white gumpaste
 Floral Dome Cake with Sasha Nary
$29.99
Floral Dome Cake with Sasha Nary
$29.99


Read It!
-
Line your pans with parchment paper and preheat your oven to 350 degrees Fahrenheit. Prepare 3.5lbs of vanilla cake batter and 16lbs of chocolate cake batter. Bake as follows:
10” square cake pan → 3.5lbs vanilla cake batter → 1 hour 20 minutes
12” square cake pan → 8lbs chocolate cake batter → 1 hour 30 minutes
11 x 15” rectangular cake pan → 8lbs chocolate cake batter → 1 hour 20 minutes
-
Remove your cakes from their pans then level each one and remove the caramelization from the vanilla cake.
-
Cut your cakes into strips as follows:
10” vanilla cake → 2 strips
12” chocolate cake → 2 strips
11x15” chocolate cake → 3 strips
-
Layer each of your cake strips into 2 layers each.
-
Use Sir Squeeze A Lot to simple syrup all of your cake layers then let sit aside to absorb.
-
Fill and stack your cakes in 4 parts as follows:
#1: 2 layers of vanilla cake with IMBC
#2: 3 layers of chocolate cake with chocolate SMBC
#3: 3 layers of chocolate cake with chocolate SMBC
#4: 4 layers of chocolate cake with chocolate SMBC
Place all four parts in the fridge to chill.
-
If necessary, level each of your cake parts then stack your 3 chocolate sections on top of each other with the widest part on the top.
-
Use a template to carve the stack of chocolate cakes into Spongebob’s body then carve the front and back in an A-line shape to make the cake slightly narrower at the bottom. Once you are happy with the shape, unstack your cakes (remember the order) and use the top of the template to carve the waves along the top of the cake.
-
Measure the top of the second and third cakes (the ones without waves) and cut foam board to fit the exact measurements of each.
-
To make Spongebob’s pants, take your vanilla cake stack and use the same template to carve a slight A-line shape. Once you are done carving, measure the top of the cake and cut a board to fit it exactly. Carefully flip the cake over and measure the base of the cake then cut two more boards to the same size. Hot glue the two base boards together.
-
Glue your double board to the base board then begin building your cake starting with vanilla cake at the bottom and adding dowels into the stack. Glue another board on top with a thin layer of IMBC then add your smallest chocolate cake stack. Continue to dowel and board your cakes all the way to the top. Once you have stacked all your cake parts, cut two dowels to the height of the cake then sharpen one end of each dowel. Hammer down the sharpened dowels all the way into the cake baseboard.
-
Crumb coat the entire cake with IMBC then chill in the fridge until firm. Remove, then ice again and chill.
-
Use a rounded measuring spoon or a melon baller to scoop out holes from the cake (he is a sponge after all!). Ice the holes by brushing IMBC into them.
-
Roll out your brown and white fondant into thin sheets then cut them both into strips for the pants and shirt. Add the pants onto the cake first then add the white above and trim away any excess.
-
Roll some more white into rounded mounds then use an oval cutter to cut out 2 cheeks. Round them out more and add them to the cake.
-
Measure the length of the cake up both sides and across the top. Roll a strip out a strip of yellow fondant that is long and wide enough to drape across the top and down both sides then drape it on by rolling the sheet around a French rolling pin and unraveling it over the cake. Smooth it out using a fondant rolling pin to help with the curves. Use your fingertips and a rounding measuring spoon to help accentuate the holes. Trim away any excess fondant flush to the cake.
-
Roll out more yellow fondant to cover the front and back of the cake. Cover the cake then accentuate the holes and trim away the excess. Trim along the bottom of the yellow in a wavy pattern where it meets the white fondant.
-
Grease two sphere pans with shortening then cut your gumpaste in half and press it down to the bottom of the pans. Place the pans in the fridge so the gumpaste gets firm.
-
Roll out your remaining colors of fondant: pink, red, black, blue, and brown. Use a template to cut out the details including his eyes, pupils, tongue, tie, shirt collar, teeth, and belt, all out of their corresponding colors. Assemble the mouth and eyes with clear piping gel.
-
Cut dowels to the length of Spongebob’s legs and arms and brush them with a bit of clear piping gel then wrap the dowels in yellow fondant. Trim away any excess. Add a bit of CMC to 4oz of yellow fondant then carefully form two hands. Use more fondant to form his nose on a lollipop stick (leaving enough stick exposed to insert into the cake) and have it dry upright.
-
Roll out some thin white gumpaste then wrap them around his legs to create socks. Cut two thin red and blue strips of fondant then glue them to the top of the socks with piping gel.
-
Roll out a thick cylinder of brown fondant then cut it in half. Insert a dowel into the cylinders to create pilot holes then form around the top of his two legs to make his shorts.
-
Create two peanut shapes shoes out of black gumpaste with pilot holes then add a smaller piece as the heel.
-
Remove the eyeballs from the sphere pans and thin them out if necessary with a fondant rolling pin. Cut the eyes to size with a circle cutter then glue on the pupils. Attach to the cake using lollipop sticks and some royal icing.
-
Create fondant paste out of yellow, white, and brown fondant then smooth out all the edges of the cake.
-
Add on belt loops to his pants, then add on his tie, collar, and mouth. Indent the corners of his mouth with a circle cutter then poke dimples with a sculpting tool. Clay extrude black fondant cords to outline his eyes then cut out eyelashes from the same cords and add them on as well. Lastly, insert his nose into the cake using a bit of royal icing.
-
Use white gumpaste to form sleeves then add them onto his arms. Add on the arms then add the hands to the bottom of the cake. Finally, add his legs to the front of the cake and attach his shoes.
Congratulations you did it!
