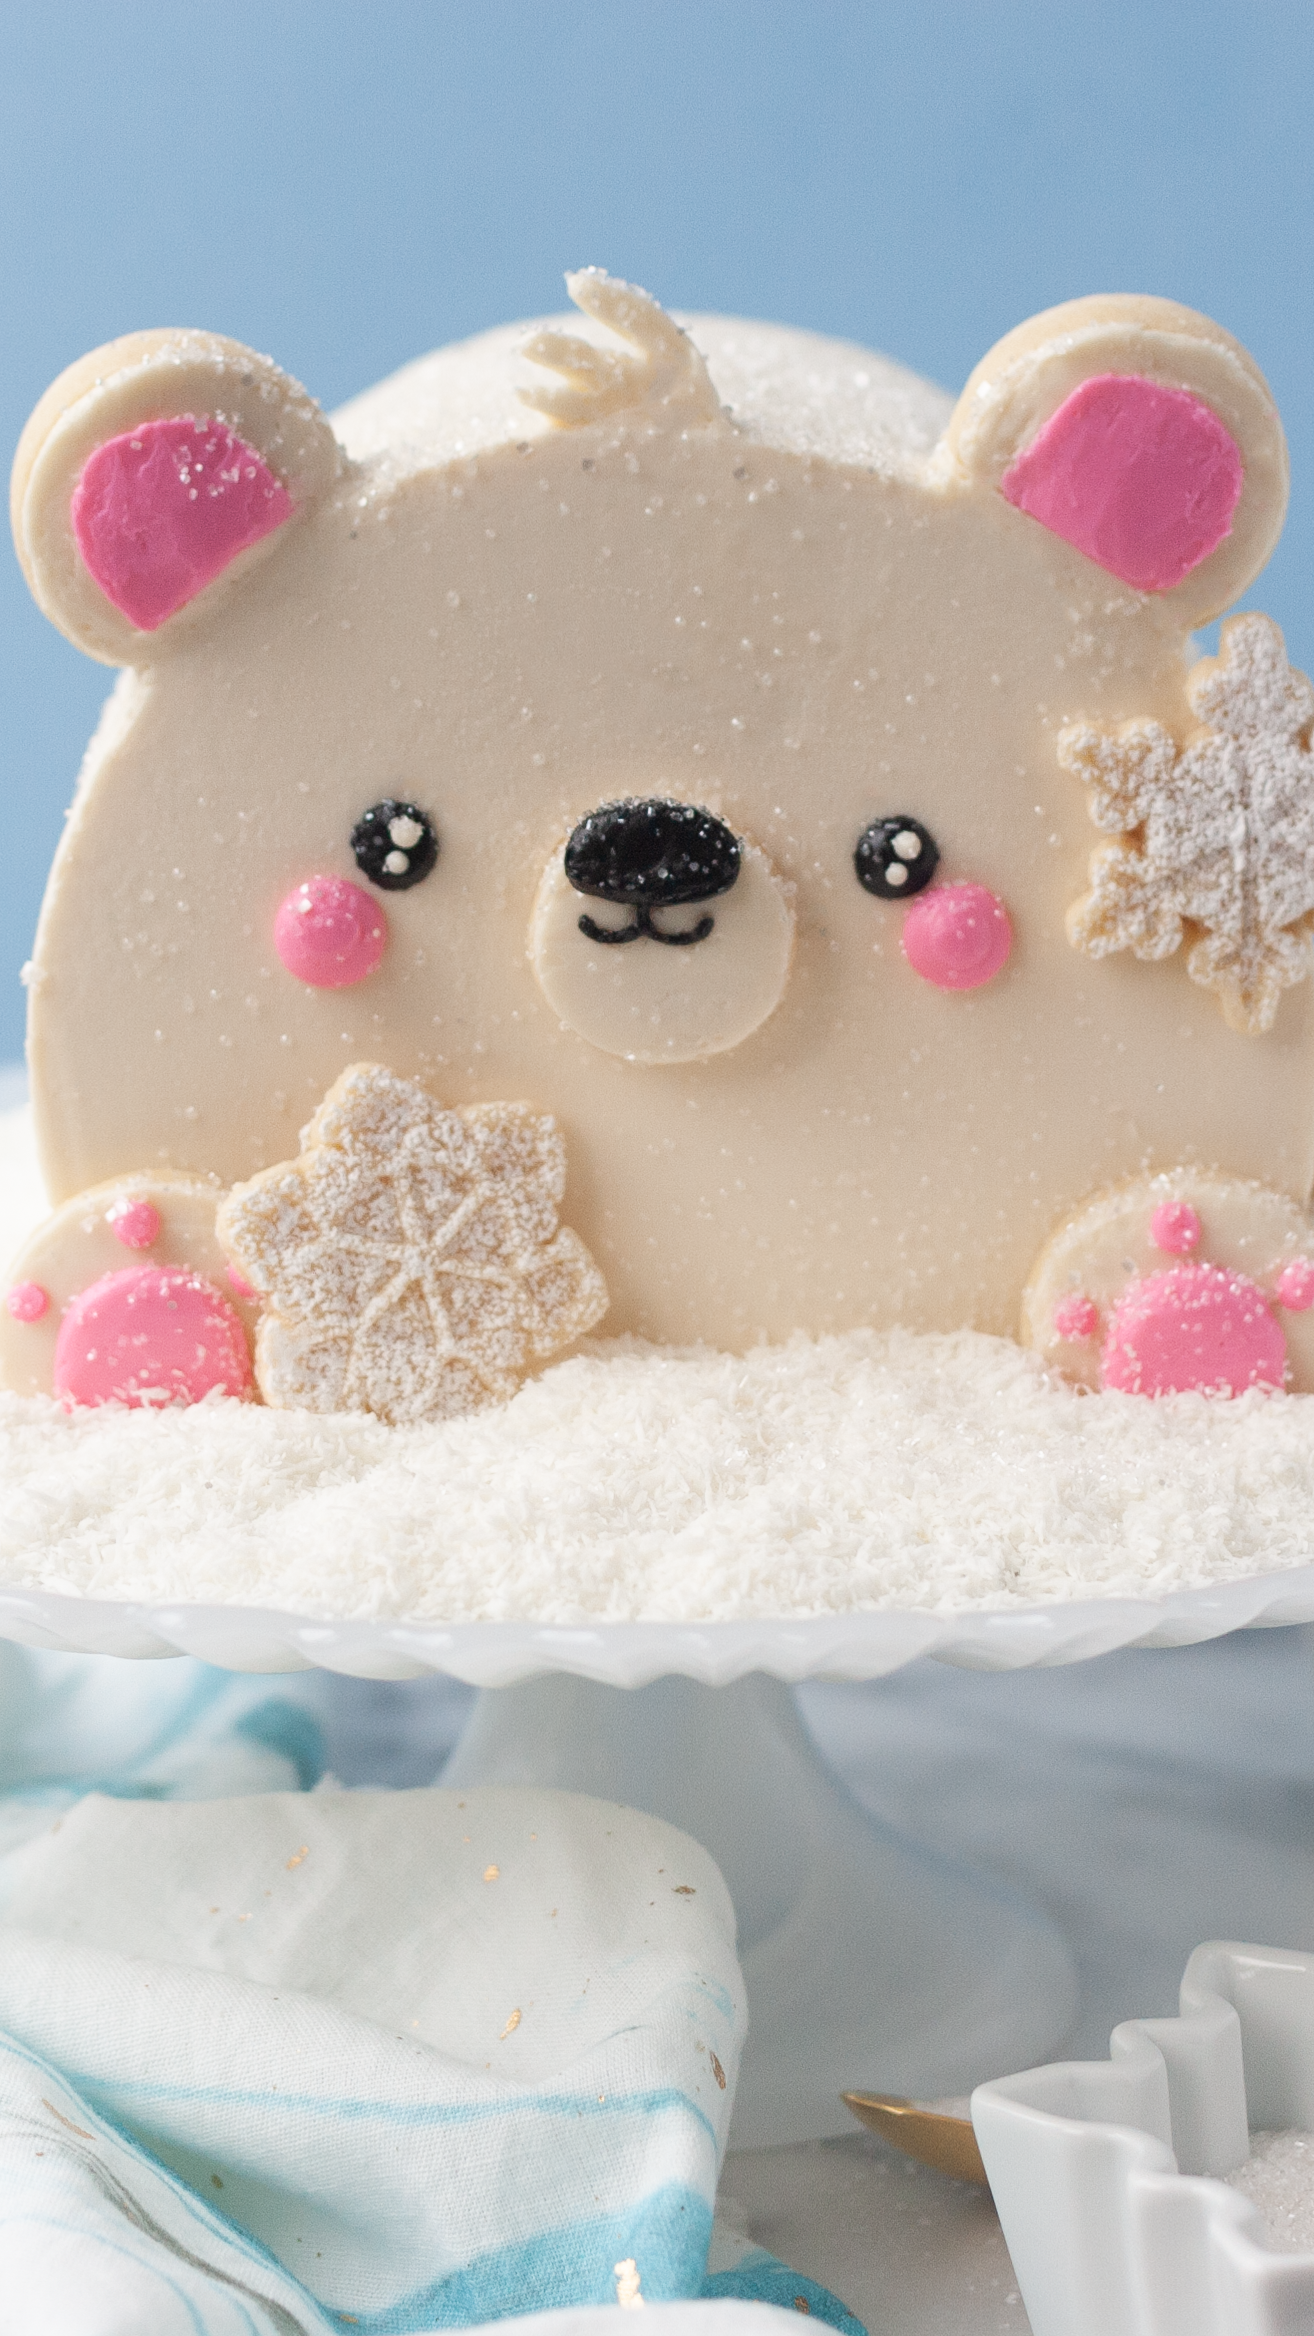
Gingerbread Polar Bear Cake Top Forward


Bear , Forward cake , Holiday , Holidays , Jessica , Polar bear , Polarbear , Poler , Poler bear , Roll cake , Snow , Snow day , Snowflakes , Snowlfkaes , Sprinkle service , Teddy bear , Winter , Winter animal , Winter party
Bundle up with this adorable AND delicious cake full of holiday flavors!


Ingredients
Gingerbread Cake
- 2 cups all-purpose flour
- ¾ teaspoon baking soda
- ¾ teaspoon baking powder
- ½ teaspoon salt
- 1 ½ teaspoons ground cinnamon
- 1 ½ teaspoons ground ginger
- ¼ teaspoon ground cloves
- ¼ teaspoon ground nutmeg
- ½ cup (1 stick) unsalted butter, room temperature
- ½ cup brown sugar, packed
- 2 large eggs, room temperature
- ½ cup unsulphured molasses (not blackstrap)
- 1 tablespoon fresh ginger, grated
- ¼ cup sour cream, room temperature
- ½ cup whole milk, room temperature
Swiss Meringue Buttercream (Makes about 5 cups)
- 7 large egg whites
- 1 ¾ cups caster sugar (or extra fine granulated sugar)
- ⅛ teaspoon salt
- 2 cups (4 sticks) unsalted butter (removed from the fridge about
- 30 min before making)
- 2 teaspoons vanilla extract
Sugar Cookies
- 2 ¼ cups all-purpose flour
- ¼ cup cornstarch
- ¼ teaspoon salt
- ¾ cup unsalted butter, room temperature
- ¾ cup granulated sugar
- 1 large egg, room temperature
- 1 teaspoon vanilla extract
- ¼ tsp lemon or almond extract (optional)
- Powdered sugar (optional, for dusting)
** Makes about 2 dozen cookies, depending on the size of the cookie cutters you use
Decorations
- 1/3 – ½ cup gingersnap cookies, crushed
- White sparkling sugar (optional)
 Floral Dome Cake with Sasha Nary
$29.99
Floral Dome Cake with Sasha Nary
$29.99
Read It!
-
I like to break the entire process up and spread it out over several days, so everything has time to cool, and it won’t take up your entire day. Bake the cakes the day before frosting and decorating. Wrap each completely cooled layer in plastic wrap and transfer to the freezer. Remove about 45 min before decorating. This helps keep them firm for stacking and cutting.
To bring all the chilled ingredients to room temperature, remove them from the refrigerator about 45 minutes before you begin.
To save time and any hassle of leveling the cake layers, I like to bake them up nice and flat. Bake even strips help a lot with this and they help the cake retain moisture (so the edges won’t overcook or brown before the middle is set). Just soak them in warm water while preparing the cake batter.
The cookie dough works best when it’s kept cold. If it starts to get too warm or sticky, when cutting out the shapes, just pop it into the freezer for about 5-10 minutes before continuing.
Depending on the temperature of your butter (and your kitchen), the swiss meringue buttercream can sometimes be a bit finicky. If the egg white and sugar mixture whips into stiff peaks anything after that step can be salvaged. Soupy buttercream means it is too warm- pop the entire mixing bowl in the fridge for 20 minutes and whip again. If the buttercream curdles it is too cold. My favorite way to fix this is to blow a hair dryer on the outside of the mixing bowl while whipping the frosting on medium speed (just move it around while it whips so you aren’t melting the buttercream).
To achieve a smooth buttercream finish on the cake, always re-whip buttercream that’s been sitting out for a few hours, or overnight, with a spatula to get rid of air bubbles.
-
Let’s begin with the cake! Preheat the oven to 350ºF. Grease both 6” cake pans, line the bottoms with parchment paper circles, grease again and flour. Set aside.
-
In a large mixing bowl, whisk together the flour, baking soda, baking powder, salt, and spices. Set aside.
-
Add the softened butter to the bowl of a stand, or handheld, mixer fitted with the whisk attachment. Beat on medium speed, for 1 minute, or until soft and creamy. Add the brown sugar and continue to beat for 2 more minutes. Scrape down the sides of the bowl.
-
Add the eggs, one at a time, mixing well in between and making sure they are fully incorporated.
-
Add the molasses (you can spray your measuring cup with non-stick cooking spray to make it easier to pour) and fresh ginger and mix again. Scrape down the sides and bottom of the bowl.
-
In a large measuring cup, whisk together the milk and sour cream until smooth.
-
With the mixer on low, alternate adding the flour and milk to the mixing bowl, starting, and ending with the flour (in 3 additions). Mix just until the batter comes together. Scrape down the sides of the bowl and use a spatula to stir in any extra flour.
-
Evenly divide the batter between your 2 prepared cake pans. If using bake even strips, lightly wring out a bit of the water and tighten them around your pans.
-
Transfer the cakes to the middle rack in the oven and cook for 30 minutes. I like to then rotate the pans for another 5-10 minutes. You will know the cakes are done when a toothpick inserted in the center comes out with just a few moist crumbs (not wet). Mine was done in 40 minutes, but check after 30 and 35.
-
Transfer the cake pans to a wire cooking rack to cool. Once cooled, invert the pans (you may have to carefully run an offset spatula between the cake and the pan to release) and allow them to cool completely. Then wrap in a double layer of plastic wrap and transfer to the freezer overnight. You can stack them on cake boards if it makes it easier to move them around.
-
While chilling the cake we can make the cookies! In a medium size bowl, whisk together the flour, cornstarch, and salt. Set aside.
-
In the bowl of a stand mixer, use the paddle attachment to cream the butter and sugar on medium speed for 3 minutes until fluffy.
-
Add the eggs, vanilla, and additional extract (if using) and continue to mix until thoroughly combined. Scrape the sides and bottom of the bowl.
-
Add the flour to the wet ingredients and mix on the lowest speed just until the batter begins to come together into a dough.
-
Roll the dough out to ¼ inch thick, between 2 sheets of parchment paper. Transfer to the refrigerator to chill for one hour.
-
Preheat the oven to 375°F. Remove your chilled dough and use the Ateco cookie cutter set to cut out 6 circles with the 1.5” cutter, and 1 with the 1.25” cutter. Use the extra dough to stamp out snowflakes or any designs you would like (extra dough can also be double wrapped, placed in a freezer-safe bag and frozen for longer storage).
-
Arrange the cookies onto a parchment lined baking sheet and transfer the entire tray to the freezer for 10 minutes.
-
Once chilled, bake the cookies for 8-12 minutes or until the edges are starting to set, and the bottom is just a little golden (larger cookies will need more time). For a crisper cookie, bake longer.
-
While the cookies are still warm, cut one side off the bottom of each 1.5” circle for the paws and ears (to give them a straight edge). Allow the cookies to cool for 5 minutes on the baking sheet before transferring them to a wire rack to cool completely.
-
Time for the frosting ☺! The Swiss Meringue Buttercream can be made in advance. You’ll just want to re-whip it the day you are frosting and assembling your cake. I left the frosting that covers the cake the natural color, since real polar bears are actually more of an off white than bright white. But if you’d prefer to brighten it, you can either add a teeny bit of purple icing gel while mixing, or a little of the white icing gel before the second coat of frosting goes onto the cake. To begin, you want to make sure your mixing bowl, whisk and paddle attachments, and all tools are 100% free from any grease or the egg whites won’t properly set up. I like to rinse them with a little white vinegar mixed with cold water.
-
Crack the eggs, one by one, in a small bowl, adding the egg whites to a large mixing bowl (this prevents any yolks from contaminating all the eggs at once). Whisk in the sugar and salt.
-
Set the bowl over a saucepan filled with about 1 ½ -2 inches simmering water and whisk constantly. Make sure the bowl of egg whites is resting above the water and not touching it. Continue to whisk until the mixture begins to thin out and become a bit frothy looking. Carefully dip a clean finger into the egg white mixture and rub 2 of your fingers together to see if you can feel any sugar granules. Once the mixture is completely smooth and warm to the touch it is ready. You can also use an instant read thermometer to check when the mixture comes to 160°F.
-
Carefully pour the warm egg white mixture into the bowl of your stand mixer, fitted with the whisk attachment, and beat on medium-high for 15 minutes, or until stiff peaks form and the outside of the bowl is cool to the touch. If stiff peaks form but the bowl is still warm pop it in the fridge for about 10 minutes before continuing onto the next step.
-
Replace the whisk attachment with the paddle attachment, and with the mixer on medium speed, very slowly add the butter 1 tablespoon at a time, allowing each to become fully incorporated before adding more.
-
Once all the butter has been added, add the vanilla, and increase the speed to medium-high whipping again for 1 minute.
-
Now that everything is made, we can assemble the cake! I like to use acrylic disks and a turntable for this, but you can decorate without them as well. Add a little of the buttercream to a cake board and lay your first layer of cake on top (the bottom of the cake against the cake board. Pipe or spread a layer of the SMBC over the cake and then pipe a ring of buttercream around the edge of the layer and fill the middle with crushed gingersnap cookies (the ring of buttercream helps to keep the cookie pieces from mixing into the frosting on the outside of the cake).
-
Add the second cake layer (with the bottom of the cake facing up). Gently press down and make sure the cake is level.
-
Crumb coat using the 2 Ateco spatulas to transfer frosting to the sides and top of the cake and roughly smooth the frosting. I also like to use a bench scraper for this process. Transfer the cake to the refrigerator for 30 minutes.
-
Once chilled, repeat the process of adding buttercream to the cake, and use the Ateco spatulas and a bench scraper to smooth as much as possible. Transfer back to the refrigerator for at least 1-2 hours.
-
Next, we will do a cold scrape which allows us to get razor sharp edges. This works because we used a meringue-based buttercream. Make sure the frosting is firm and then use your same spatula tools to gently scrape any excess frosting away and smooth.
-
Wrap a second (sturdy) disk or cake board in parchment paper- secure the paper well with tape. Place the parchment against the top of the cake, and carefully flip the entire cake so that the bottom is now on top. Gently peel off the previous cake board and add a thick layer of frosting to the new top of the cake (being careful not to dislodge crumbs as we didn’t do a crumb coat on this part). Smooth as much as possible then transfer the whole cake to the fridge for 15 minutes.
-
Once chilled, cut about 1.25” off the bottom of your stacked cake (you can cut more or less depending on how you’d like the shape to look). This will be the area that the cake rests on when we flip it forward. Prepare your final presentation cake board with a line of buttercream to secure the cake.
-
Very carefully lift the cake and bottom cake board and use your hand or a cake spatula to hold the bottom (cut section) of the cake – so that the cake is now tilted upright like an arch. Gently remove the back cake board and parchment paper. Place the cake onto your prepared board. Use the Ateco spatulas to smooth out any areas that need fixed after moving. Place the whole cake back in the fridge for another 10-15 minutes.
-
Time to decorate! Divide the remaining SMBC into 3 bowls – with the majority into 1 bowl and a small amount (about 1/3 cup or less) in the other 2. Use the Black and Pink How to Color It icing gels to color the 2 smaller bowls of buttercream. To get a vivid color, just remove about 1-2 TB of buttercream and place it into a small microwave-safe bowl. Add the desired icing gel color and heat for 5-6 seconds. Stir and then stir the colored icing into the larger bowl of icing.
-
Fit 3 piping bags with couplers. Transfer the black, pink, and uncolored buttercream to each bag.
-
Using either the #5 or 8 piping tips with the plain buttercream, attach the snout and paw cookies to the cake. Pipe buttercream over the cookies and use the Ateco spatulas to smooth.
-
Use the #2 &11 piping tips and the black buttercream to pipe the nose, mouth, and eyes onto the cake. Use the #11 & 8 piping tips and the pink buttercream to add the cheeks and paw details. You can also use the plain SMBC to add highlights to each eye. Chill the cake in between any steps, for about 10 minutes, if needed to help smooth the buttercream.
-
Use the #8 piping tip and plain buttercream to pipe between 2 cookies for the ears (forming a cookie sandwich for each ear). Attach to the top of the cake with more SMBC and then frost and smooth. Use the #11 piping tip and the pink buttercream to add the inside details to the ears. You can also add little fur “hair” tufts at the top of the head with the plain SMBC and piping tip #352. Sprinkling with sanding sugar will add a glittery “snowy” look. To finish the decorations on our winter cake, add either plain stamped snowflake cookies (or the designs of your choice) or lightly dust the cookies with powdered sugar right before adding. You can also decorate them with leftover buttercream if you choose. Admire and enjoy your adorable creation, then enjoy!
-
Leftover cake should be covered and stored in the refrigerator. Let sit at room temperature for about 30 minutes before eating.
Congratulations you did it!
