Giant Hot Pepper Cake


Chilli , Collection--novelty-cake-recipes , Collection--novelty-recipes , Fun summer cake , Giant , Heat , Hot , Hot dog , Hot pepper , Jalapeno , Mexican , Spice , Spicy , Spicy mayo , Summer , Sweet chili heat
Feelin' Hot Hot Hot! This week I caked up something… Too hot to handle! ;) I’m really happy with how this cake turned out but I still need help naming her! Make sure you leave your name suggestions in the comments on the new video!
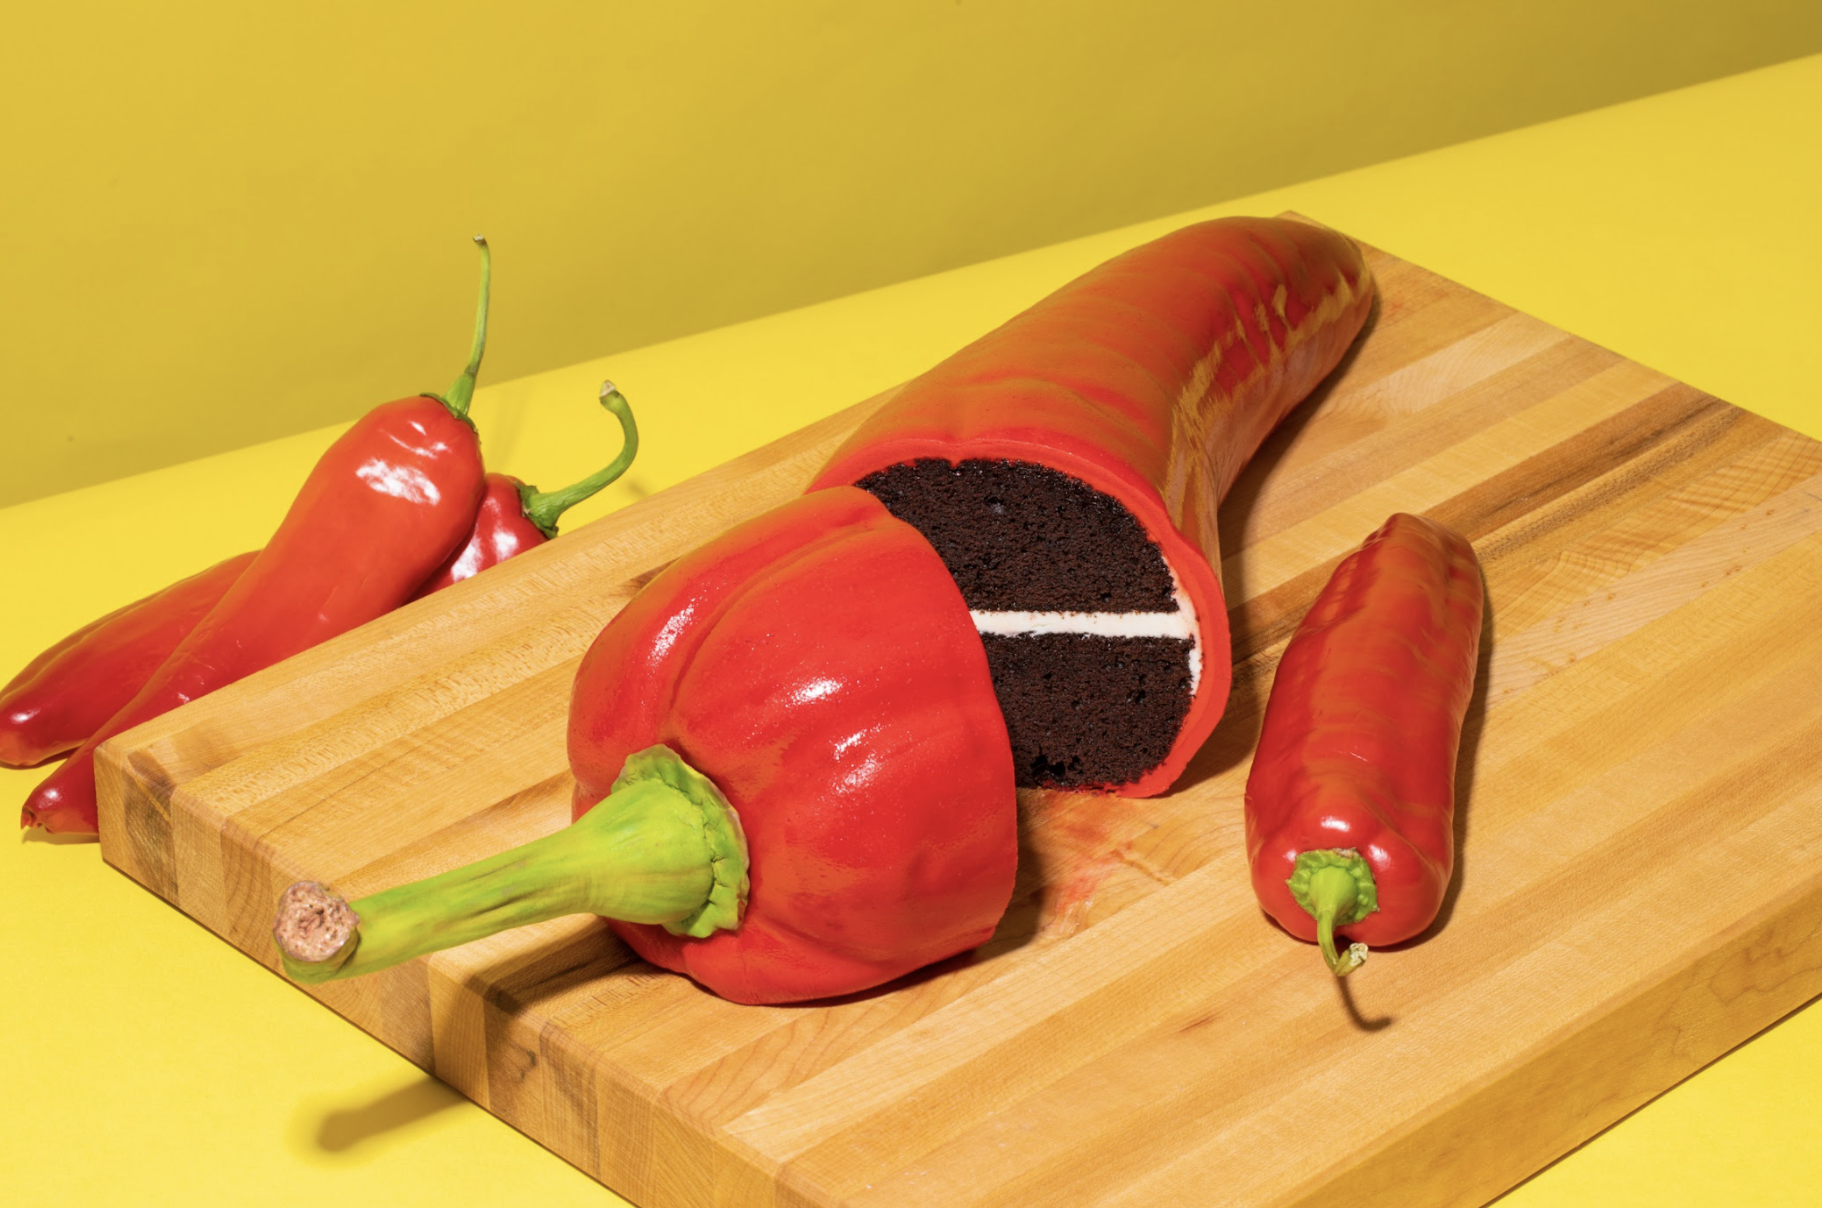
This Giant Hot Pepper is calling for some spicy heat! It’s made of sweet chocolate cake layers iced with bright red Italian meringue buttercream then draped in a bright red fondant detailed with veins and wrinkles then painted in a mix of reds. I also added a green gumpaste stem which I painted in green, brown, and citrine lustre dusts to give it dimension!


Ingredients
Cake
- 3.5lbs of Yo’s Ultimate Chocolate Cake
Icing
- 1 batch of Simple Syrup
- 1 batch of Italian Meringue Buttercream
Decorations
- Red gel food coloring
- Bright red gel food coloring
- Orange gel food coloring
- White gel food coloring
- 1.5lb red fondant
- 2oz green gumpaste
- Powdered colors: green, citrine, cappuccino

Tools
- 9" round cake pans
- Parchment paper
- Sir Squeeze A Lot
- Ball tool
- Veining tool
- Wooden dowel
- Paintbrushes


Read It!
-
Line your pans with parchment paper then preheat the oven to 350 degrees Fahrenheit. Prepare 3.5lbs of chocolate cake batter and divide evenly in your pans. Bake for 55 minutes.
-
Remove your cakes from their pans then level each into 2 layers. Cut each cake into 2 semi circles.
-
Stack your semi circles in 2 groups then begin to carve the bottom shape of a pepper out of one stack. Line up your second stack and carve the rest.
TIP: If you’re finding it difficult to carve, take a break and continue to carve after you’ve iced and chilled the cake.
-
Use Sir Squeeze A Lot to soak each of your cake layers with simple syrup then set aside to absorb.
-
Fill and stack your cakes with Italian meringue buttercream then chill the stacks.
-
If necessary, continue carving your cake now.
-
Use your red gel colorings to color your IMBC a bright red.
-
Crumb coat your cake in the red IMBC then chill your cake until firm. Remove your cake from the fridge then ice again - this time using my invention (a square piece of acetate) to smooth out the edges.
-
Roll out a large sheet of red fondant - large enough to cover the entire cake. Drape it over the cake then smooth it out. Make sure you tuck it under the sides of the cake then trim away any excess.
-
Use various sculpting tools and your fingertips to add veins and texture to the pepper then use different ball tools to add wrinkles.
-
Use green gumpaste to form the pepper stem around a wooden dowel. Create more texture on the stem using a veining tool until you are satisfied with it.
-
Insert a wooden dowel into the cake for support - add more if necessary to help prop it up.
-
Paint your entire pepper using a mix of bright red and orange with clear food grade alcohol then paint on a darker red paint near the tip of the pepper.
-
Carefully remove the stem from the wooden dowel then prop it onto a cake dummy. Dry dust it with green and citrine then add brown lines with cappuccino. Add clear food grade alcohol to the cappucino to darken it then use the paint to highlight the edges and top. Add a bit of white to the top of the step then add the entire stem back onto the cake.
Congratulations you did it!
