Red Velvet Steak Cake


Because Steaks & Cakes Are The PERFECT Pairing For Father’s Day! If there’s anything I know about dads, it’s that they just want to be appreciated, relax, and maybe enjoy a nice hunk of barbecued steak one in a while. That’s why, I’m making the ULTIMATE Dad-cake this Father’s Day to celebrate all the hard work they do for us!
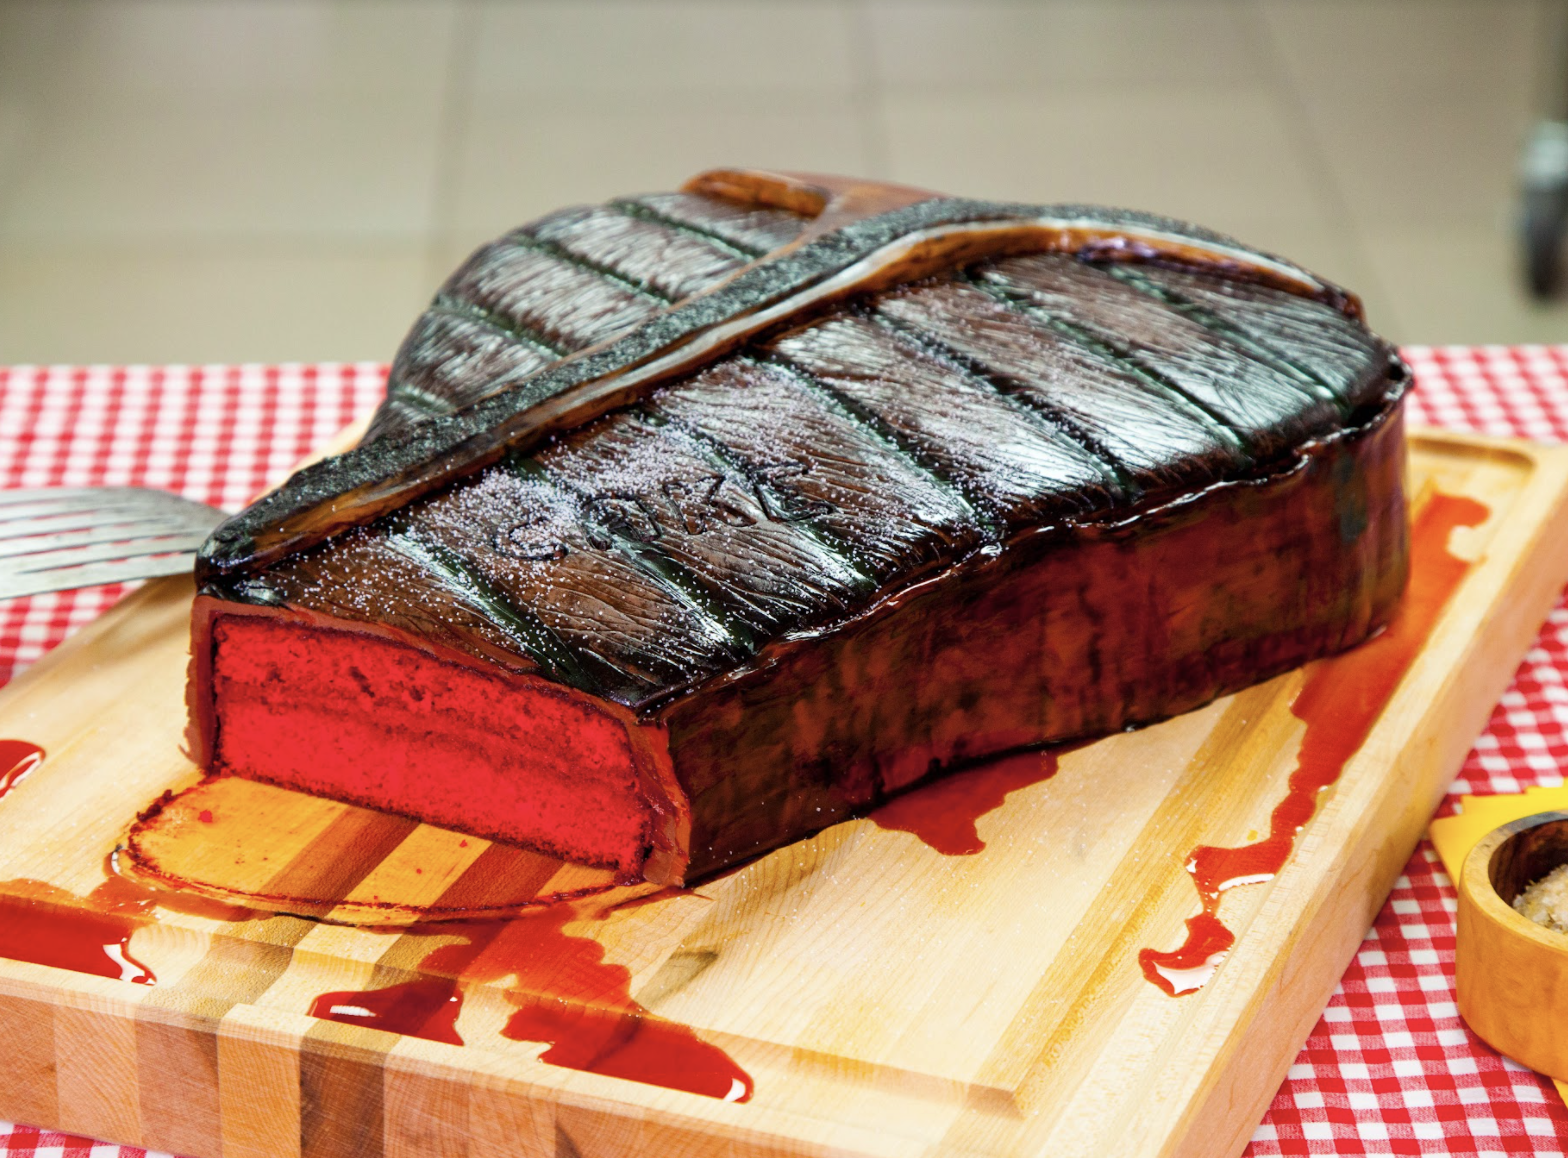
To make this Steak cake, I whipped up some Ultimate Red Velvet Cake, iced it with crimson-dyed Italian Meringue buttercream and added enough fondant and painted details to make it look so realistic, your dad may truly miSTEAK it for the real thing! (See what I did there?)


Ingredients
Cake
- 8 lbs Yo’s Ultimate Red Velvet Cake
Icing
- Simple Syrup
- Italian Meringue Buttercream
- Red (No Taste) Food Gel
- Red Food Gel
- Crimson Food Gel
Decorations
- 2 lbs Chocolate Fondant
- 1 ½ lbs of White Fondant
- Burgundy Food Colouring
- Ivory Food Colouring
- Icing Sugar
- Clear Food Grade Alcohol
- 1 lb Modelling Chocolate
- Brown Food Gel
- Coarse Sugar


Read It!
-
Prepare 8 lbs of Yo’s Ultimate Red Velvet Cake recipe. When you’re happy with the colour, divide your batter evenly into each of your 12” square pans. Bake at 350 degrees for about 1 hour, or until a toothpick comes out clean. Cool cakes completely in their pans sitting on a wire rack.
-
Prepare your Italian Meringue Buttercream. Set aside at room temperature.
-
Prepare your simple syrup and set aside at room temperature.
-
Prepare one recipe of my Modelling Chocolate. Set aside at room temperature.
-
Once your cakes are completely cool, level the tops of each cake using a ruler and a serrated knife, but leave the caramelization on the bottom and sides of your cake. In this case, the caramelization really lends itself to look the way a cooked steak looks - pinker in the middle, and darker around the edges - so you’ll want to leave it on your cake for this reason.
-
Place your first 12” square cake so that the caramelization is on the bottom. Next, flip your second cake over and stack it on top of your first cake so that the caramelization is on top. Using a hand-drawn template or a photo for reference, begin to carve out the shape of your steak. Because a steak is typically meatier at the top, I used the bulk of my 12” cakes for the top portion and then moved my remaining cake pieces alongside the bottom of the cake and continued to carve the bottom of the steak shape.
-
When you’re happy with the overall shape of your cake, flip the top cake off of the bottom layer so that both layers now have the caramelization facing down. Shower your cakes with a layer of simple syrup and allow to soak in completely before moving on to the next step.
-
Using the same food colouring you used to dye your cake batter, dye 2 cups of your Italian Meringue buttercream a bit deeper shade of red than the colour of the inside of your cake. Once you’ve achieved a colour you’re happy with, set aside.
Note: It’s helpful to mix the dye into your buttercream with the cake sitting next to you so you can compare the colours of both.
-
Lay your first 12” square cake onto a cake board with the caramelization on the bottom. Spread on a layer of red buttercream, making sure to spread a thicker layer in the centre of the cake, while spreading a very thin layer toward the sides. This is so we can create a ‘dome’ shape in the center of your cake when you stack your second layer, making your steak look ‘meatier’ or more ‘rare’ in the middle. When you’ve built up enough buttercream in the middle, stack your top cake layer so that the caramelization is facing up.
-
Take your remaining red buttercream and mix in some brown food colouring so that it looks closer to a ‘cooked steak’ colour. Crumb coat the entire cake in this buttercream using your small offset spatula & chill in the fridge for about 20 minutes.
-
Remove cake from the fridge and ice again. Chill for another 20 minutes.
-
In order to achieve a good base colour for our steak, mix together your chocolate and white fondant until well blended. Next, take away about ½ lb of this fondant and knead in a touch of Burgundy and Ivory food colouring until you reach a reddish-brown colour, similar to the way a cooked steak looks. Once you’re happy with the colour of that section of fondant, colour the rest of your chocolate/white adding the appropriate food colouring as you go. This technique of slowly adjusting the fondant’s colour is just to save you the trouble of going “too far” and having to add more fondant to lighten the batch.
Note: The colour of this fondant will appear a lot duller than the colour of an actual cooked steak, but we will enhance this later on when we paint it and add texture.
-
Once you’re happy with overall colour of your fondant, roll it out so that it’s about ¼ inch thick and larger than the size of your cake. Drape it over your cake and smooth to the sides of your cake using your hands or a Fondant Smoother. Trim away and remove any excess from the bottom using a sharp paring knife.
-
In order to make your steak cake look grilled, press your ¼ inch Wooden Dowel directly into the fondant in a diagonal pattern across the face of your steak. Make sure to use a ruler to make sure the grill marks are equally spaced.
-
It’s time to add that ‘T-bone’ to your steak! Unlike fondant, modelling chocolate can be very sticky. (It is chocolate, after all!) It helps to roll out your modelling chocolate using a bit of icing sugar or cornstarch sprinkled onto a non-stick mat. Place the band on top of your cake and cut out your ‘T-bone’ shape using a sharp paring knife. Roll out some more modelling chocolate and cut out a band that runs alongside the top of your steak, about the same width as the “thickness” or height of your cake. Attach it to your cake so that the chocolate comes up to meet the “T-bone” shape sitting on the surface, making it appear as if the bone is wedged inside your steak cake instead of just sitting on top.
NOTE: It’s helpful to look at photos of T-bone steaks to help achieve the same look. If you’re uncomfortable cutting the bone out freehand, feel free to print out a large photo and cut out a template to help!
-
Every juicy T-bone steak comes with a nice layer of fat on the side. To make this fat, take the rest of your modelling chocolate and dye it a light brown colour by kneading in a bit of your Brown food colouring. Next, roll your modelling chocolate out to about ⅛ of an inch thin and about the same width as the height of your cake. Attach alongside one side of your cake with a bit of clear piping gel. Trim the top so that it’s flush with the height of your cake using a sharp paring knife.
-
Use the rest of your brown modelling chocolate to create the tip of the T bone at the bottom of the “T” shape down the side of your cake. Later, when we paint this cake, we will want that part of the bone to look darker than the rest.
-
To create your steak’s meaty texture, score the fondant with the tip of your knife over the top and sides of your cake. The texture of meat usually changes direction on either side of the bone. Next, begin adding some texture to the center of the bone by taking your Piping Tip #233 and poking firmly down into the center of the modelling chocolate to create a rough and porous texture until it looks like the marrow of your T-bone.
-
It’s time to give your steak a more realistic colour! Using a photo for reference if you need it, begin to paint a base coat onto your cake using a mixture of Ivory food colouring diluted with clear food grade alcohol. Allow that coat to dry, then paint with a mixture of Brown and Black food colouring, dabbing the paint in places where a steak gets naturally more ‘charred’ - like the outer edges. Allow your second coat to dry, then begin experimenting with different sized brushes and dry brushes with all three icing colours to create different textures on the surface of your cake. Let dry.
Note: If you ever feel like your steak is getting too dark in colour, just brush a bit of clear food grade alcohol all over the surface in order to lift some of the colour off of your cake - just like I did in my Breakfast in Bed cake! You can dab it with a clean paper towel.
-
Once you are happy with the colour of your steak, use your Veining Tool to deepen those grooves where you originally made score marks with the tip of your knife, all over your cake and to the sides of your cake where the ‘fat’ isn’t. If necessary, further score your cake with the tip of your sharp paring knife until you can really notice that meaty texture.
-
To further give your steak a realistic ‘charred’ look, brush a combination of Brown and Black icing colours into the center of the bone and alongside the side of the T-bone where it naturally gets more charred. Have fun building up the paint and creating that ‘grilled’ look. Don’t forget to paint the strip of fat as well. You will want it to look slightly lighter than your meat.
-
Usually, when a steak is cooked on the grill, that fat on the side of the steak tends to shrivel up and pull away from your steak. To do this, take your Veining Tool once again and use it to pull some of the modelling chocolate ‘fat’ away at various points from the top and sides of your steak. You want it to look as if it has shrivelled away from the meat a bit. Once you are happy with the way it looks, brush a bit of piping gel mixed with some water all over the side of the fat to make it look like it’s glistening.
Note: Make sure your paint is completely dry before brushing your piping gel and water mixture onto your fat, or you may pull some of the colour away.
-
No steak is complete without giving it a good branding. Once you figure out what word you want to stamp into your steak, take your metal cookie cutters and use a brulee torch to heat them up enough to melt through the fondant when you press in. Once you press in all of your letters, brush into the indents your cookie cutters made with a small paint brush and some Black food colouring.
Note: Be very careful when using your brulee torch! Make sure to use a pair of tongs or tweezers when holding your metal cookie cutters into the flame, or you could burn your fingers!
-
Carefully lift your steak cake onto a wooden cake board and use some leftover Simple Syrup mixed with a bit of Crimson food colouring to make it look like the juice seeping out of the grilled steak. Spoon your mixture into the grooves of your cutting board as if it’s running out of the steak. Finally, sprinkle on a bit of coarse sugar to the surface of your cake as if you are adding a bit of ‘salt’ to your steak before digging in!
Congratulations you did it!
