LEGO Ninjago Cake


Birthday cake , Boys cake , Cake , Character cake , Characters , Chocolate cake , Collection--novelty-cake-recipes , Dowels , Lego , Lego cake , Movies , Ninja , Ninja cake , Ninjago , Recipes-export

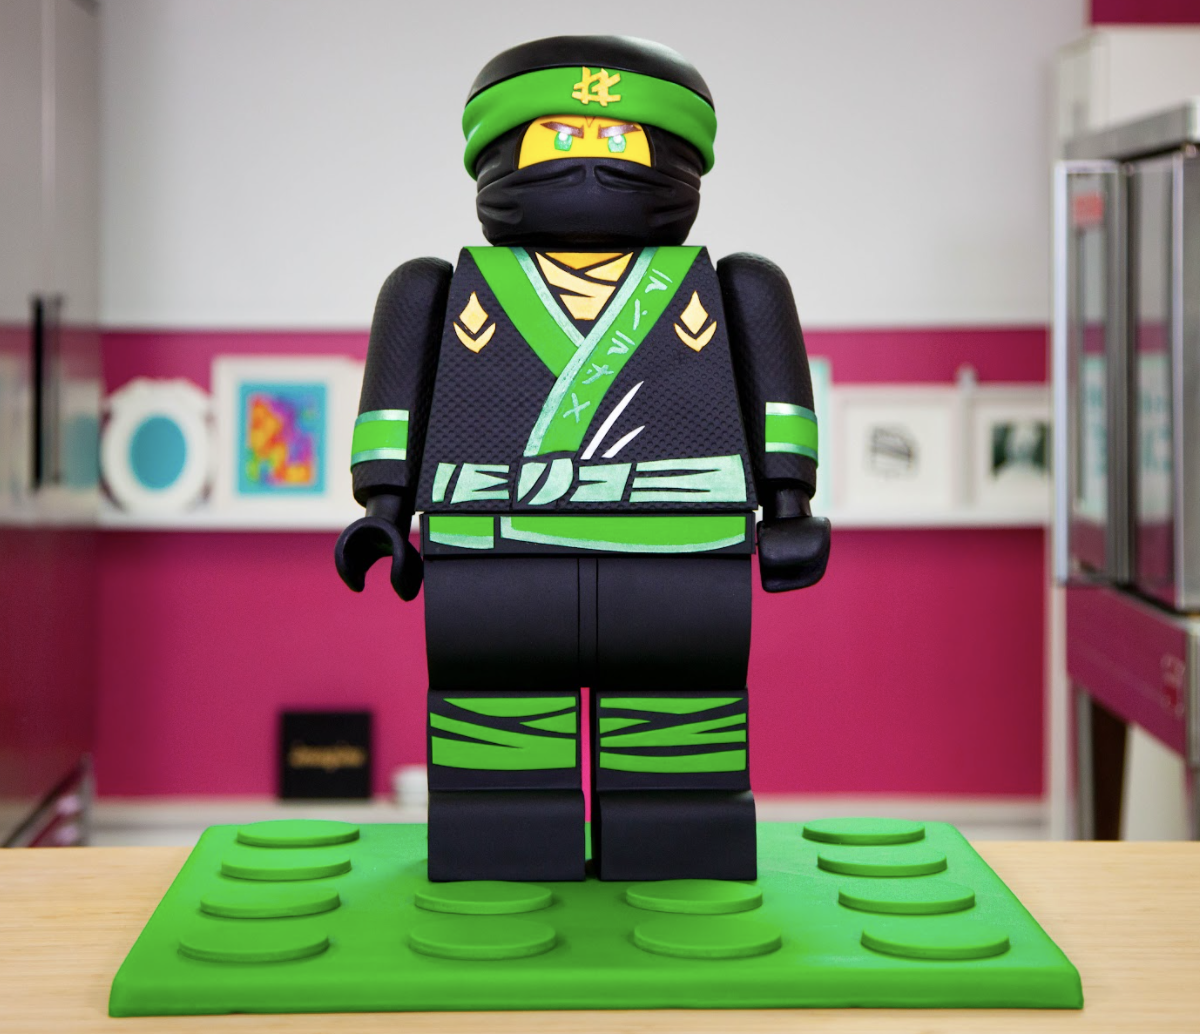
LEGO My Ninjago Cake! I’m not even going to lie, this cake was REALLY tough to make. I was actually pretty anxious about making this character cake, but because Lloyd is pretty much my son’s version of Beyonce, I just had to do him justice!
That’s why this Lego Ninjago Cake is filled with rich layers of Ultimate Chocolate cake, filled with Italian Meringue Buttercream and supported with a firm, sculpting Rice Krispie mixture (and SO many dowels!) to keep all of his extra parts in place
By the end of it, my Lloyd Cake definitely looked like a true ninja warrior, but I still just wanted him to NinjaGO away…. ;)


Ingredients
Cake
- 8 lbs of Yo’s Ultimate Chocolate Cake
Icing
- Simple Syrup
- Italian Meringue Buttercream
- 2 ½ x Sculpting Rice Krispie Mixture
Decorations
- 6 lbs Black Fondant
- ½ lb Yellow Fondant
- 1 lb Green Fondant
- 1 oz White Fondant
- 1 oz Brown Fondant
- Clear Piping Gel
- Clear Food Grade Alcohol
- Gold Colour Dust
- Green Colour Dust
- Royal Icing


Read It!
-
Prepare 8 lbs of Yo’s Ultimate Chocolate Cake. Pour 1 lb of batter into each of your 5” round cake pans, and the remaining 6 lbs of batter into your rectangular cake pan. Bake at 350 degrees for 60 minutes, or until a toothpick comes out clean. Cool cakes completely in their pans, sitting on a wire rack.
-
Prepare your Italian Meringue Buttercream and set aside at room temperature.
-
Prepare your Simple Syrup and set aside at room temperature.
-
Prepare your Royal Icing and set aside at room temperature.
-
Once your cakes are completely cool, gently remove them from their pans. Because I built Lloyd up in stages, let’s start with prepping his torso first and leave your 5” round cakes aside. Level your rectangular cake with a serrated knife, then cut your cake into three equal parts. Next, layer each third into two parts so that you now have six equal rectangular layers. Set aside.
-
Place your cake layers onto a flat surface and shower them with a layer of simple syrup. Allow the simple syrup to soak in completely before moving on to the next step.
-
Begin stacking and filling your cakes in three separate stacks, using a small offset spatula to spread your Italian Meringue Buttercream in between each layer. Once you’ve filled all three cakes, lay them on top of each other and begin carving your cake so that his upper body is a bit ‘trimmer’ than his lower body - sort of like a thick “pyramid”. Once you’re happy with the shape, you can then begin putting those three cakes together. Place a cake board in between each cake “stack” as you stack upwards, so that there are a total of two cake boards resting in between your three cake stacks.
-
Once your cake is fully stacked, crumb coat Lloyd’s torso with Italian Meringue Buttercream using a small offset spatula. Chill in the fridge for about 20 minutes.
-
While your cake is chilling, let’s start preparing Lloyd’s head. Take your cooled 5” round chocolate cakes and level with a serrated knife. Layer each cake into two layers per cake, so that you’re left with 4 equal layers of cake. Set aside.
-
Place your cake layers onto a flat surface and shower them with a layer of simple syrup. Allow the simple syrup to soak in completely before moving on to the next step.
-
Once your simple syrup is fully soaked in, begin stacking and filling Lloyd’s head as you would a regular cake - using your Italian Meringue buttercream and offset spatula.
-
Crumb coat Lloyd’s head with Italian Meringue Buttercream using a small offset spatula. Chill in the fridge for about 20 minutes.
-
Once both cakes are fully chilled, remove them from the fridge and ice again using Italian Meringue Buttercream. Chill for another 20 minutes.
-
Prepare 2 ½ recipes of my Sculpting Rice Krispie Mixture. This recipe is almost like my regular Rice Krispie squares recipe, except without the butter and vanilla. Because we need this mixture to create specific structural elements on Lloyd, we just want marshmallows and cereal only to help keep it solid. Set aside at room temperature.
-
Start by molding your prepared Sculpting Rice Krispie Mixture into two pieces - a solid, block-like shape for his legs and feet, and a rounded log for his thighs, which rest just above his legs. Once you’re happy with the overall shape of the legs-portion of his lower body, you can then slice it into two individual legs with a serrated knife. (Be sure to keep the rounded thighs in one piece!) Before continuing, let all three pieces set up so that they’re completely cool, then use serrated knife to trim the edges, creating that signature block-like look to his lower body.
-
With your remaining Sculpting Rice Krispie Mixture, create two equal-sides arms. (Without the hands!) Make sure to give them a slight curve, as LEGO characters tend to have a bit of a bend in their arms. Once you’re happy with the way the basic shape looks, allow them to cool before carving any further details into it. Set aside.
-
Once all pieces are set, crumb coat with Italian Meringue Buttercream using a small offset spatula, making sure that the buttercream fills in all of the cracks and grooves. Chill in the fridge for about 20 minutes.
-
Remove cakes from the fridge and ice again over the same parts using Italian Meringue Buttercream once again. Chill for another 20 minutes.
-
Once (almost) all of Lloyd’s body parts are created, it’s time to start covering them all with Black fondant! Take this step slowly and begin covering your cake in pieces - one side at a time. LEGO characters tend to be very block-like and rigid, which makes covering their body parts one side at a time the best strategy for maintaining those straight edges. To further help keep those edges perfectly straight, make sure to trim away any excess fondant using a ruler and your sharp paring knife. For Lloyd’s arms, I used the same texture mat that I used in my Football Cake tutorial, which was actually a drawer mat that I had lying around. So, feel free to get creative with your resources to give his clothes some texture.
-
Every LEGO character needs a solid “base” that they get built upon! To make this base, take a large cake board and cover it entirely with green fondant. Next, roll out another portion of green fondant - this time, a little thicker than before - and cut out large circles using a circle cutter that will go on top of the base to look like those “connector” pieces at the top of each lego block. Affix with some clear piping gel, making sure to leave some room on the board without any circles so that you can place Lloyd there. Let dry.
-
It’s time to start building this LEGO Ninja! First, place Lloyd’s two legs onto the green board and center them overtop of where each of those round pegs would usually go. Use a bit of Royal Icing to glue them onto the board. Next, place his thighs on top of his legs, again securing with a bit of Royal Icing. Allow to dry. While you’re waiting for the icing to dry, measure two wooden dowels to be the height of Lloyd’s legs and thighs and sharpen them at one end. Once the icing is dry, send those wooden dowels down into the middle of each leg, starting from the top of his thigh, using a hammer. Make sure to nail them down completely into the Rice Krispie mix and through to the baseboard.
-
In order for Lloyd’s LEGO legs to support the weight of his delicious chocolate cake body, he’s gonna need another super-sturdy cake board. But this time, I wanted to construct it so that it also acts as his ninja “belt” and gives the illusion that his upper body is actually being connected to his lower body - like a real LEGO piece! To do this, I created my own custom board by measuring the perimeter of his torso and thighs and crafting something together using a thick foam board and some hot glue; however, you can feel free to use whatever you’d like to make this work.
-
Before we begin adding these components to Lloyd’s lower body, we still need to add some more detail. Since we’ll be able to see part of the custom “belt” cake board, roll out some more of your Black fondant and cut out pieces that will cover those sides. Attach with some clear piping gel and let dry. To enhance Lloyd’s ninja wardrobe, roll out your Green, Black and Yellow fondant and cut out all of the necessary parts that make up his outfit. (It’s helpful to blow up a large image of Lloyd from the computer and use it as a template when cutting out all of the components.) Once it’s all created, affix to your torso with some clear piping gel, using your template once again to help for placement.
-
Now that Lloyd’s torso is completely decorated, we can finally add him on top of his legs and lower body! Carefully lift your cake off its cake board and onto the custom “belt” board that you’ve now secured onto the lower half of your LEGO Ninjago cake.
-
Now that Lloyd’s body is mostly assembled, it’s time to attach his arms! Measure two wooden dowels so that one is a bit longer than the length of his lower torso, and the other is a bit longer than his upper torso. Sharpen both ends of each dowel and insert through the center point of the side of each “section” of his body so that the sharpened parts are sticking out at both ends. (In this case, one dowel through his upper torso, and the other through his lower torso.) This way, when you place the arms at either side of his body, it will stick into the dowels to help support that weight. To attach his arms, make sure to create “pilot holes” with another sharpened dowel into his Rice Krispie arms in the places where each dowel will go, so that you can be sure it will fully penetrate and hold.
-
I’ll be honest, I had NO clue how to make Lloyd’s ‘cuppy hands’. So, I improvised and used an empty saran wrap roll. To do this, cut out two cylinders that are the right thickness for his hands. Then, cut out a piece on each roll so that it looks like a “cupped” hand. Use an awl or sharp edge to poke a hole through the middle of your two ‘hands’ so that we can later use this to help attach it to Lloyd’s arms. Brush each hand with a layer of clear piping gel and cover with black fondant. (Doing this was also tricky, so just be patient!) Chill as necessary. Once you’re happy with the way it looks, cut two lollipop sticks and fit it into those holes you previously created. Wrap a thin band of fondant all the way down the stick so that it’s completely covered. Finally, use another lollipop stick to make a pilot hole at the bottom of Lloyd’s arms and carefully push his two hands up into his arms.
-
Time to bring Lloyd to life! Roll out your Black and Yellow fondant and begin covering his face in parts. Cut out a strip of Black fondant and wrap it around the lower part, where his mouth would normally go. Then, cut out another strip of Black fondant and wrap it around the top part of his head. Using your sharp paring knife, cut out a space in the center where his eyes peer out and fill this spot with the same sized piece of Yellow fondant, which is where the classic LEGO colour comes through! Finally, roll out some White, Brown and Green fondant to make his eyes, brows and furrows between his brows. (I found it helpful to use a template for this!) Once you’re happy with all his parts, secure to his face with some clear piping gel. Allow to dry.
-
To make Lloyd’s bandana, roll out some more of your Black fondant and wrap it around the top of his head. Add some marks and ripples in the fondant with your Ball and Veining tools to really enhance the detail and make it look like fabric wrapped around his head. Next, roll out your Green fondant long enough to go around the circumference of his head, and wrap it around once again. Using the ends that remain, try to recreate the look of a “knot” in the back to make it look like it’s tied.
-
Once you’re fully happy with the way Lloyd’s face looks, it’s time to assemble! With the help of some (more) dowels, attach his head to the rest of his body - being careful to create those pilot holes once again, and making sure his head is fully secured to his torso.
-
If you’re not already ready for Lloyd to Ninja-GO away at this point, let’s add the finishing touches! Create the emblem on his bandana by rolling out some thin yellow fondant and using a template to cut out the exact shape. Once you’re happy with the way it looks, paint it gold using some clear food grade alcohol mixed with Gold colour dust. Affix to his bandana by brushing on some clear piping gel. Finally, paint on some green details along the trim of his ninja wardrobe using some Green colour dust mixed with clear food grade alcohol. Let dry.
Congratulations you did it!
