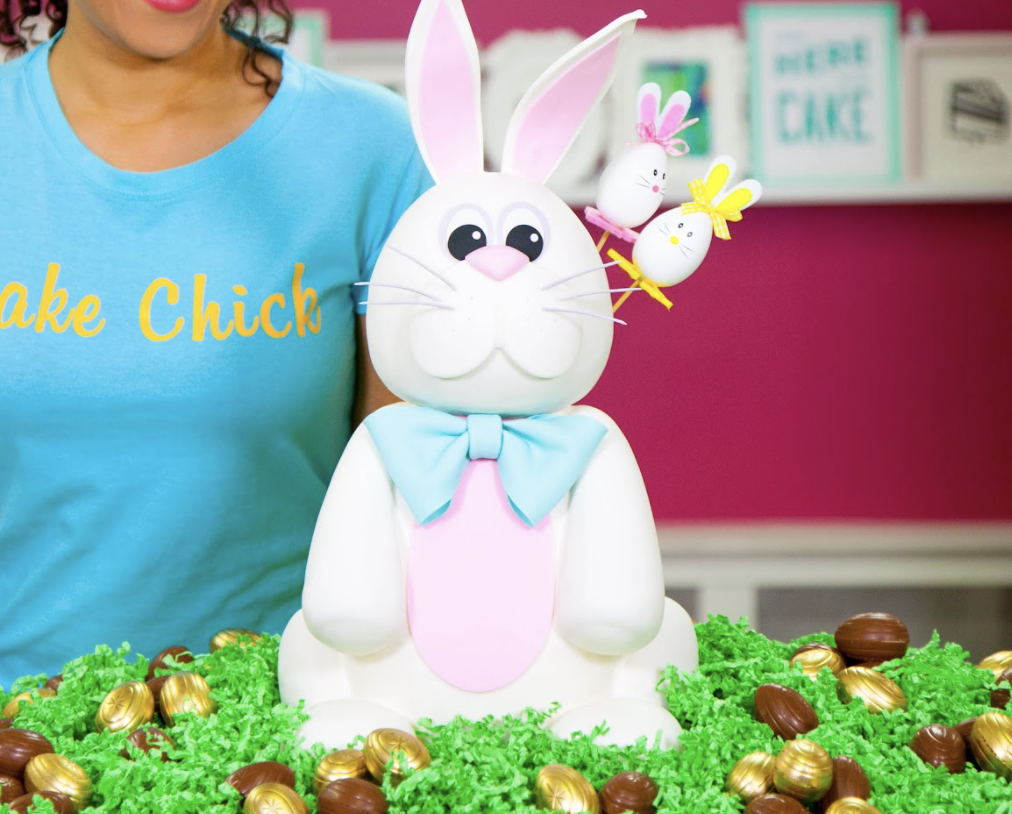
Easter Bunny Cake


Cake your own Easter Bunny to life! Did you know that the Easter Bunny lays Cadbury Creme eggs? That’s why I’m caking this cute lil’ character out of pink vanilla cake and layering it with Italian meringue buttercream and FOUR delicious Cadbury Creme Egg flavours - Original, Chips Ahoy, Oreo and Caramilk. YUM!!
(NOTE: If you feel like this guy is a little TOO ambitious, just follow the first few steps - bake my pink vanilla cake, layer and remove caramelization, then fill with my buttercream and chopped Cadbury Creme Eggs!)


Ingredients
Cake
- 2 x 4lb Yo’s Ultimate Vanilla Cake
- Americolor Soft Pink Gel Coloring (½ tsp in each batch of batter)
Icing
- Simple Syrup
- Italian Meringue Buttercream
- Cadbury Cream Eggs
Decorations
- 5 ½ lbs White Fondant
- Icing Sugar
- 1oz Black Fondant
- 8oz Gumpaste
- Americolor Teal Gel Coloring
- 2 x Modelling Rice Krispie Mixture
- Royal Icing

Tools
- 5” Round Cake Pan, lined with parchment paper
- 3 x 6” Round Cake Pans, lined with parchment paper
- 2 x 7” Round Cake Pans, lined with parchment paper
- Rubber Spatula
- Ruler
- Serrated Knife
- Small Icing Spatula
- Small Offset Spatula
- Sir Squeeze-A-Lot
- Rolling Pin
- Fondant Smoother
- Paring Knife
- 3” Circle Cutter
- 4” Heart Cutter
- Oval Cutter Set
- #8 Round Piping Tip
- #809 Round Piping Tip
- 22 Gauge Wire


Read It!
-
Create a bunny ear-shaped template (either freehand, or using an online template) out of paper. Divide 5 ounces of gumpaste in half. Roll out your first half of the gumpaste into a rectangle and cut it into two long, equal-sized bands with your sharp paring knife. Brush a bit of clear piping gel onto one of the rectangular bands, lay a long piece of 22 gauge wire overtop along the centre. Brush some clear piping gel onto the surface of the gumpaste and place the second rectangular band over that, securing the wire inside. Use a fondant rolling pin to roll over the entire piece and secure it together. Use your template to cut a bunny ear shape out of your first wired, rectangular gumpaste piece. Once you are happy with the shape, insert the wire into the top of a stacked cake dummy so it can flop down naturally and rest on the dummy while drying. Repeat with your second half of gumpaste to create two bunny ears. Set aside.
NOTE: I suggest making yourself one or two extra ears. You know, as bunny insurance ;) -
Dye 3 ounces of your gumpaste with a little bit of Americolor Teal Gel food colouring. Once you’re satisfied with the colour, roll it out and cut it into two equal bands with a sharp paring knife - about 3 inches wide and 4 inches long. Taper the bands slightly so both ends of both bands are slightly more narrow than the middle. (Be sure to work quickly, because gumpaste dries out fast!) Next, pinch your tapered ends together and loop them over a thick dowel or some crumpled soft tissue so the ends meet each other, creating two bow loops. Leave the tissue inside the loops while it dries. Set aside.
NOTE: These steps should be done about 2-3 days in advance to allow enough time for the gumpaste to harden and set. -
Preheat oven to 350 degrees, and prepare Yo’s Ultimate Vanilla Cake batter. Prepare your pans with parchment. Fold ½ tsp of Americolor Soft Pink Gel Coloring into each batch of batter until it’s a nice pink colour. Pour 1 lb of batter in each of your 5” and 6” cakes and 2 lbs of batter in your 7” cake pans.
-
Bake your 7” round cakes for 1 hr 15 minutes, your 6” round cake for 1 hr 5 minutes, and your 5” round cakes for 50 minutes, or until a toothpick comes out clean. Set aside to cool completely in their pans on a wire rack.
-
Prepare your Italian Meringue Buttercream, Royal Icing and Simple Syrup. Set aside until you’re ready to decorate.
-
Remove your cooled cakes from their pans and level them with a ruler and serrated knife. Be sure to remove all of the caramelization from the bottoms of all your cakes, as well.
-
Give all of your cakes a simple syrup shower with Sir Squeeze, and allow to fully soak in before moving on to the next step.
-
Begin to stack the cakes in the following order, from bottom up:
- 6 inch round cake
- 7 inch round cake
- 7 inch round cake
- 6 inch round cake
- 5 inch round cake
As you stack, chop up some Cadbury Creme Eggs in Original, Chips Ahoy, Oreo & Caramilk flavours. Using your offset spatula, fill each layer with Italian Meringue buttercream and top it off with some chopped Cadbury Creme Eggs in the flavour of your choice. (I used one flavour per layer!)
NOTE: After stacking, you’ll have one 6 inch cake remaining. We’ll be saving this to create your bunny’s feet! -
Place your cakes in the fridge for 20 minutes to allow the buttercream to set.
-
Using a sharp serrated knife, carve your stacked cakes into an “egg-like” shape, with a rounded bottom and a tapered top - leaving most of body in the center. To help, make a mark with a 3-inch circle cutter at the top of your cake and use it as a guide to ensure that you’re creating a enough of a tapered shape. You can leave the bottom about the same width as your original cake diameter; however, make sure to remove all of the caramelization from all sides.
-
Taking your remaining 6-inch cake, cut it in equal halves using a serrated knife. Next, carve each half-circle into a “teardrop” shape, making sure that they are equal in size and shape. Round out the top edges with a small serrated knife.
-
Crumb coat all your cakes with Italian meringue buttercream, and return to the fridge to chill.
-
Retrieve your cakes from the fridge after 20 minutes, and give them another ice with your Italian meringue buttercream. Give your bunny another chill for 20 minutes. Smooth out any ridges in the buttercream with a small offset spatula, and a little bit more buttercream if needed.
-
We’re going to make our Easter bunny’s head, tail, arms and thighs out of modeling rice krispie mixture. Prepare two batches of your Modelling Rice Krispie Mixture and set aside.
-
With your hands greased with vegetable shortening, pour out enough of your rice krispie mixture and begin to sculpt it into your bunny’s cute little head. It helps to have the body of the cake beside you while you work to understand the proportions you’re aiming to achieve. Once you’re happy with the head, set aside.
-
Rub some more vegetable shortening on your hands and, taking enough of your rice krispie mixture from the batch, create two equal-sized arms. Again, it helps to have the body of the cake beside you while you work to understand the proportions you’re aiming to achieve. Make sure to really compress the mixture while you’re sculpting in order to help it harden in place. Set aside.
-
This step will take some intuition, because it’s hard to explain what a bunny thigh looks like - but let’s just say, this Easter bunny needs pretty FIT thighs to hop around all day. Making sure your hands are greased, sculpt two equal sized, rounded triangular ‘bunny thighs’. It’s a good idea to keep your cake closeby to help get the proportions right and even test out how it will look with the feet underneath. Allow to set and harden.
NOTE: If you ever feel like you’re unhappy with a piece and it’s starting to harden, just pop it in the microwave for a few seconds at a time. Once marshmallows are reheated, your mixture will soften and you’ll be able to mould it again. -
Rub some more vegetable shortening on your hands and create a spherical-shaped bunny tail with the remaining rice krispie mixture by rolling it around in your hands. Allow all of your bunny parts to fully cool and harden before moving on to the next step.
-
Once your rice krispie components are set, give them a crumb coat with Italian meringue buttercream. Get buttercream into all of the crevices, trying to get these pieces as smooth as your cakes. Chill them for 20 minutes, and then give them another ice. Return to fridge for a final 20 minute chill.
-
Measuring the width and height of your bunny’s body, roll out a circle of white fondant large enough to cover the entire cake. Drape the fondant over the cake and smooth the fondant over the body, working downward to push all of the extra air out the bottom. (I find that the palm of your hand works the best here.) Once you reach the bottom, tuck the fondant underneath so it’s flush to the cake and cut away any excess with your sharp paring knife. Repeat this process with your two bunny feet.
-
Roll out your white fondant and cover all of your rice krispie parts entirely. For each piece, I covered the front with fondant and then flipped it over onto a flower sponge, gathering the excess fondant around the back and pinching the ends shut. Trim and smooth as best you can.
-
Before I covered the head with fondant, I cut a small cake board to the exact size as the bottom diameter of the head, making sure to poke a hole in the center (we’ll be dowelling our cake later!). Dab a bit of royal icing on the exposed rice krispie and press against the cake board. Next, roll out your fondant and cover the head completely, trimming away any excess around the cake board and smoothing it as best as possible.
-
It’s time to assemble! Place your two bunny feet at an equal distance from each other at the bottom of your cake body and attach with a bit of royal icing. Next, add a dab of royal icing to the inner and underside of both your bunny thighs, where it will attach to the side of your bunny body and the tops of your bunny feet and secure in place. Use a picture for reference if you’re unsure about placement. Make sure the feet and thighs are in the same place on either side of your bunny body. Allow to dry.
-
Fill a parchment piping bag with royal icing and cut a hole at the end. Pipe out a bit of royal icing around the cracks and seams between the bunny’s feet and thighs to fill in any gaps. Use a damp paintbrush to smooth over the piped royal icing so it fills in all the cracks. Allow to dry.
NOTE: It’s helpful to have a clean damp cloth to wipe the tips of the brush in between sections. -
Measure the total height of your bunny’s body and head and use this measurement to cut a dowel to a slightly smaller height (you don’t want the dowel poking out the top of your bunny’s head) before sharpening both ends. Poke a hole almost ¾ of the way through bunny’s head using the hole you created in the cake board at the bottom, but don’t leave the head attached to the dowel just yet. Next, push your sharpened dowel down into the center of the body through the cake until it reaches the bottom. Now you can place your bunny head overtop using your pre-made “pilot hole”. Once the head is securely attached to the body, pipe some royal icing around the neck using the same technique as the previous step.
-
Add your bunny arms on either side of the body at an equal distance. Use a lollipop stick to help support the arms by inserting it through the cake, and then attaching your arms to the other end. Use the same technique as Step #24, piping a bit of royal icing around all the seams and smoothing with a damp paintbrush to fill in all the cracks.
NOTE: I had a bit of trouble with my arms because I felt that they were too bulky. If you have any issues, cut away any excess carefully and glue it to your cake so the rice krispie mixture that gets revealed is hidden. -
Add your bunny tail to the middle of the backside of your cake, using a lollipop to support. Repeat Step #24, adding royal icing to fill in any seams or cracks.
-
To make your bunny’s eyes, roll out several fondant colours - soft gray (using a bit of black fondant mixed with white fondant), black and white. Next, use two oval cutters - one slightly bigger than the other - to cut two big ovals out of gray and two smaller ovals of white for his eyeballs. Use your #809 piping tip to cut out pupils from the black fondant and a #8 piping tip to cut out two white little “catch lights” in the corner of the pupils. Affix with royal icing or clear piping gel.
NOTE: Feel free to have a little fun using different colours, or making him animated differently! -
Roll out some leftover white fondant and, using a large heart cutter, cut out a piece that will become the bunny’s mouth, or muzzle. Cut away the point at the bottom of the heart and create rounded edge with a sharp paring knife or a large circle cutter. Make a mark in the center of the bunny’s head, where his nose will go and use it as a guide for where to place your muzzle. Affix the heart, upside-down with some clear piping gel.
-
Dye about 6 ounces of white fondant with a tiny drop of the same Americolor Soft Pink Gel Coloring as you used to dye your cakes. Knead your fondant until the colour is fully incorporated and looks like a soft, light pink hue. Mould a small portion of pink fondant into a rounded triangle shape, so it looks like a bunny’s cute little nose. Affix with clear piping gel.
-
Measure the distance between both arms and from his neck, down to his feet, and cut out an oval shape on a piece of paper according to those measurements. This will become the template you will use to create your bunny’s soft, pink belly. Roll out your soft pink fondant, lay your template overtop and trace around the template with a sharp paring knife. Glue on with a bit of clear piping gel.
-
Once your bow is solid, remove the tissue. Apply some royal icing to the back, flat part, of each bow loop and attach it to your bunny right under his face. You can use a toothpick to further support the bow loops by inserting it carefully through the bottom opening of each loop and through the cake on a diagonal. Roll a small band of teal gumpaste and use it to cover where the loops meet, tucking the band over and under and trimming it to make sure it looks like a bow that’s been tied.
-
Trim the template you created to make your bunny’s ears so that it’s a slightly smaller size. Roll out your remaining light pink fondant and trace around your slightly-smaller ear-shaped template to create the inner section of your bunny ears. Secure to your (now dry) gumpaste ears with a bit of clear piping gel. Use a toothpick to poke two holes in the top of your bunny’s head at equal distances from each other. Twist the exposed wire on each ear and trim it if you need to. Push the wire into the holes you created until no wire is exposed. Use the same royal icing technique as Step #24 to fill in any seams or gaps.
-
To create your whiskers, cut 6 equal lengths of 22 gauge wire, about 3 ½ inches in length, and brush about ¾ of each wire with clear piping gel. Roll out 6 small tubes of grey fondant and poke the wires into the fondant tubes, making sure that there’s about ½ an inch of wire still exposed. Keep rolling the tube with the wire inside to make sure the surrounding fondant is as thin as possible. Trim away any excess.
-
Make a pattern of 7 dots on each cheek of your bunny’s muzzle using a sharp pin. Once you’re happy with the placement, deepen the holes with a toothpick. Now add 3 whiskers to each cheek making sure to chose the same 3 holes on each side.
Hop. Hop. Hop!
Congratulations you did it!
