Nick’s Candy Apple Cupcakes!


Apple , Apple orchard , Apple picking , Autumn , Candy , Chocolate , Collection--cupcake-recipes , Cup cakes , Cupcake , Cupcake recipe , Cupcakes , Diy , Fall , Fall cakes , Fall harvest , Food , Fruit , Holidays , Mini cupcakes , Nick , Recipes-export , Thanksgiving
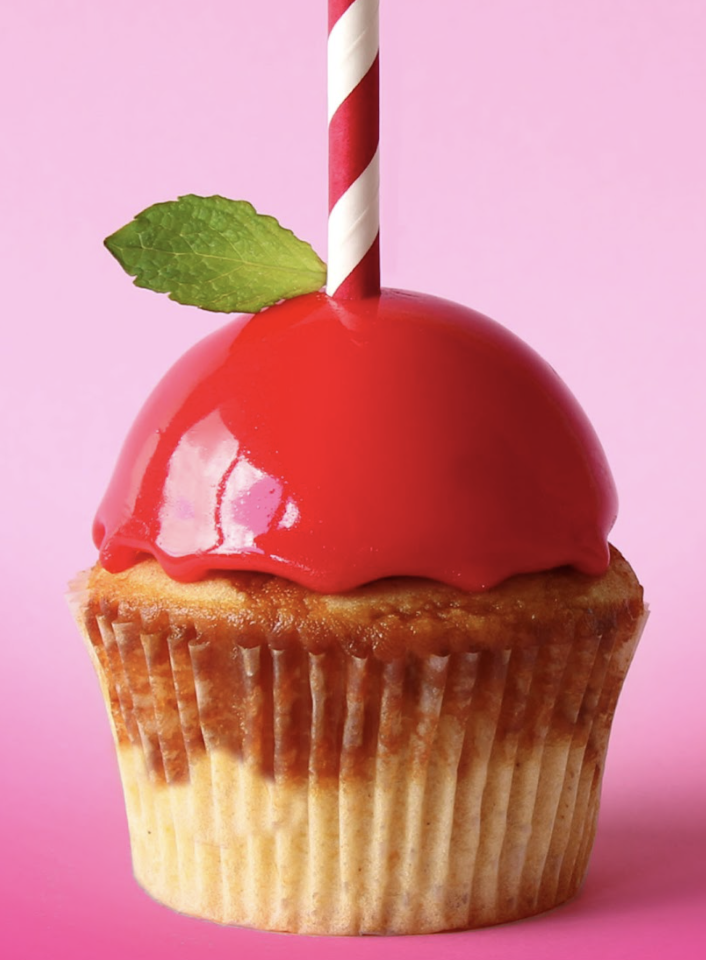
The the perfect way to kick off the Fall season! These Candy Apple Cupcakes are an apple vanilla cupcake with a cheeky swirl of salted caramel sauce topped with a gorgeous mirror glaze mousse.
Guys, this recipe will need to be made over two days. Make the mousse and allow it to set on the first day. Prepare the mirror glaze, stewed apples and cupcakes on the second day and put them all together.


Ingredients
Cake
- 215g flour
- 1 1/2 tsp baking powder
- 132g sugar
- 187ml milk
- 65ml oil
- 60g butter
- 1tbsp yogurt
- 1 egg
- 1/2 tsp vanilla extract
- 1 tsp cinnamon
- Salted caramel sauce to drizzle
- Mint leaves to decorate
Stewed Apples
- 5 green apples, peeled and cubed.
- 2tbsp brown sugar
- 1 tsp lemon juice
Caramel Mousse
- 250g white chocolate, finely chopped + 100ml cream
- 250ml cream
- Pinch salt
- 3 tsp unflavored powdered gelatin
- 2 tbsp water
- 2 tsp vanilla extract)
- 3 tbsp dulce de leche (can substitute it with 1 tbsp salted caramel sauce)
Red Mirror Glaze
- 200 grams sweetened condensed milk
- 300 grams granulated sugar
- 150 grams water
- 350 grams white chocolate chips
- 19 grams gelatin (+ 1/2 cup water to bloom)
- 4 -6 drops red red Americolour food gel (liquid food dye will not work in this recipe)

Tools
- Cupcake Baking Tin
- Cupcake Liners
- Large Mixing Bowls
- Whisk
- Half Sphere Silicone Molds
- Hand Mixer
- Sharp Knife
- Spatula
- Kitchen Scales
- Medium Sized Saucepan
- Candy thermometer
- Sieve
- Wire Rack
- Stand Mixer (or hand mixer)
- Magic Whisk (for wet ingredients)
- Paper Straws
- Small Offset Spatula
- Wooden Spoon
- Ice Cream Scoop


Read It!
-
** Make the mousse a day in advance.
Prepare the mousse: combine the white choc chocolate, 100ml of cream, and salt in a microwave-safe bowl. Microwave in 30-second increments, stirring every 30 seconds, until the chocolate has melted and the mixture is smooth.
Pour it into a large bowl, and let it cool to room temperature, stirring occasionally.
While you wait for the chocolate mixture to cool, prepare the gelatin. Whisk together the gelatin and the cold water in a small bowl, and set it aside to let the gelatin absorb the water. When the chocolate is at room temperature, microwave the bowl of gelatin for 15 seconds, until it is melted. Whisk the melted gelatin and chocolate together.
Whip the remaining 1 cup heavy cream to soft peaks. Add the dulce de leche and whip until you reach stiff peaks. Fold half of the whipped cream into the chocolate, and once it’s incorporated, gently fold in the remaining whipped cream.
Pour the mixture into your silicone molds and allow them to set overnight. To remove them gently cut the very top of the opening using a sharp knife and invert the mousse out of the molds as shown in the video.
-
Combine gelatin with 1/2 cup of water and set aside for 5 minutes.
Heat milk, sugar and water in a saucepan over medium heat and bring to a simmer.
Add bloomed gelatin and stir until dissolved.
Place chocolate chips in a large heat proof bowl. Pour hot mixture over chocolate and let sit for 5 minutes. Once chocolate has softened, add red food dye and use an immersion blender or a hand whisk to smooth mixture. Pour mixture through a sieve to remove any remaining lumps.
Allow glaze to cool to 33C before pouring. You’ll need a candy thermometer to test the temp. If you don’t have one handy, I generally look for it to be thick enough that you can’t see the cake or mousse under the glaze when you pour it over. If it’s really thin when you pour it, let that set for 20 min and try pouring a second layer when it’s cooled a little more.
Place set mousse on a wire wrack or on top of the end of a glass and pour mirror glaze over them all. Make sure it’s nice and thick on there. You might want to do two coats. Let one set for 20 min and then pour the second over.
Once they’re all covered, place them in the fridge ready to use the following day.
-
Add peeled and cubed apples into a medium sized microwave safe bowl along with lemon juice and brown sugar. Microwave for 5 min, stir and then microwave for an additional 5 min or until apples are tender. If there’s a lot of juice drain it out. Alternatively you can do this in a sauce pan on a stove top on medium heat. Set aside to cool down while you prepare the cupcakes.
-
Preheat a fan-forced oven to 180C (356F) or 160C (320F) for a fan forced oven. Line a cupcake tin with cupcake liners.
In the bowl of a stand mixer fitted with the paddle attachment, add the flour, baking powder, caster sugar and salt. Turn mixer on low speed and allow it to mix for a couple minutes to help everything combine well (alternatively you may do this by sifting the ingredients together). Add the softened butter and let it mix until it resembles a fine sand like texture.
Next, add milk, eggs, yogurt, oil and vanilla extract in a large jug and whisk well.
Add wet ingredients to dry ingredients in a slow and steady stream until no dry ingredients are visible. Scrape down the bowl, add stewed apples and mix for another 20 seconds.
Fill each cupcake liner 3/4 of the way (using an ice cream scoop to transfer the batter into the cupcake liners makes this a quick and easy process otherwise you can use two tablespoons). Drizzle some salted caramel sauce on top. (about 1 tsp)
Bake for 30-35 min or until a toothpick inserted comes out clean. Allow them to cool completely on a wire cooling rack before frosting.
-
Carefully add your set mousse on top of each cupcake and finish off with a paper straw and a mint leaf right before serving.
Congratulations you did it!
