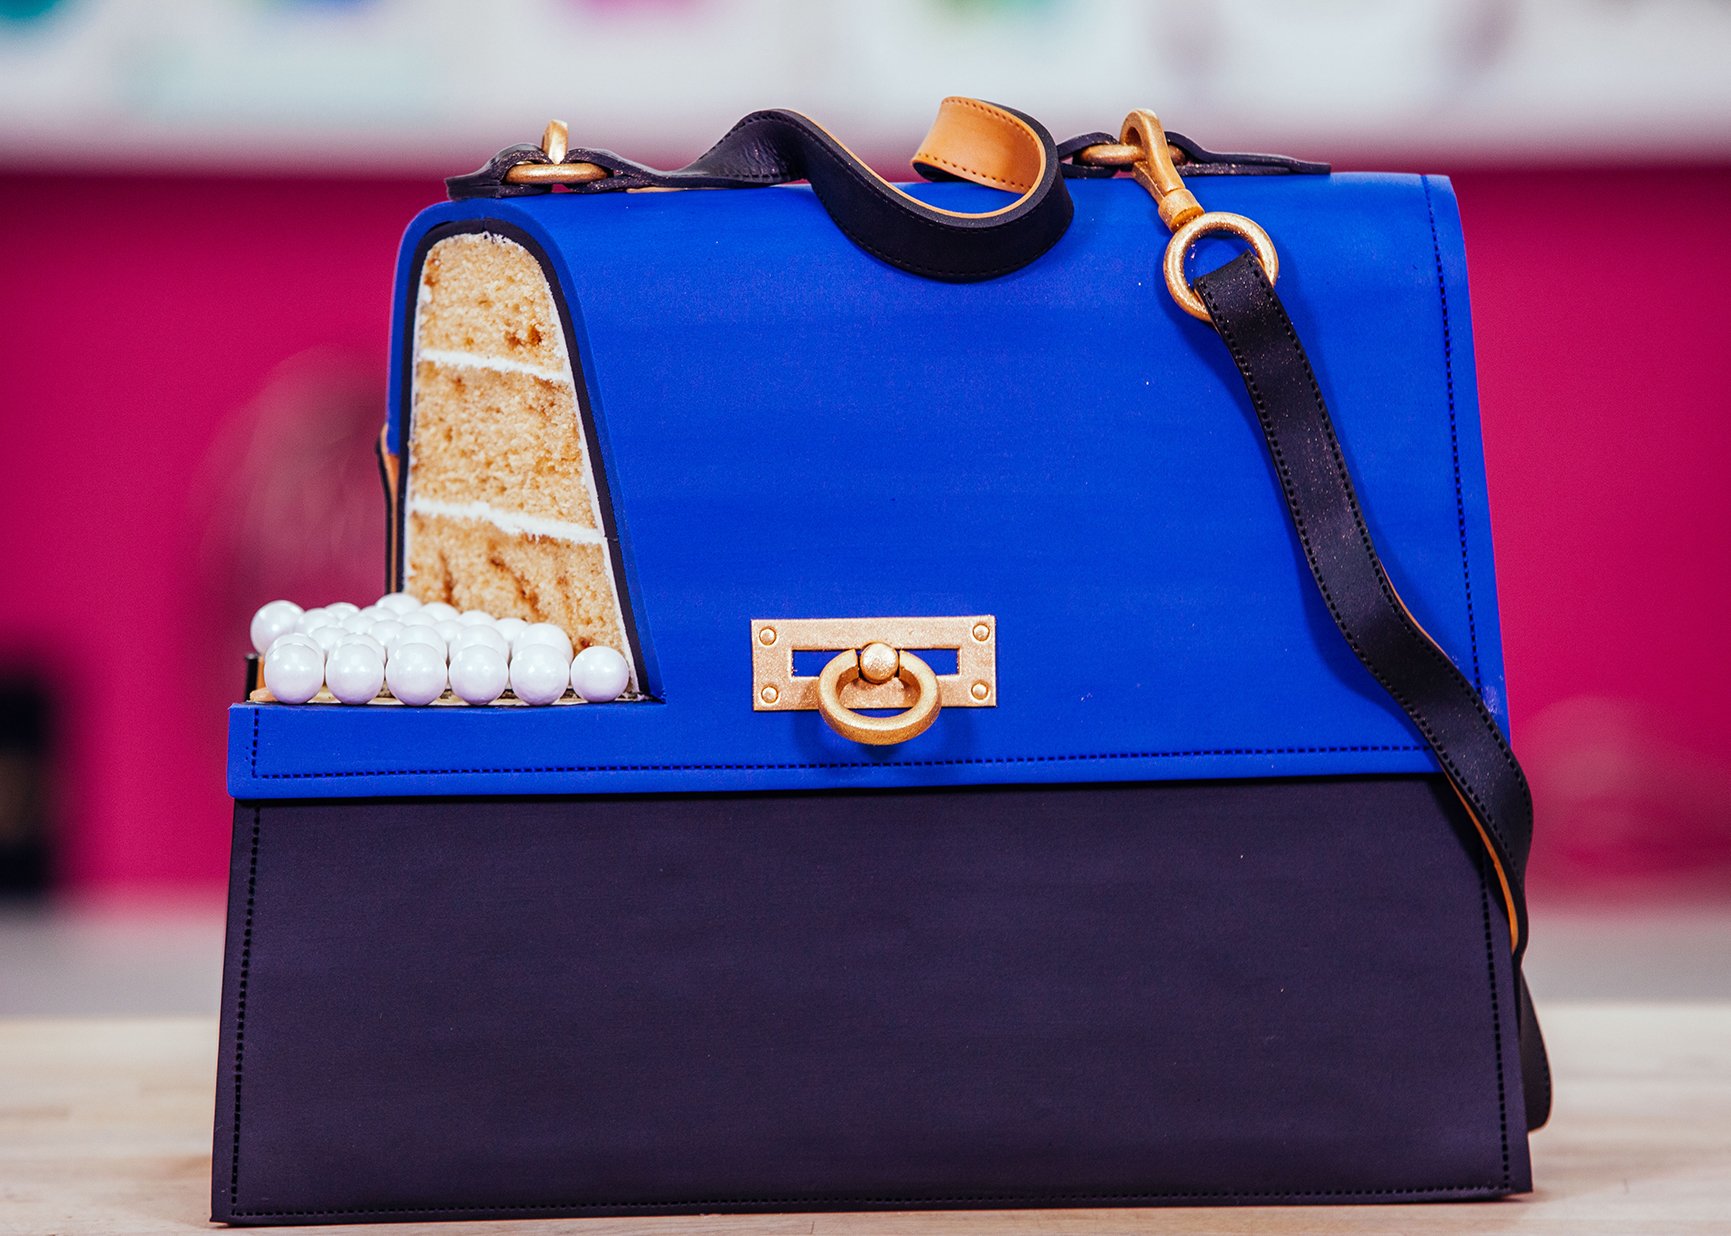
Handbag Cake


Vanilla toffee cake with fashionista fondant details! Every girl has their favourite purse. The one they use all the time, its their favourite accessory. Now imagine that purse made out of cake! It's a dream come true. A beautiful purse that you can eat! What more could a girl ask for. My handbag cake was originally made to celebrate the Duchess of Cambridge, Kate Middleton's birthday. That's why I made the handbag out of Vanilla Toffee Cake, the Duchess fave dessert, sticky toffee pudding!


Ingredients
Cake
- 2 x 6lb portion of Vanilla Toffee Cake
Icing
- 1 x Recipe Italian Meringue Buttercream
- Simple Syrup
Decorations
- Icing Sugar
- Clear Food Grade Alcohol (like white rum, or vodka)
- Gold Highlighter
- 2 lbs White Fondant
- 2 lbs Black Fondant
- 3 oz gumpaste
- Gel Food coloring: ivory, royal blue, yellow, brown
- Vegetable Shortening


Read It!
-
Prepare your Vanilla Toffee Cake Batter. Pour 4 lbs into each 9"x13" pan, and 3lbs into the 10" square pan. Bake your cakes at 350 degrees for 1 hour and 20 minutes, or until a cake tester comes out completely clean. Let cool completely in their pans.
-
Prepare your Italian Meringue Buttercream and Simple Syrup. Set aside.
-
To prepare your cake boards, cut two smaller boards out of one full board. I cut my base board to measure 11" x 4", and my middle board to measure 9" x 3", poking a hole in the centre.
-
Remove all three cakes from their pans and level them. Cut off the bottom caramelized layer and the sides.
-
Trim the 9" x 13" cake to 8" x 12", and the 10" square cake to a 9" square.
-
Start with the first 8" x 12" rectangle, and cut a 5" strip. Then cut a 4" strip from the second 8" x 12"
-
For the 9" square cake, I cut it equally in half to create 2 strips that measured 4 5/8" x 9" . All strips should be 12" long, so cut a 2" piece of one of these strips to add length to the other.
-
Shower your cakes with simple syrup. Then begin to layer. Layer your strips as follows, from the bottom up:
5" x 12"
4" x 12"
4 5/8" x 9" plus the 4 5/8" x 2" ( this whole strip now measures 4 5/8" x 12")
-
Insert one dowel into the cake, make a mark, and then cut it with garden shears. Cut 4 dowels into 8 measured lengths and insert into the cake. Spread on a thin layer of buttercream before adding your board.
-
Place your middle board in the centre, spread a thin layer of buttercream, and stack the rest of your cake: 3" x 12", then 3" x 12".
-
Your remaining cake strip should measure 4 5/8 " x 6" . Cut it in half lengthwise so that you have two strips that measure 2" x 6" and then cut of the length of each one. Leaving you with two strips that measure 2" x 6". Stack them on top of your cake side by side. Let chill for 30 minutes.
-
Cut the front, back and sides of my cake to create a tapered shape. Create an indent at the sides where the leather would fold in on itself. Use an X-acto knife to cut away any of your base cake board that is noticeable.
-
Crumb coat and chill. Then, trim your final dowel to the height of the entire cake, and insert. Ice again, and chill once more.
-
Dye 1lb of your white fondant tan using Ivory and Buckeye Brown gel food colouring. Dye the remaining 1 1/2lbs royal blue with the Royal and Cornflower Blue gel colours.
-
Cover the two sides of the handbag cake with the tan fondant and trim away any excess.
-
Roll out the black fondant 1lb and cover the front and back of your bag. Trim away any excess. Leave a small overlap of black fondant where it meets the tan fondant.
-
Use your overstitch wheel along the edges and the bottom. This enhances the leather look.
-
Roll out the blue fondant to create a flap for the top. Measure first! Make a light mark in the front to indicate where the flap should end. Dampen the surface of your black fondant, brushing it lightly with water, and lay your blue fondant over top. Add the stitch detail to the blue flap.
-
Use Wilton Ivory icing colour diluted with white rum to paint the tan and black fondant. Repeat the process with diluted Wilton Royal Blue icing colour for the blue flap.
-
Dye the gumpaste with Wilton Golden Yellow. Let set/dry overnight.
-
Shape loops, hooks, a clasp, and a ring for your bag using your dried gumpaste. Brush a thin layer of vegetable shortening on the pieces, then paint with gold highlighter.
-
Take a thin strip of gumpaste and press a strip cutter into it. This will create a zipper like pattern.
-
Use the leftover tan and black fondant to create a handle and a shoulder strap for your bag. Use the overstitch wheel to add stitch details to the straps.
-
Use floral wire to attach the loop hardware to the bag.
Congratulations you did it!
