Elsa Doll Cake


Barbie , Collection--novelty-cake-recipes , Collection--novelty-recipes , Doll , Dress , Frozen , Frozen 2 , Movie characters , Olaf , Recipes-export , Snow , Snowflakes , Winter
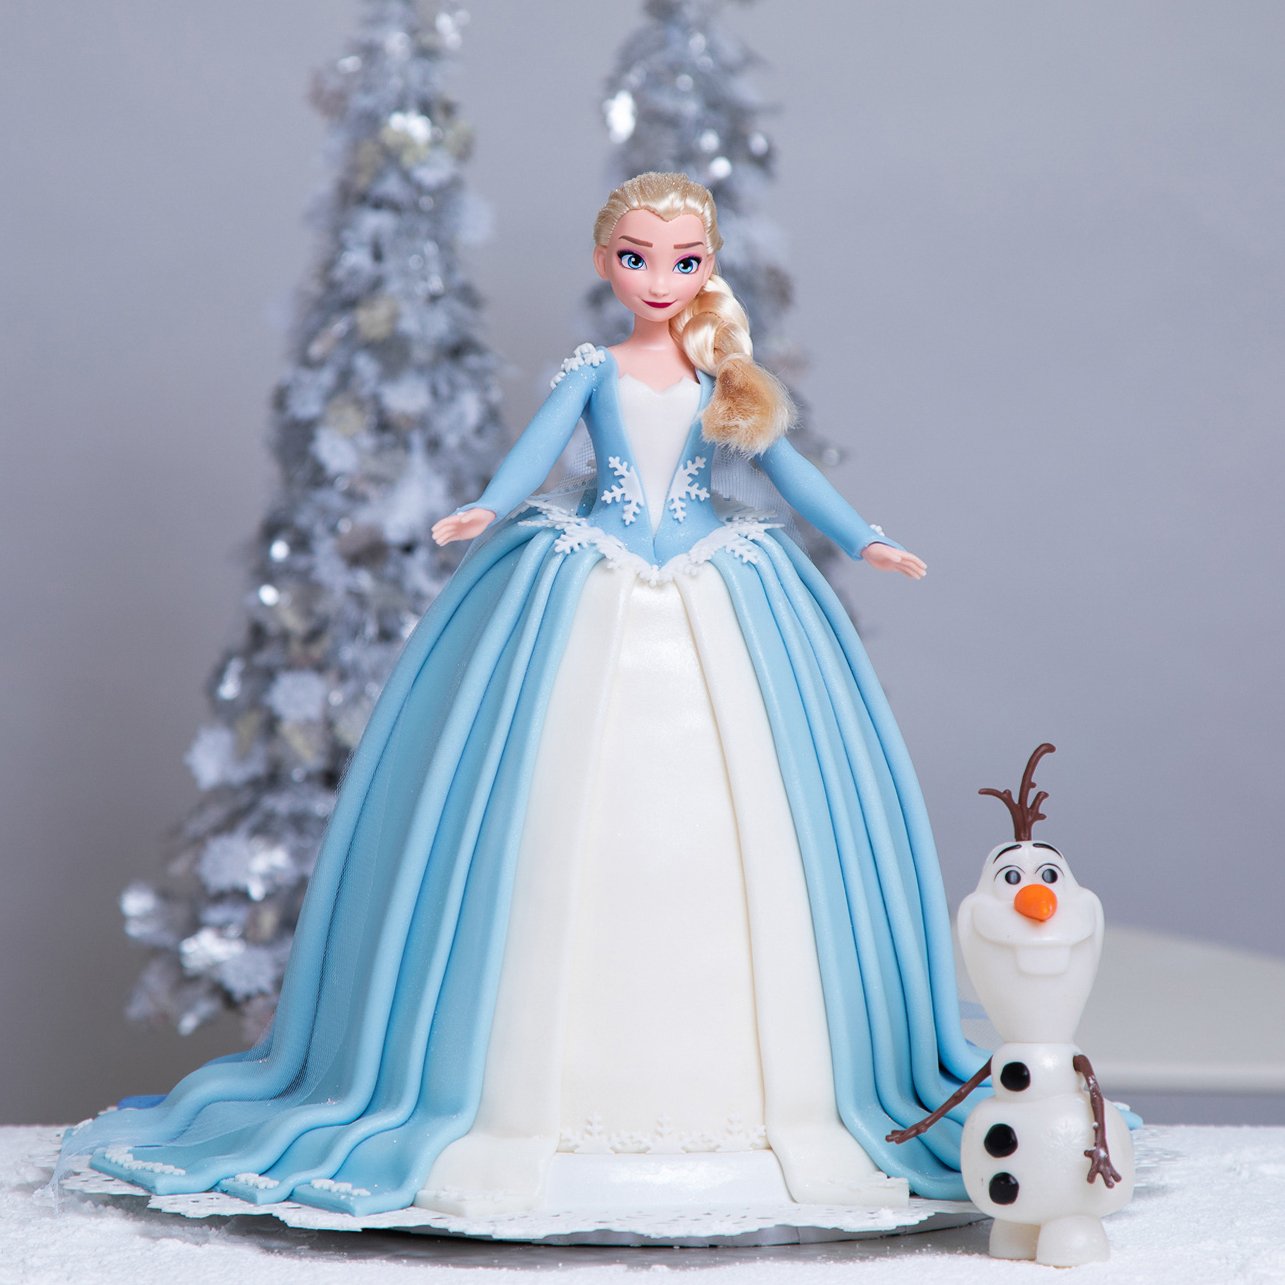
The Snow Queen is back to save her kingdom! In Frozen 2, Elsa sets on an adventure to discover the roots of her magical powers. In honor of her extraordinary quest, we caked up Elsa in a magical dress topped with gorgeous snowflakes and sparkles. Love is an open door so surprise any of the snow queens or Frozen lovers you know out there with this shimmering sweet cake!
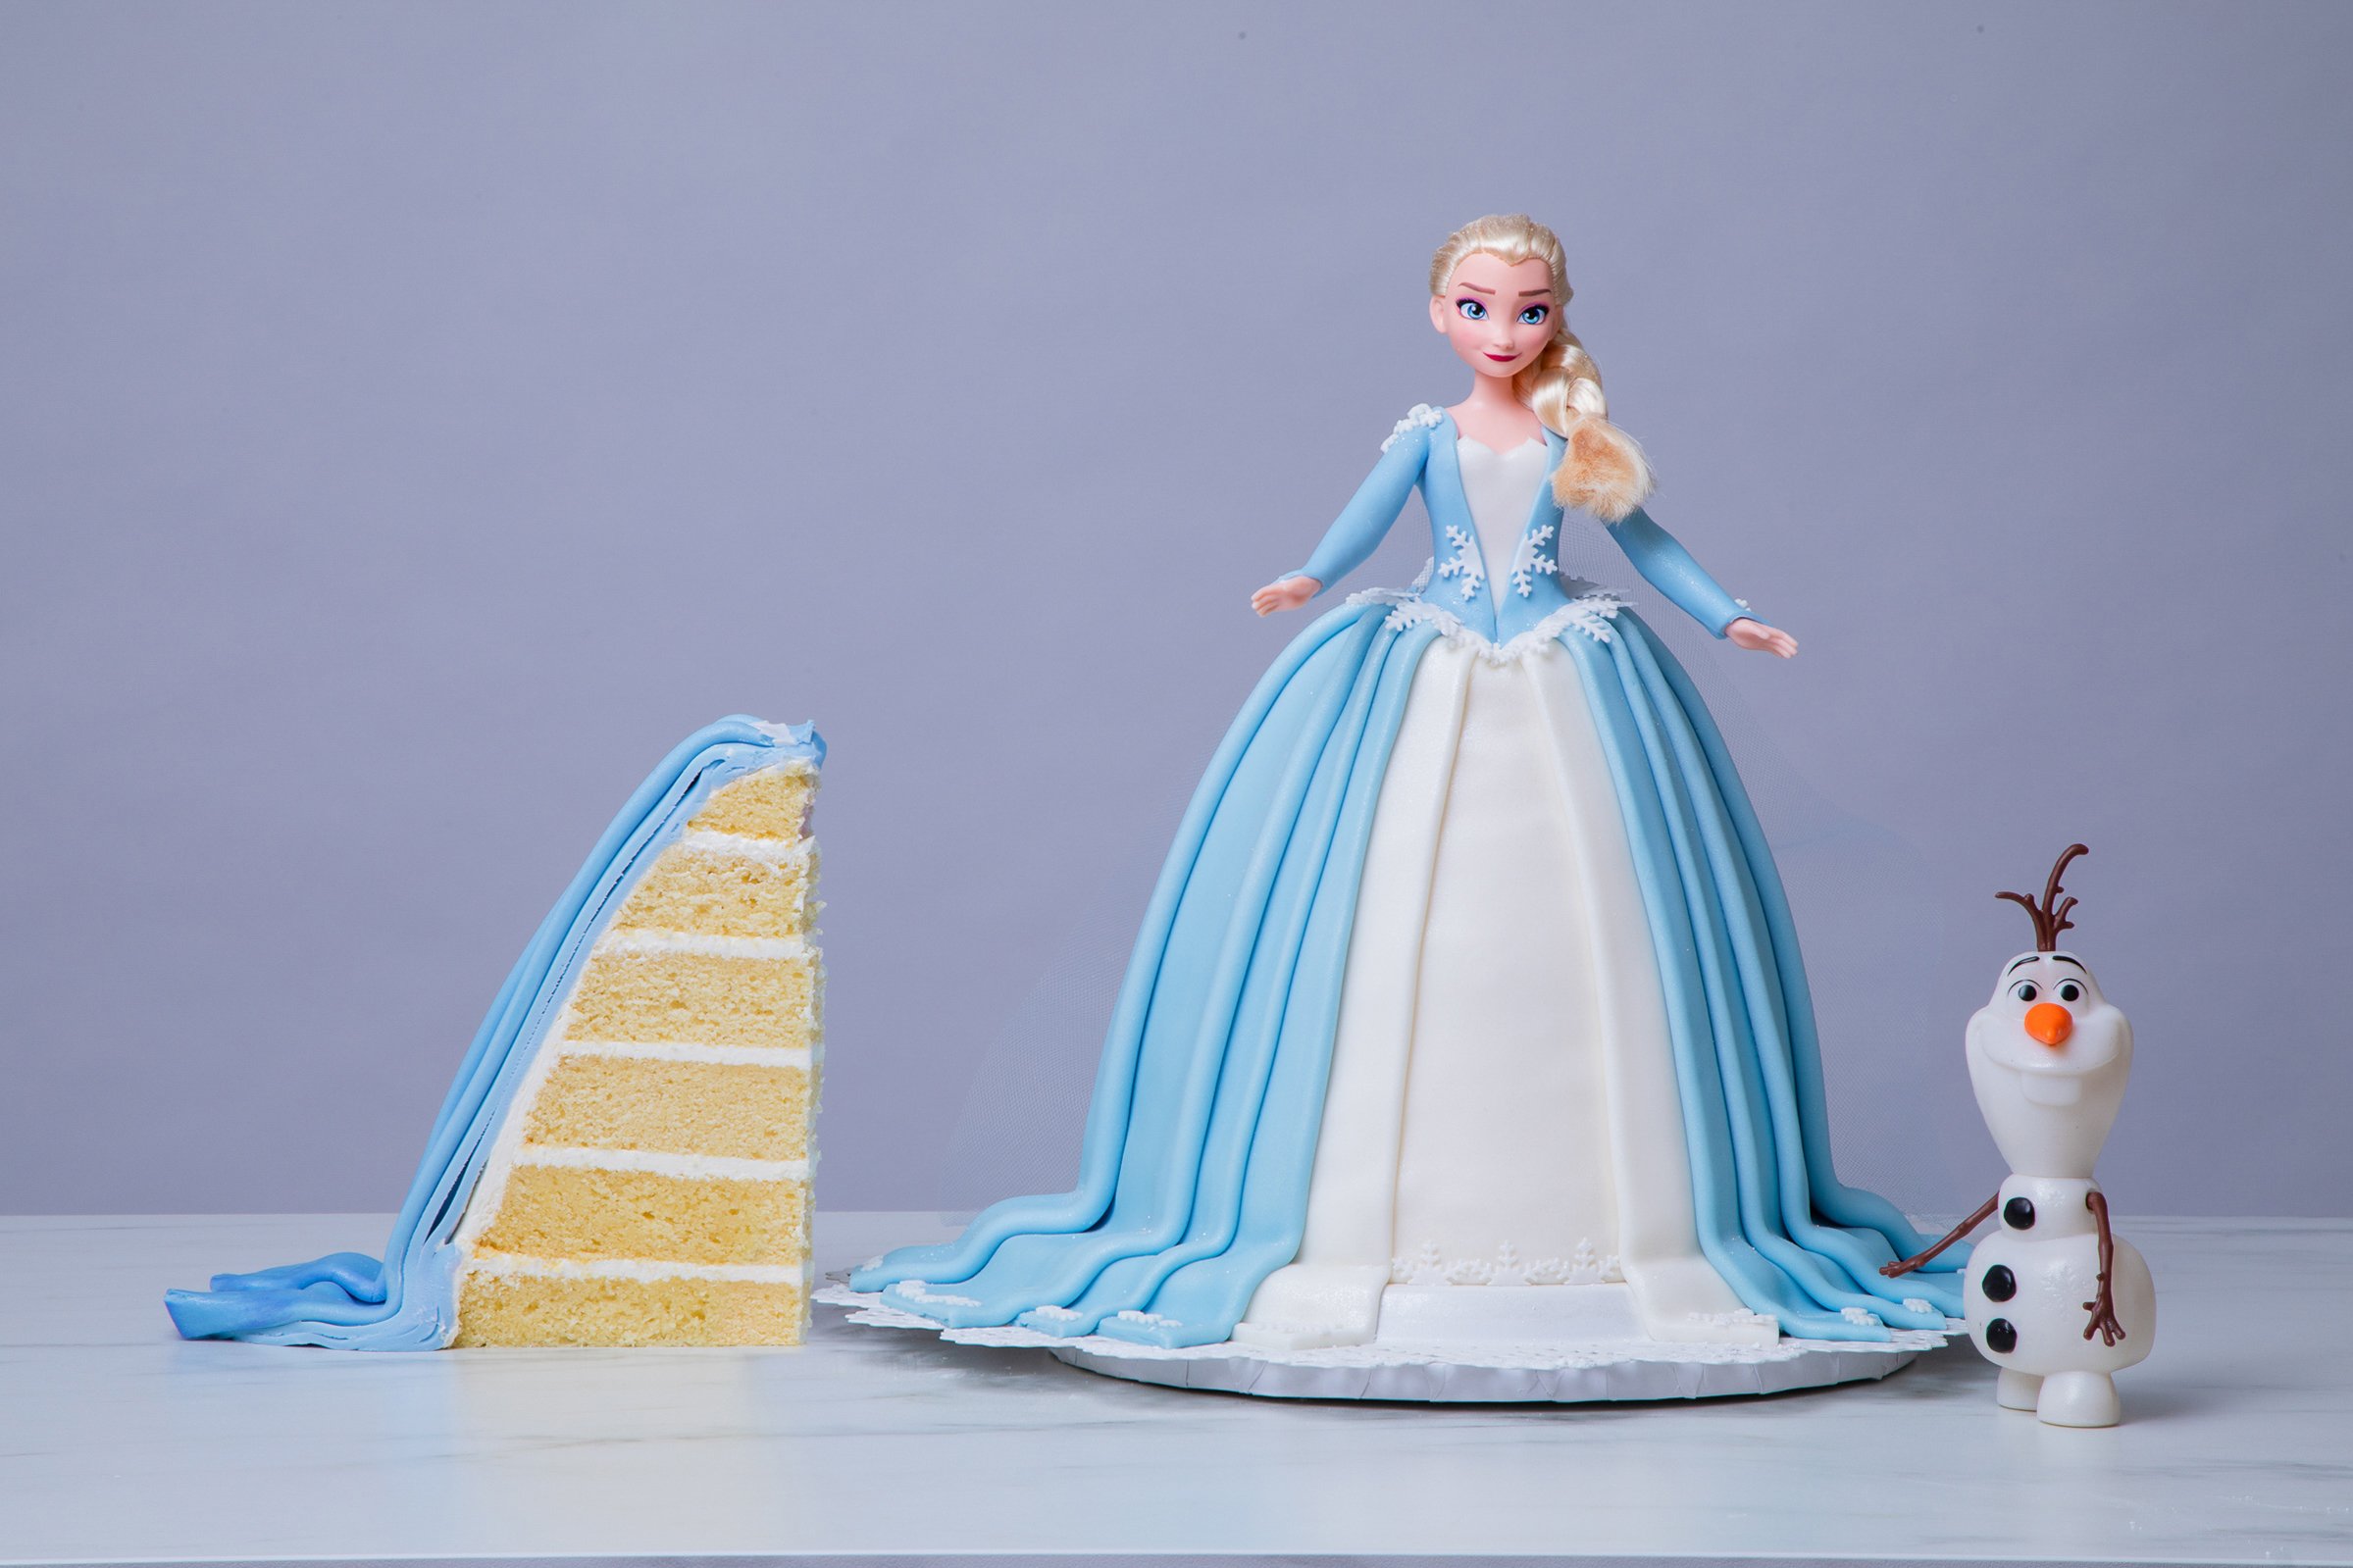
This Elsa Doll cake begins with 10lbs of my Ultimate Vanilla Cake and is filled with a deliciously sweet Italian Meringue Buttercream. This cake also features an extra special secret chamber - rather than being filled with candy, it transforms the entire cake into Elsa’s beautiful skirt! Her skirt is covered in gorgeous shades of blue fondant and covered with crisp snowflake details - making her dress truly one of a kind. The cake is finally topped off with shimmering pearl lustre dust giving her an extra magical glow!


Ingredients
Cake
- 10lbs Yo’s Ultimate Vanilla Cake
Icing
- 1 batch of Simple Syrup
- 1 batch of Italian Meringue Buttercream
Decorations
- 6oz white fondant
- 3.5lbs light blue fondant (in two shades)
- Purple gel coloring
- Pearl luster dust
- “Flurries” sprinkle blend
- 2oz white gumpaste
- Snowflake plunger cutters


Read It!
-
Line the bottoms of all your pans with parchment paper then preheat your oven to 350 degrees Fahrenheit. Bake each cake as follows:
- 6” round pan → 1.5lbs vanilla cake batter → 55 minutes
- 7” round pan → 2.35lbs vanilla cake batter → 1 hour
- 8” round pan → 3lbs vanilla cake batter → 1 hour and 10 minutes
- 9” round pan → 3.25lbs vanilla cake batter → 1 hour and 10 minutes
Let your cakes cool completely in their pans before removing.
-
Remove your cakes from their pans. Level them all and remove the caramelization from the bottoms and sides of each cake.
-
Using a large serrated knife, layer each of your cakes into 2.
-
Using Sir Squeeze-A-Lot, soak all of your layers with simple syrup then let them absorb for a couple of minutes.
-
This isn’t just any normal secret chamber - this one will fit the Elsa doll into it. Cut a secret chamber out of each layer (except for the 9” cakes) towards one edge as follows:
- 1¼“ out of 8” layers
- 1½” out of 7” layers
- 2” out of 6” layers
TIP: To create a train on her dress, don’t center your secret chambers. But ensure they align.
NOTE: Set your 9” cake layers aside for now. We will work on them later.
-
Fill and stack your layers with IMBC starting with the largest layers at the bottom and smallest at the top. Make sure that your secret chambers are aligned, and keep them free of buttercream. Once you have stacked your cake, let it chill in the fridge until firm.
-
Using a large serrated knife, carve the shape of Elsa’s skirt out of the cake. Try to make the sides as symmetrical as possible and round off the skirt’s train.
-
To create a larger skirt, cut your 9” cake layers in half to create semi circles.. Next take your 8” round pan as a guide and cut your cakes creating crescent moon shapes from all the layers. Add these layers around the back of the dress then create more layers from the cut out pieces. Once you are satisfied with the size of the skirt, simple syrup the extra layers of cake then fill and stack them with more IMBC right up against the back of your cake and chill it once again.
-
Use your large serrated knife to carve and round out the back of the skirt where you added the additional layers. This will ultimately emphasize the train on her dress.
-
Crumb coat your cake with IMBC, then chill it until firm. Remove it from the refrigerator and ice it once again with more IMBC. I used a small square of acetate to help smooth my buttercream.
-
Place your Elsa doll into the cake as reference. If she is too short, take your 1¼” cookie cutter and cut out a small circle from two of your cake scraps. Drop these small cake circles into the secret chamber to act as a pedestal for the doll to stand on so that her waist is flush with the top of the cake.
-
Roll out some white fondant then cut and fit it to the front of the cake, creating a strip that is narrower on top and wider at the bottom an- almost creating a triangular shape. Once you have covered the front with the white sheet, trim away the excess at the bottom flush with the cake.
Roll out two more white strips, cut them into the same shape then fold the long edges inwards to soften the look. Add these two panels to either side of the front white piece. The folded edges help create a fabric look. Trim these panels away from the cake, so they appear longer. Continue to add panels of fondant around the cake using clear piping gel as glue - folding them the same way you did with the white, starting with the lightest blue then switching to a darker shade of blue. I like to add the panels in symmetry, add a panel on the right, then mimic the same panel on the left, rather than working your way around the skirt in one direction. The back panel should be the thinnest and right down the center. Trim away the excess at the bottom.
-
Wrap Elsa’s legs in plastic wrap then insert her into the cake.
-
Roll out some white fondant and cut a frill border. Wrap this around Elsa’s torso using clear piping gel as glue.the frill border will create a sweetheart neckline. Cut away any excess.
-
Roll out more of the darker blue fondant, cut it into two panels and drape them over Elsa’s arms and on the side of her torso leaving a V opening in the front and back. Very carefully, cut away the excess between her arm and torso and smooth it out under her arm and along the side of her torso. Repeat the same step for her other arm. Cut a V shaped opening on the ends of each sleeve at her hand.
-
Mix together some purple gel food coloring, white pearl lustre dust, and clear food grade alcohol then lightly paint the back bottom of the dress with the shimmering purple. Bring the paint about halfway up the skirt into a point then use a dry brush to blend it together. Paint the back middle panel completely with the purple paint.
-
Take the “Flurries” sprinkle blend and add the white snowflakes along the bottom edge of Elsa’s dress and to her shoulders. You can also get creative here and decorate freely with the sprinkles.
-
Dust the white parts of Elsa’s dress with pearl lustre dust to give her dress an extra shine. Then paint the rest of the cake with a the same pearl lustre dust.
-
Roll out some thin white gumpaste and use your snowflake plunger cutter to cut out snowflakes. Cut some of them in half then line the bottom edge of her top with the snowflakes to embellish her waist. Continue to add and arrange them around the dress to embellish it until you are happy with the look of it. I also added a few to the bottom of the front white panel of her dress.
-
Cut two thin strips of light blue tulle out and carefully attach them to the back of her dress and have them draping down the back of the skirt.
Congratulations you did it!
